
DeVille V8-252 4.1L VIN 8 FI (1983)
Air Injection Hose/Tube: All Technical Service Bulletins
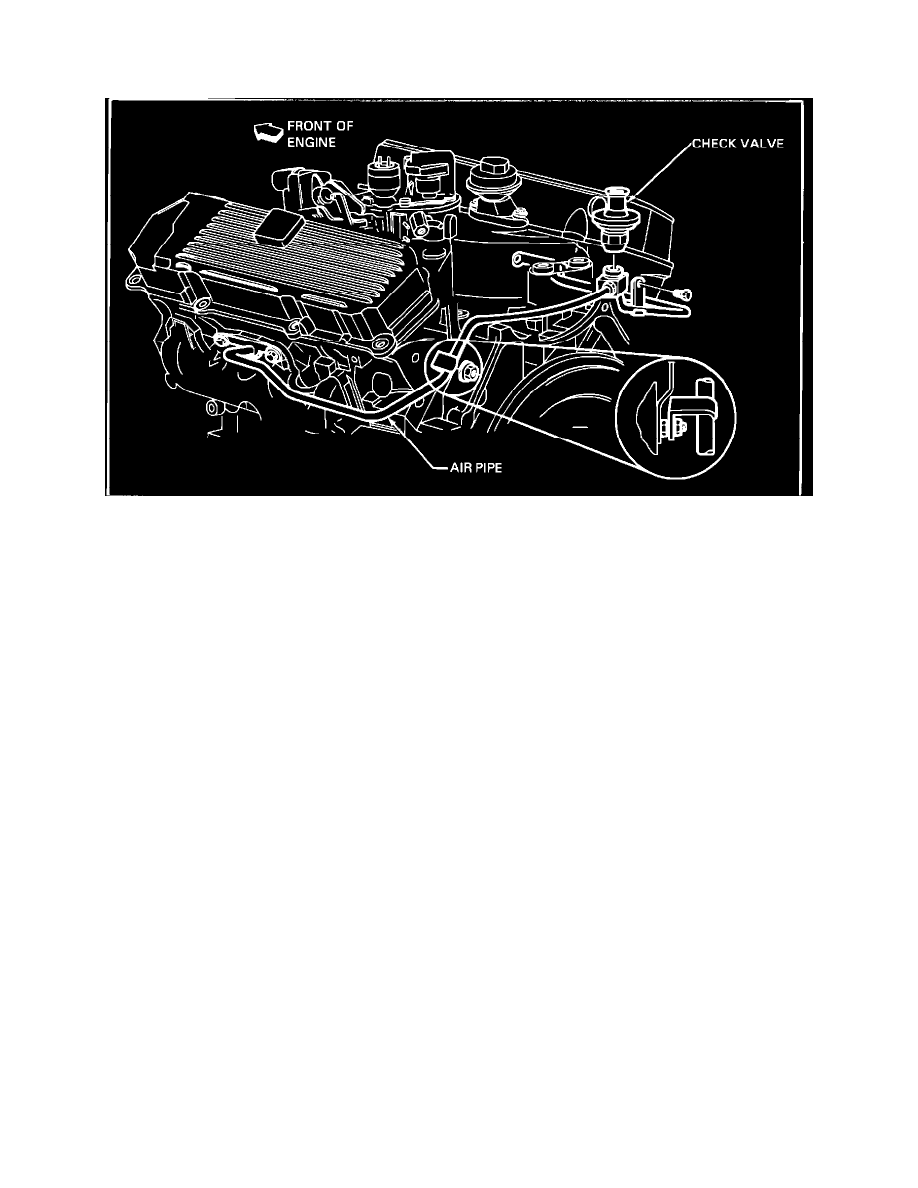
Check Valve to Left Exhaust Manifold A.I.R. Pipe
FIGURE 1 - A.I.R. PIPE - CHECK VALVE TO LEFT EXHAUST MANIFOLD
Removal (Figure 1)
1.
Open hood and cover fenders.
2.
Remove air cleaner.
3.
Disconnect spark plug wires 2, 3, 4 and 8 from distributor to gain access to air pipe fitting at check valve air.
4.
Disconnect pipe from check valve using an 11/16 inch open end wrench.
5.
Disconnect the bracket which holds the A.I.R. pipe to the vacuum pipe at the rear of the engine using a 7 mm box end wrench. Disconnect the
bracket which holds the A.I.R. pipe to the vacuum pipe at the exhaust manifold using a 7 mm box end wrench.
6.
Remove the six 10 mm hex screws which attach the heat stove to the exhaust manifold and remove the heat stove.
7.
Disconnect the A.I.R. pipe from the exhaust manifold using a 13 mm box end wrench.
8.
(C/D SERIES ONLY) Raise vehicle.
9.
(C/D SERIES ONLY) Disconnect the fuel feed and return lines mounting bracket, Figure 3, from the transmission using a 15 mm flex socket
wrench with a long extension. (E/K SERIES ONLY) Disconnect the fuel feed and return lines mounting brackets, Figure 3, from the
transmission using 13 mm and 15 mm socket wrenches.
10.
(C/D SERIES ONLY) Disconnect the A.I.R. pipe from the cylinder head/engine lift mounting stud using a 15 mm flex socket wrench with a
long extension. (E/K SERIES ONLY) Disconnect the A.I.R. pipe from the cylinder head/engine lift mounting stud using a 15 mm socket
wrench.
11.
(C/D SERIES ONLY) Disconnect transmission and starter harnesses to provide clearance.
12.
(C/D SERIES ONLY) With the pipe in its normal position, rotate the exhaust manifold end of the pipe so that it is pointed downward. Move
the fuel feed and return lines so that the A.I.R. pipe is below the lines. Remove the A.I.R. pipe. (E/K SERIES ONLY) Remove the A.I.R.
pipe.
Installation (Figure 1)
1.
(C/D SERIES ONLY) From the underside of the vehicle, install the A.I.R. pipe (CHECK VALVE END FIRST) so that the exhaust manifold
end of the pipe points downward. When installing the pipe, make certain that it is routed on the engine side of both the fuel feed and return
lines and the engine ground strap. Move the fuel feed and return lines so that the A.I.R. pipe is on the upper side of the lines. Rotate the
exhaust manifold end of the pipe into its normal position. (E/K SERIES ONLY) Install the A.I.R. pipe.
2.
(C/D SERIES ONLY) Lower vehicle.
3.
Connect the A.I.R. pipe to the check valve using an 11/16 inch open end wrench.
4.
(C/D SERIES ONLY) Raise vehicle.
5.
(C/D SERIES ONLY) Connect transmission and starter harnesses.
6.
(C/D SERIES ONLY) Connect the pipe to the cylinder head/engine lift mounting stud using a 15 mm flex socket wrench with a long
extension. (E/K SERIES ONLY) Connect the pipe to the cylinder head/engine lift mounting stud using a 15 mm socket wrench.