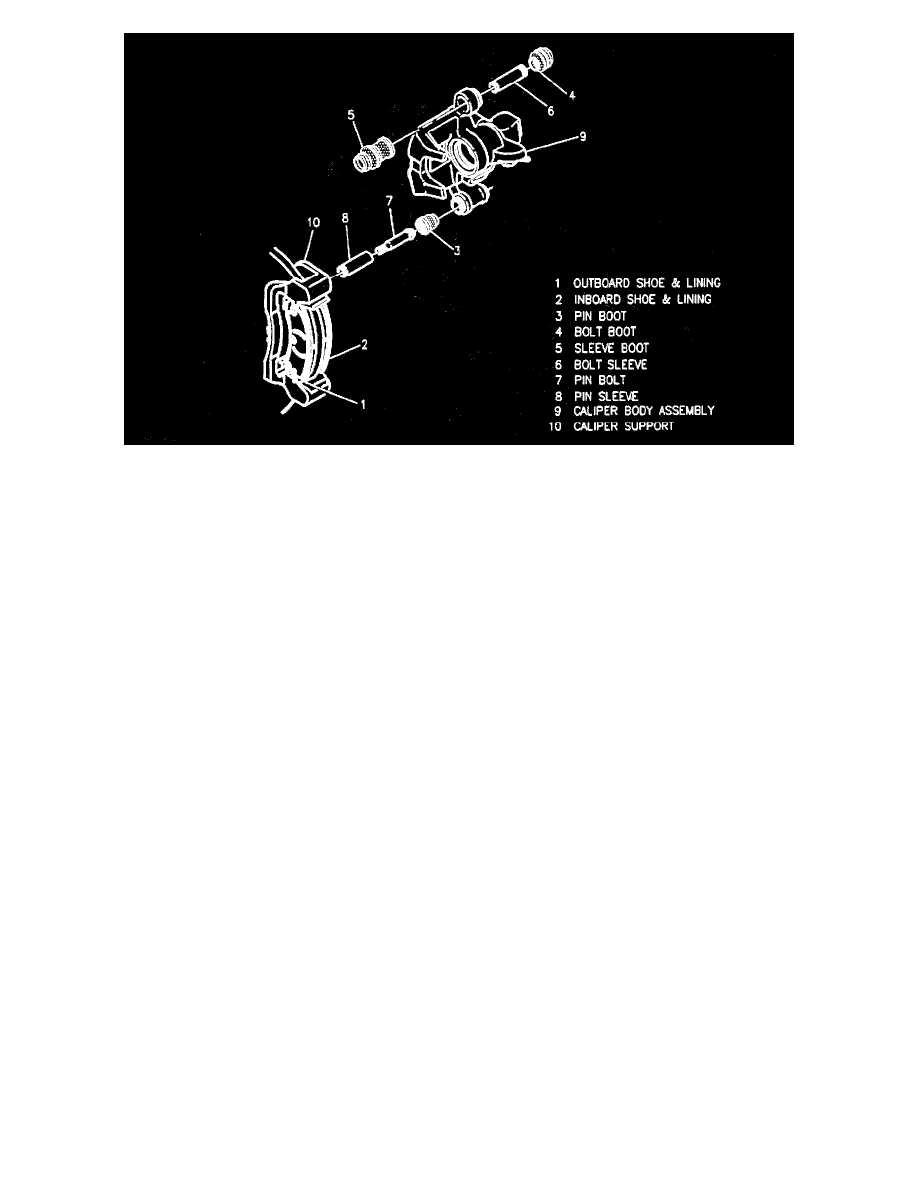
DeVille V8-4.9L VIN B (1995)

Removal
1. Raise vehicle and suitably support. Mark relationship of wheel to axle flange.
2. Remove Wheel and tire. Reinstall two wheel nuts to retain rotor.
3. Brake hose from caliper, only if caliper is to be completely removed from vehicle for unit repair. Plug openings in caliper and brake hose to
prevent fluid loss and contamination.
4. Parking brake cable from parking brake lever, only if caliper is to be completely removed from vehicle for unit repair. Lift up on end of cable
spring to free end of cable from lever.
5. Bolt and washer attaching cable support bracket to caliper body assembly.
6. Sleeve bolt.
7. Caliper body assembly. Pivot caliper body assembly up to clear rotor and then slide it inboard off pin sleeve.
Note: If caliper is being removed only for pad and lining replacement or to provide access to support bracket, rotor or wheel brake components, hang
caliper from suspension using a wire hook so as not to stretch or damage brake hose or brake cable.
Inspection
1. Pin boot, bolt boot and sleeve boot for cuts, tears or deterioration. If damaged, replace boots.
2. Bolt sleeve and pin sleeve for corrosion or damage. Pull boots to gain access to sleeves for inspection or replacement. Replace corroded or
damaged sleeves. Do Not attempt to polish away corrosion.
Installation
1. Install Caliper assembly. If not replaced, remove pin boot from caliper body assembly and install small end over pin sleeve (installed on caliper
support) until boot seats in pin groove. This is to prevent cutting pin boot when sliding caliper body assembly onto pin sleeve. Hold caliper body
assembly in position it was removed and start over end of pin sleeve. As caliper body assembly approaches pin boot, work large end of pin boot in
caliper body groove. Then push caliper body fully onto pin. Pivot caliper body assembly down, using care not to damage piston boot on inboard
pad. Compress sleeve boot by hand as caliper body moves into position to prevent boot damage. After caliper body assembly is in position,
recheck installation of pad clips. If necessary, use a small screwdriver to reseat or center the pad clips on the support abutments.
2. Install Sleeve bolt. Torque to 27 Nm (20 lb.ft.).
3. Install cable support bracket (with cable attached) with bolt and washer. Torque to 43 N.m (32 lb. ft.).
4. Connect end of parking brake cable to parking brake lever if disconnected. Lift up on end of cable spring clip and work end of parking brake cable
into notch in lever.
5. Brake hose to caliper if disconnected. Bleed brakes if brake hose was disconnected. Remove wheel nuts securing rotor to hub.
6. Install wheels and tires, aligning previous marks. Torque wheel nuts to 140 Nm (100 lb.ft.).
7. Apply approximately 778 N (175 lb) force to brake pedal (after bleeding, if necessary) three times to seat pad and linings against rotor.
