
Fleetwood Brougham V8-307 5.0L (1989)
Camshaft: Service and Repair
1.
Disconnect battery ground cable, then drain radiator.
2.
Remove upper radiator baffle and disconnect upper radiator hose from water outlet.
3.
Disconnect transmission oil cooler lines at radiator.
4.
Remove radiator fan shroud, then the radiator.
5.
Disconnect fuel lines from fuel pump.
6.
Remove air cleaner, then disconnect throttle cable.
7.
Remove all drive belts, then position alternator, power steering pump and air conditioning compressor aside.
8.
Disconnect bypass hose from water pump, all electrical and vacuum connections from engine.
9.
Remove distributor.
10.
Raise vehicle, then drain oil pan.
11.
Remove exhaust crossover pipe, then the starter.
12.
Disconnect exhaust pipe from manifold.
13.
Install engine support bar.
14.
Remove engine mount to bracket bolts, raise engine, then remove engine mounts.
15.
Remove flywheel cover and engine oil pan.
16.
Place wood blocks between exhaust manifolds and crossmember to support engine, then remove engine support bar.
17.
Remove crankshaft pulley and balancer, then the engine front cover.
18.
Lower vehicle, then remove valve covers, intake manifold, rocker arms, push rods and valve lifters. Note position of the valve train components
to ensure installation in original location.
19.
If equipped with A/C, discharge refrigerant, then remove condenser.
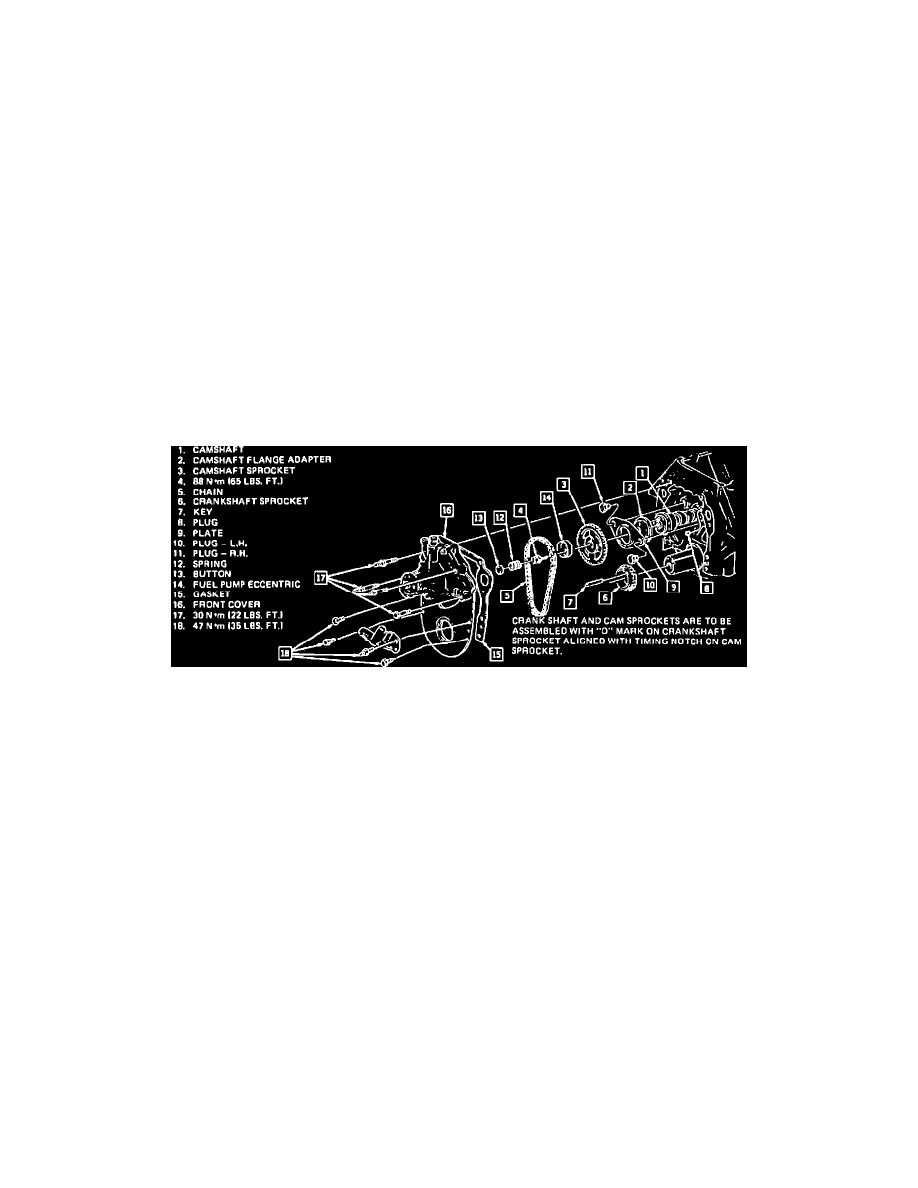
Fig. 12 Engine Front Cover, Timing Chain, Sprocket & Camshaft
20.
Remove fuel pump eccentric, camshaft sprocket, oil slinger and timing chain, Fig. 12.
21.
Slide camshaft from front of engine.
22.
Reverse procedure to install. To insure proper camshaft installation, and to provide initial lubrication, it is extremely important that the
camshaft be coated with GM Concentrate (Part No. 1051396).