
SRX RWD V8-4.6L VIN A (2006)
can cause a wheel to come off when the vehicle is moving, causing loss of control and possibly personal injury.
Important: If the vehicle is equipped with directional tread tires, ensure that the directional arrow on the outboard side of the tire is pointed in the
direction of forward tire rotation prior to installation on the vehicle.
Remove any corrosion or foreign material from the wheel and the hub mounting surfaces.
2. Clean the threads on the wheel studs and wheel nuts.
3. Align the reference mark and install the tire and wheel assembly to the hub.
4. Install the wheel nuts.
5. Notice: A torque wrench or J 39544 must be used to ensure that wheel nuts are tightened to specification. Never use lubricants or penetrating
fluids on wheel stud, nuts, or mounting surfaces, as this can raise the actual torque on the nut without a corresponding torque reading on the torque
wrench. Wheel nuts, studs, and mounting surfaces must be clean and dry. Failure to follow these instructions could result in wheel, nut, and/or stud
damage.
Notice: Refer to Fastener Notice in Service Precautions.
Important: Tighten the nuts evenly and alternately in order to avoid excessive runout of the tire and wheel assembly.
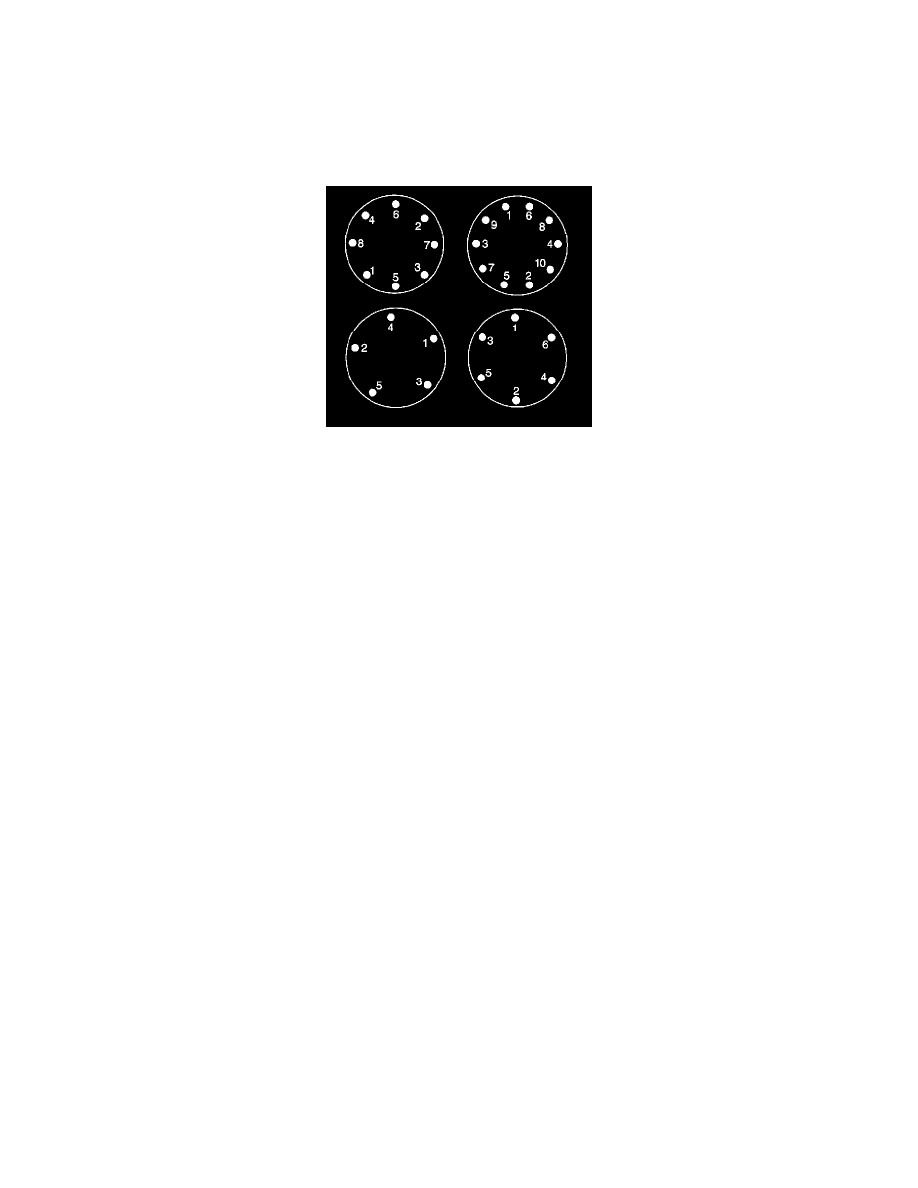
Using the J 39544-KIT , tighten the wheel nuts in the appropriate sequence shown.
Tighten the nuts in sequence to 140 Nm (100 ft. lbs.).
6. Install the wheel nut caps, if equipped.
7. Install the wheel center cap, if equipped.
8. Lower the vehicle.
9. Perform the tire pressure sensor learn procedure. Refer to Tire Pressure Sensor Learn in Tire Pressure Monitoring.
Tire Mounting and Dismounting
Tire Mounting and Dismounting
Notice: Use a tire changing machine in order to dismount tires. Do not use hand tools or tire irons alone in order to remove the tire from the wheel.
Damage to the tire beads or the wheel rim could result.
1. Notice: Do not scratch or damage the clear coating on aluminum wheels with the tire changing equipment. Scratching the clear coating could
cause the aluminum wheel to corrode and the clear coating to peel from the wheel.
Notice: Use care when positioning the tire and wheel assembly on the tire changer. The upper/lower bead breaker or tire changing tools may
damage the TPM sensor. To prevent damage, position the valve stem/sensor 90 degrees away from the two bead breakers. For rim clip tire
changers, position the bead breakers approximately 180 degrees away from the valve stem/sensor.
Notice: Damage to either the tire bead or the wheel mounting holes can result from the use of improper wheel attachment or tire mounting
procedures. It takes up to 70 seconds for all of the air to completely exhaust from a large tire. Failure to follow the proper procedures could cause
the tire changer to put enough force on the tire to bend the wheel at the mounting surface. Such damage may result in vibration and/or shimmy, and
under severe usage lead to wheel cracking.
Deflate the tire completely.
2. Important: Rim-clamp European-type tire changers are recommended.
Use the tire changer in order to remove the tire from the wheel.
3. Use a wire brush or coarse steel wool in order to remove any rubber, or corrosion from the wheel bead seats.