
C 1500 Truck 2WD V8-350 5.7L VIN K TBI (1995)
REAR AXLE SHAFT, OIL SEAL AND BEARINGS
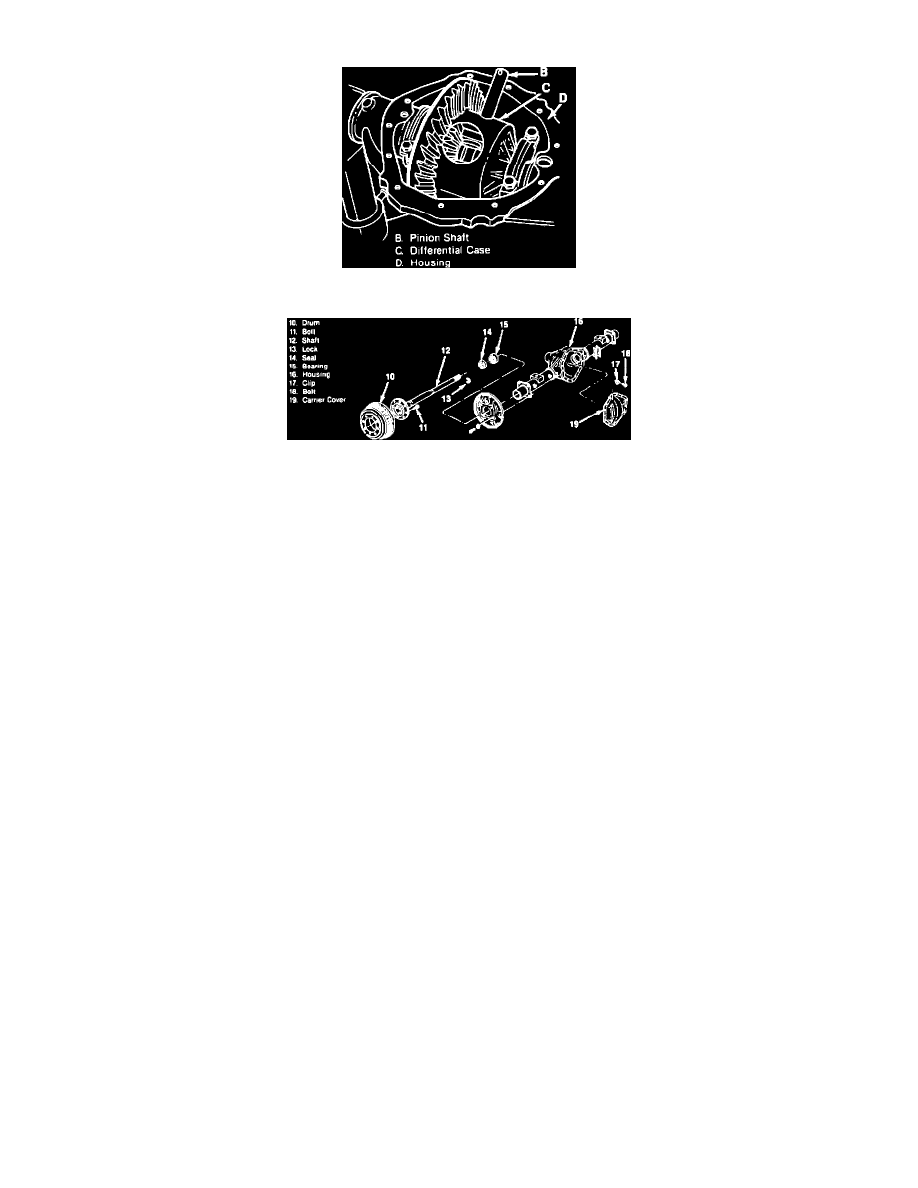
Fig. 1 Position Case For Clearance
Fig. 2 Axle Shaft & Housing Components. Chevrolet Semi-Floating Axle
1.
Raise and support vehicle.
2.
Remove wheel and tire assembly.
3.
Remove brake drum.
4.
Remove carrier cover and drain fluid from axle. Remove gasket.
5.
Remove locking screw.
6.
Remove pinion shaft as follows:
a. On models less locking differential, remove pinion shaft from case.
b. On models with locking differential, remove pinion shaft partially and rotate case until pinion shaft touches the housing, Fig. 1.
c. Using a screwdriver, rotate lock until it aligns with thrust block.
7.
Push axle shaft flange toward differential. Do not hammer the shaft to move.
8.
Remove lock (13), Fig. 2, from button end of axle shaft.
9.
Slide axle shaft out from housing. Do not damage seal.
10.
Using axle shaft bearing remover tool No. J-23689 or equivalent, remove oil seal.
11.
Remove bearing as follows:
a. Using axle shaft bearing remover tool No. J-23689 or equivalent, (for 8 1/2 ring gear), or axle shaft bearing remover tool No. J-29712 or
equivalent (for 9 1/2 ring gear), carefully pull bearing from axle.
b. Insert appropriate tool into axle bore so it grasps behind the bearing. Tighten nut and washer against bearing face, then pull bearing out using
slide hammer with adapter tool No. J-2619-01 or equivalent.
12.
Reverse procedure to install.
Wheel Bearing/Oil Seal
REAR WHEEL BEARING AND OIL SEAL
1.
Remove axle shaft as previously described.
2.
Use a suitable puller to remove bearing and oil seal.
3.
Lubricate wheel bearing and cavity between seal lips with wheel bearing lubricant before installation.
4.
Reverse procedure to install.
Axle Housing
REAR AXLE HOUSING
1.
Raise and support vehicle, then remove rear wheels.
2.
Remove the two trunnion bearing U-bolts, then split universal joint and position propeller shaft aside.
3.
Remove hub and drum assembly, then disconnect parking brake cable at lever and flange plate.
4.
Disconnect brake hose at axle connector, then the shock absorbers at axle brackets.
5.
Support axle housing with a suitable jack, remove spring plate U-bolts and remove axle housing from vehicle.
6.
Reverse procedure to install.
Axle Shaft
REAR AXLE SHAFT