
Caprice V6-262 4.3L (1987)
Brake Master Cylinder: Service and Repair
Master Cylinder Removal and Installation
With Powermaster
WARNING:Failure to fully depressurize Powermaster unit before performing service operations could result in injury to service personnel and
damage to painted surfaces.
Removing/Installing Powermaster Assembly
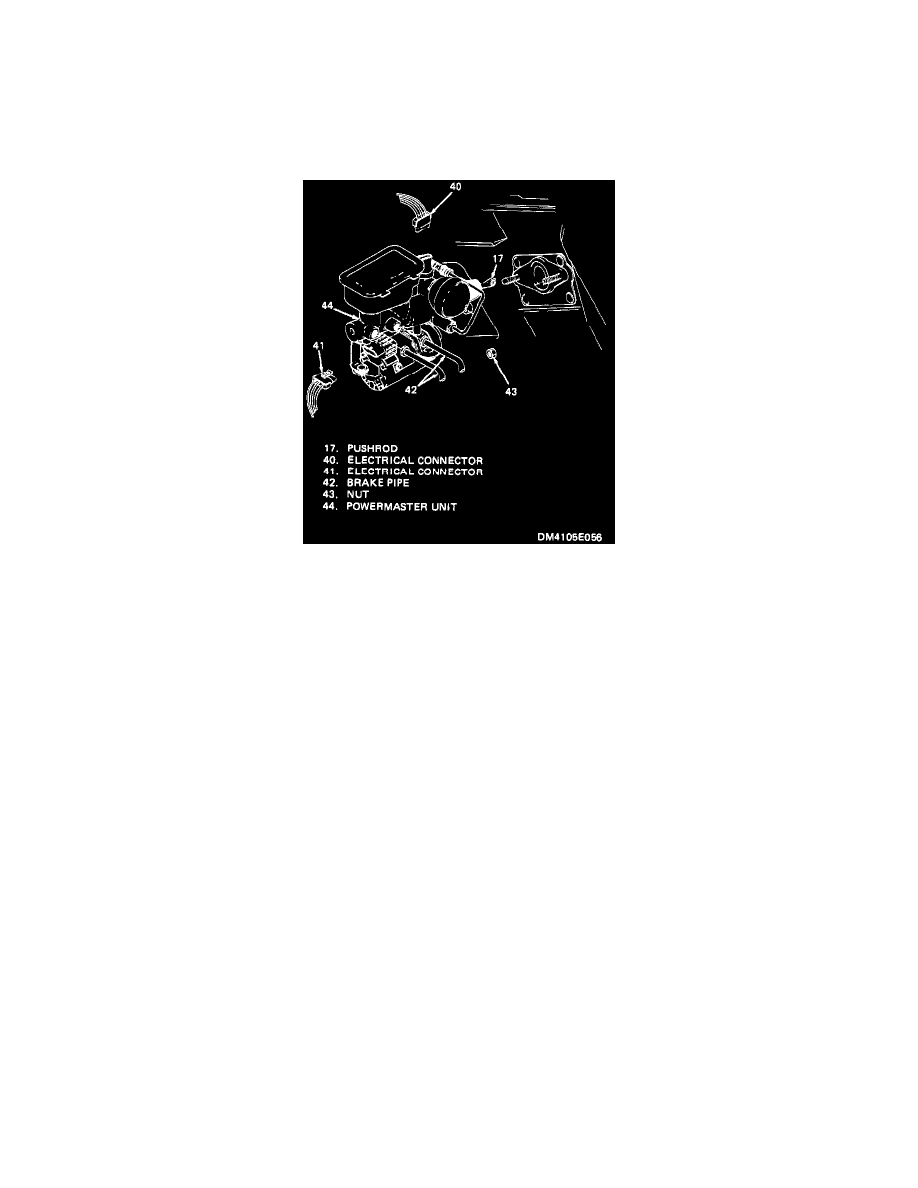
Removal:
1. Depressurize Powermaster by turning ignition off, applying and releasing brake pedal a minimum of 10 times using approximately 50 pounds force
on the pedal.
2. Disconnect electrical connector (40) from pressure switch.
3. Disconnect electrical connector (41) from electro-hydraulic (E-H) pump.
4. Remove brake pipes (42) from Powermaster unit (44).
5. Remove two attaching nuts (43).
6. Remove pushrod (17) from brake pedal.
7. Remove Powermaster unit (44).
Installation:
1. Install Powermaster unit.
2. Install pushrod (17) to brake pedal.
3. Install attaching nuts (43) and torque to 30-45 Nm.m (22-30 lb. ft.).
4. Connect brake pipes (42) to Powermaster unit (44) and torque nuts to 14-20 Nm.m (120-180 lb. in.).
5. Connect electrical connector (41) to E-H pump.
6. Connect electrical connector (40) to pressure switch.
7. Bleed hydraulic system. Refer to Brakes/Brake Booster/Hydraulic Brake Booster/Service and Repair/Bleeding Procedure. See: Service and
Repair
Without Powermaster
CAUTION:Brake fluid will damage electrical connections and painted surfaces. Use shop cloths, drip pans and fender covers to prevent brake fluid
from contacting these areas.