
Cavalier L4-2.2L VIN 4 (1998)
7. Loosen the forward brake pipe connection at the master cylinder in order to purge air from the cylinder.
8. Tighten the connection.
9. Slowly release the brake pedal.
10. Wait 15 seconds.
11. Repeat the previous eight steps until all air is removed from the bore.
Use extreme care in order to prevent brake fluid from contacting painted surfaces.
12. Bleed the master cylinder at the rear (cowl end) connections after all the air has been removed at the forward connections. Slowly depress the
brake pedal and hold the pedal.
13. Check for a firm pedal feel and proper brake pedal travel. If the wheel cylinders and calipers do not contain air, bleeding is not necessary, but
recommended in order to remove any moisture or debris.
14. After all air is removed from the master cylinder, bleed the wheel cylinders in the following order, if necessary:
14.1. Right rear
14.2. Left rear
14.3. Right front
14.4. Left front
15. Raise the vehicle. Support the vehicle. Refer to Vehicle Lifting and Jacking.
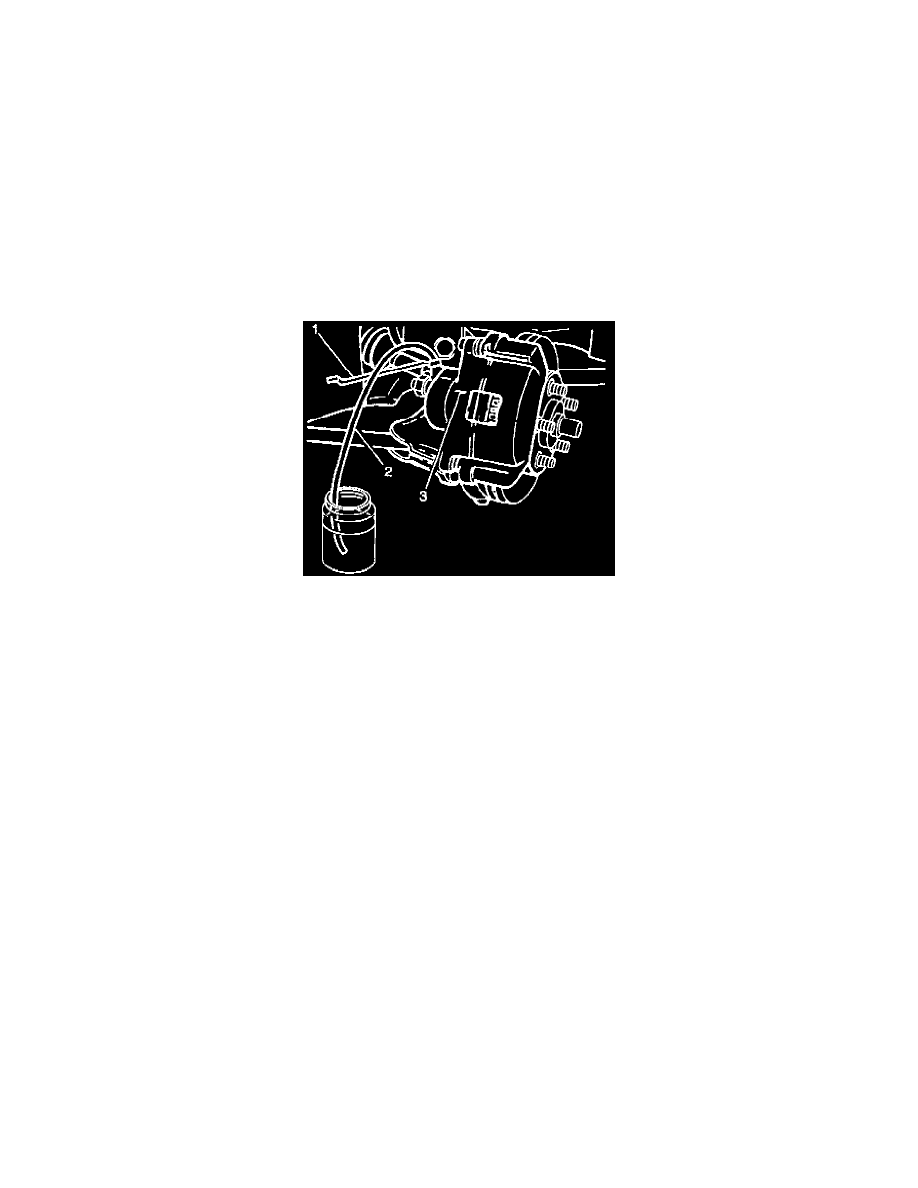
16. Place a proper size box end wrench (1) (or special tool) over the caliper/cylinder bleeder valve.
17. Attach a transparent tube (2) over the bleeder screw.
Submerge the other end in a transparent container partially filled with clean brake fluid.
18. Slowly depress the brake pedal and hold the pedal.
19. Loosen the bleeder screw in order to purge the air from the cylinder/caliper.
NOTICE: Always use the correct fastener in the proper location. When you replace a fastener, use ONLY the exact part number for that
application. The manufacturer will call out those fasteners that require a replacement after removal. The manufacturer will also call out the
fasteners that require thread lockers or thread sealant. UNLESS OTHERWISE SPECIFIED, do not use supplemental coatings (paints, greases, or
other corrosion inhibitors) on threaded fasteners or fastener joint interfaces. Generally, such coatings adversely affect the fastener torque and joint
clamping force, and may damage the fastener. When you install fasteners, use the correct tightening sequence and specifications. Following these
instructions can help you avoid damage to parts and systems.
20. Tighten the bleeder screw.
^
Tighten the rear bleeder screws to 7 Nm (62 inch lbs.).
^
Tighten the front bleeder screws to 13 Nm (115 inch lbs.).
21. Slowly release the pedal.
22. Wait 15 seconds.
23. Repeat the previous five steps until all air is removed from the caliper.
Do not pump the brake pedal rapidly. Pumping the pedal pushes the master cylinder secondary piston down the bore which causes difficult
bleeding.
24. Lower the vehicle.