
Citation V6-173 2.8L VIN Z 2-bbl HP (1983)
Crankshaft Main Bearing Seal: All Technical Service Bulletins
Rear Main Crankshaft Seal - New Design
Number:
84-31
Section:
6A (VI)
Date:
Dec., 1983
Subject:
REAR MAIN CRANKSHAFT SERVICE SEAL FOR 2.8L V6 60~
Model and Year:
1980-84 CAMARO, "S/T" TRUCKS, CITATION AND CELEBRITY
TO:
ALL CHEVROLET DEALERS
When service replacement of the rear main crankshaft seal in a 1980-84 2.8L V6 60~ engine is required, a new rubber split seal should be used.
The new seal, unit P/N 14069889, has been released for all model service and replaces the current rope seal.
NOTICE:
^ The installation instruction sheet (P/N 14069100) which is enclosed in the seal kit (P/N 14069889) may refer to the "Cavalier" Shop
Manual for removal and reinstallation of component parts. Disregard this and use the appropriate vehicle line shop manual.
^
The note under item 3 may read "loosening numbers 2, 3 and 4 main ....." This should be "loosening numbers 2 and 3 main ....."
These items will be revised in future seal kits.
When installing the new rubber rear seal, the following procedure should be used:
1.
Remove oil pan and oil pump.
2.
Remove rear main bearing cap.
3.
Remove upper and lower rope seal. Clean seal channel to remove any rope pieces and oil.
Loosening numbers 2 and 3 main bearings bolts may be necessary in both removing the upper rope seal and installing the new upper seal.
4.
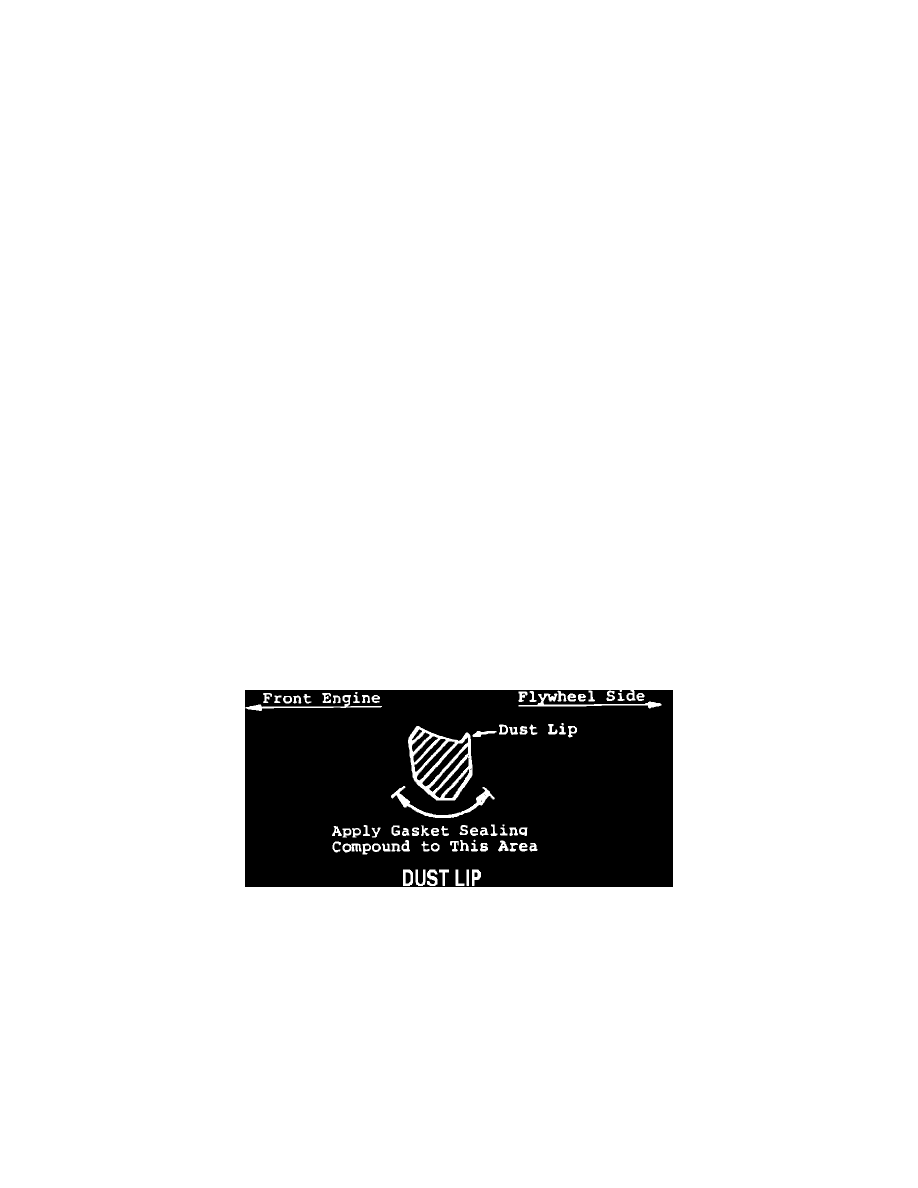
Apply a very thin coat of GM gasket sealing compound #1050026, or equivalent, to O.D. of rubber seal as shown in illustration. (Keep sealing
compound off of seal lips.)
Roll seal into position in cylinder case; turning crankshaft will help roll seal into position. A piece of shim stock must be used as a "shoe horn" between
the seal O.D. and the edge of the block seal channel to prevent damaging the seal during installation.
DUST LIP
Seal lip must be positioned inboard of the engine and the small dust lip to the flywheel side (see illustration below).
END VIEW OF SEAL
5.
Apply GM gasket sealing compound in manner described above to other half of new seal and install in main bearing cap.
6.
Apply a 1 mm bead (approximately 1/32") of anerobic sealant #1052357, or equivalent, to the cap between the rear main seal end and the oil pan
rear seal groove.
Keep sealant off the rear main seal, bearing and out of the drain slot.
7.
Just prior to assembly, apply a light coat of engine oil on the crankshaft surface that will contact the seal.