
Express 3500 V8-6.0L (2010)
Radiator Support: Service and Repair
Radiator Support Replacement
Removal Procedure
1. Disconnect the battery negative cable. Refer to Battery Negative Cable Disconnection and Connection (See: Starting and
Charging/Battery/Battery Cable/Negative/Service and Repair/Battery Negative Cable Disconnection and Connection).
2. Remove the radiator from the vehicle. Refer to Radiator Replacement (Diesel) ()Radiator Replacement (Gas) (See: Engine, Cooling and
Exhaust/Cooling System/Radiator/Service and Repair/Removal and Replacement).
3. Remove the grille. Refer to Grille Replacement (Uplevel) (See: Grille/Service and Repair/Grille Replacement (Uplevel))Grille Replacement
(Base) (See: Grille/Service and Repair/Grille Replacement (Base)).
4. Remove the headlamp and the parking lamp connectors and the harnesses from the radiator support.
5. Remove the headlamp assemblies. Refer to Sealed Beam Headlamp Replacement (See: Lighting and Horns/Headlamp/Headlamp Bulb/Service
and Repair/Sealed Beam Headlamp Replacement) or Headlamp Capsule Replacement (Minus V22) (See: Lighting and
Horns/Headlamp/Headlamp Bulb/Service and Repair/Headlamp Capsule Replacement (Minus V22)).
6. Remove the wiring harnesses from the clips at the front of the support and the back of the support.
7. Remove the ground wires from the support.
8. Remove the primary hood latch cable from the sheet metal support and the latch. Refer to Hood Primary and Secondary Latch Replacement (See:
Doors, Hood and Trunk/Hood/Hood Latch/Service and Repair/Hood Primary and Secondary Latch Replacement).
9. Remove the fuel vapor canister and the lines from the radiator support.
10. Remove the air conditioning condenser and the lines, if equipped. Refer to Air Conditioning Condenser Replacement (See: Heating and Air
Conditioning/Condenser HVAC/Service and Repair).
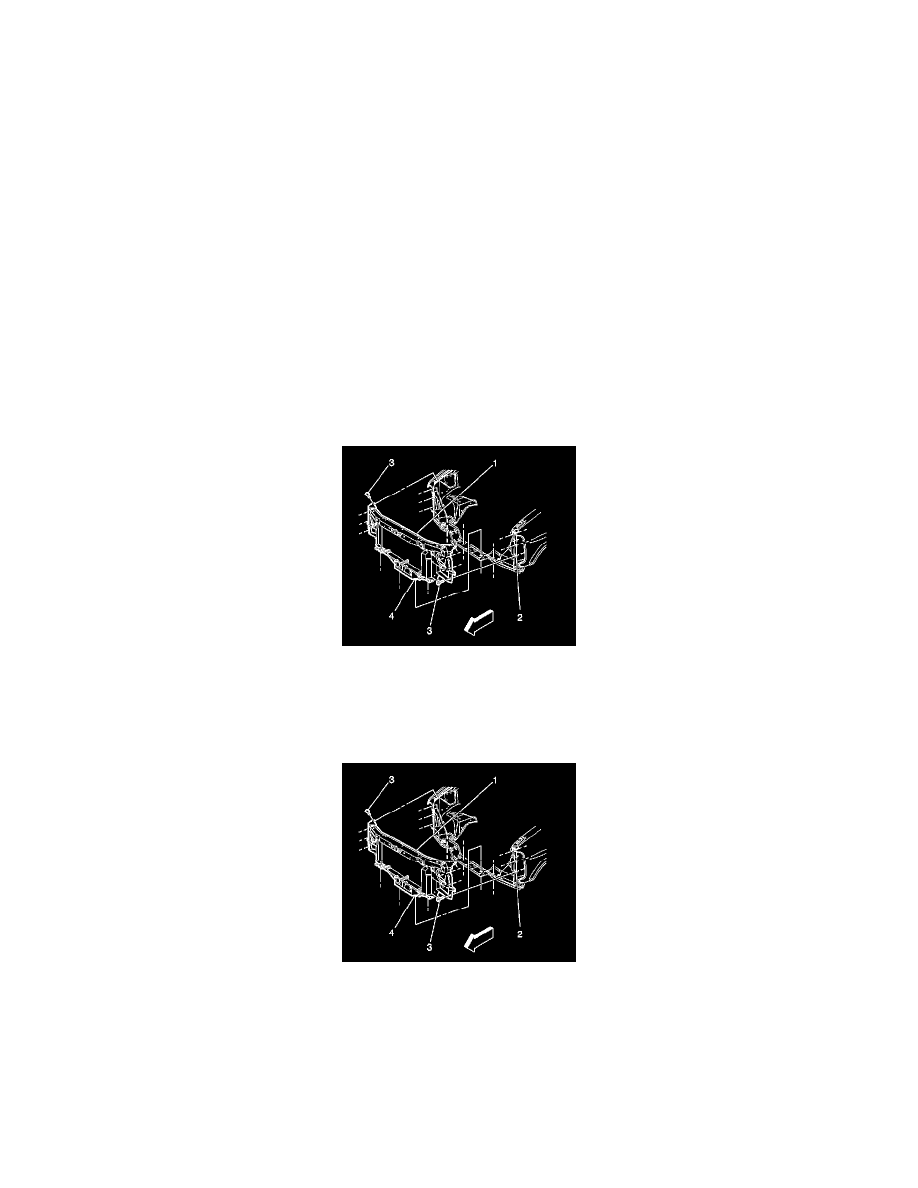
11. Remove the forward lamp harness from the radiator support (1).
12. Remove the bolts (3) retaining the radiator support (1) to the vehicle.
13. Remove the radiator support (1) from the vehicle.
Installation Procedure
1. Install the radiator support (1) to the vehicle.
Caution: Refer to Fastener Caution (See: Service Precautions/Vehicle Damage Warnings/Fastener Caution).
2. Install the bolts (3) in order to retain the radiator support (1) to the vehicle and tighten to 25 Nm (18 lb ft).
3. Install the forward lamp harness to the radiator support (1).
4. Install the radiator to the radiator support. Refer to Radiator Replacement (Diesel) ()Radiator Replacement (Gas) (See: Engine, Cooling and
Exhaust/Cooling System/Radiator/Service and Repair/Removal and Replacement).
5. Install the air conditioning condenser to the radiator support (1). Refer to Air Conditioning Condenser Replacement (See: Heating and Air
Conditioning/Condenser HVAC/Service and Repair).