
Lumina V6-191 3.1L VIN T MFI (1993)
3.
Rotate shoe retainer until tabs are aligned with notches in piston, then remove shoe retainer, Fig. 1.
4.
Remove locknut, lever, and lever seal, if installed.
5.
Remove piston by rotating actuator screw in parking brake apply direction to work piston from caliper bore Fig. 3.
6.
Remove balance spring (20), then remove actuator screw by pressing on threaded end, Fig. 1.
7.
Remove seal and thrust washer from actuator screw.
8.
Pry dust boot from caliper taking care not to damage caliper bore.
9.
Remove piston locator retainer, then the locator.
10.
Using a small piece of wood or plastic, remove piston seal from bore. Do not use a metal tool of any kind to remove seal as it may damage
bore.
11.
Remove bleeder screw. Remove bracket (5) and bolt (4), Fig. 1, if damaged.
12.
Inspect piston for scoring, nicks, corrosion, and wear and replace as needed.
13.
Inspect caliper housing and seal groove for corrosion, nicks, scoring and excessive wear, and use crocus cloth to polish away corrosion from
housing bore. Replace caliper housing if corrosion in and around seal groove will not clean up with crocus cloth.
14.
Clean all parts with denatured alcohol. Dry with unlubricated compressed air. Blow out all passages in housing and bleeder valve.
Caliper Assembly
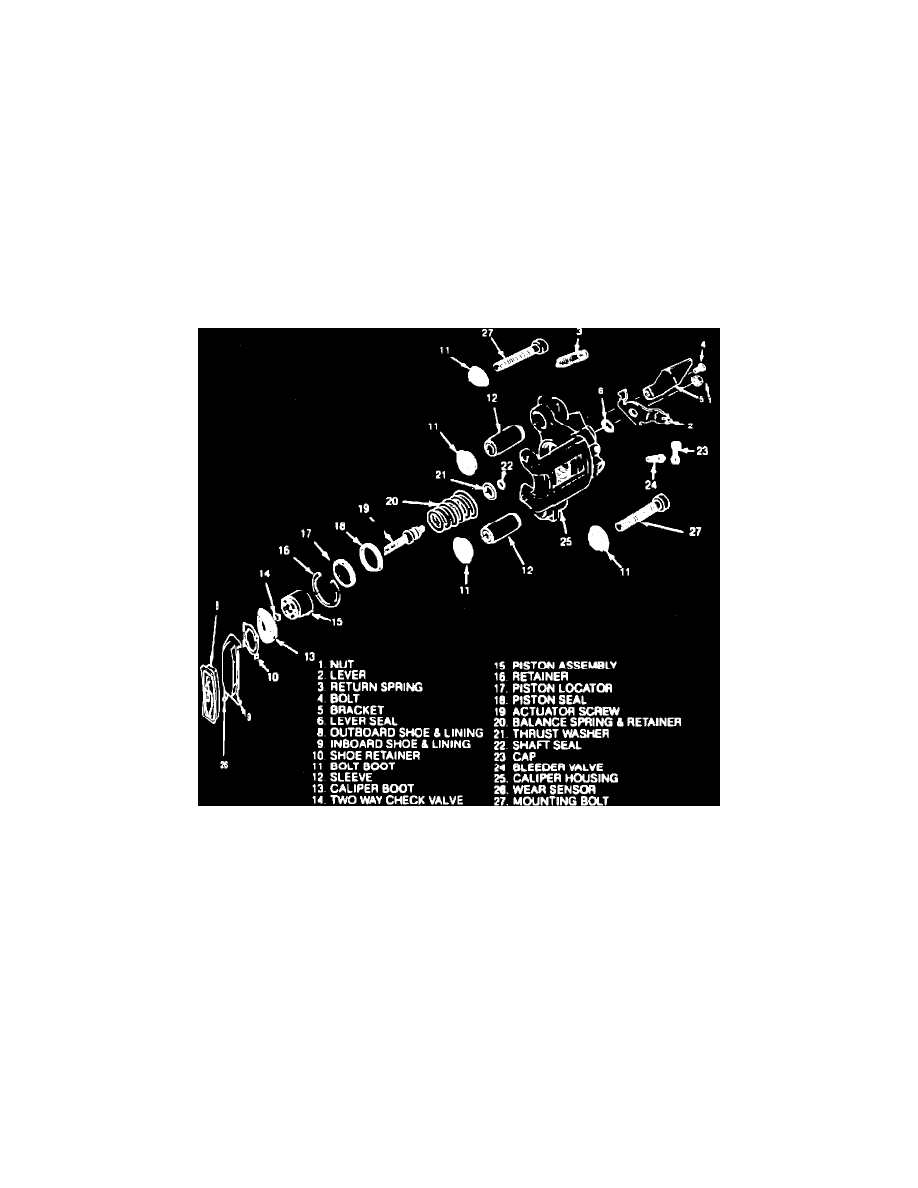
Fig. 1 Exploded View Of Delco-Moraine 7735 Series Rear Caliper
1.
Install bleeder screw.
2.
If removed, install bracket (5) and bolt (4), Fig. 1, then tighten bolt to specifications.
3.
Lubricate piston seals and bore grooves with new brake fluid, then roll piston seal into seal groove in bore, ensuring seal is fully seated and not
twisted.
4.
Lubricate piston locator with new brake fluid, then position locator on piston using piston locator installer tool No. J-36627 or equivalent.
5.
Install thrust washer on actuator screw, with grayish side towards caliper housing, then install lubricated shaft seal onto actuator screw.
6.
Install actuator screw into piston assembly.
7.
Install balance spring in piston recess in housing.
8.
Install piston assembly, pressing piston in until locator is past retainer groove, turn actuator screw as necessary to allow piston assembly to move
toward bottom of caliper bore, then install retainer ring.
9.
Install lubricated dust boot over piston with inside lip in groove in piston and boot fold toward end of piston that contacts brake shoe, then bottom
piston in caliper bore.
10.
Install lubricated lever seal over end of actuator screw, ensuring seal bead is against caliper housing.
11.
Install parking brake lever over actuator screw, rotate lever away from stop, then hold lever and torque retaining nut to 32 ft. lbs. After tightening
retaining nut, rotate lever back to stop.
12.
Seat dust boot in caliper counterbore using suitable driver.
13.
Install shoe retainer in groove on end of piston, ensuring retainer tabs are properly aligned with piston notches.