
Lumina V6-191 3.1L VIN T MFI (1993)
a.
Disconnect the negative battery cable.
b.
Remove the starter
c.
Replace the starter drive assembly with P/N 10477566.
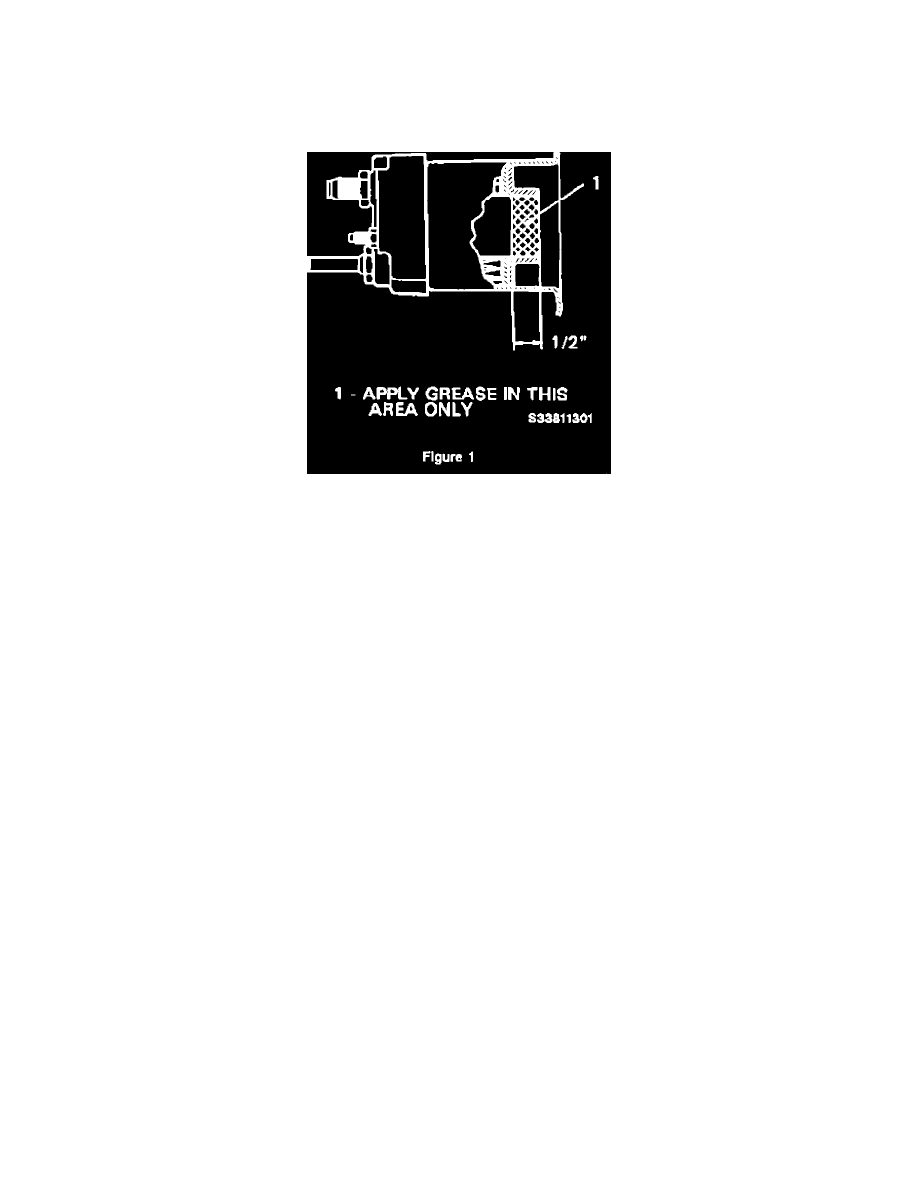
When the starter is being reassembled, apply grease, P/N 10477434, to the inside of the solenoid core, as shown in the illustration. To apply the grease,
open one packet and apply the contents evenly around the inside of the solenoid core tube, starting at the opening and covering the first 1/2" (13 mm) of
the inside of the tube.
The grease, P/N 10477434, comes in a box of 25 one gram packets, and one packet will be used for each starter solenoid.
a.
Reinstall the starter. Reconnect the negative battery cable.
Note:
If the oil filter was removed to reinstall the starter, Install a now filter and check the oil level.
ALARM SYSTEM REWORK
1.
Disconnect negative battery cable. Remove air cleaner, and on 3.1L only, rotate engine forward.
2.
Remove the sound insulator panels from both sides. Remove the knee bolster. Locate the theft alarm module. This module is normally located
under the I/P on the left, but may have been installed in other locations. Disconnect connector C202 (I/P harness to steering column). Remove
terminal from cavity B6 (yellow wire). Cut terminal off, and tape wire back. Crimp and solder a new terminal to the needed length of 10 gauge
wire (enough to reach the alarm module), and install the terminal in the connector. If the starter circuit has been cut on the steering column side of
C202, use female terminal, P/N 12084590. Otherwise, use male terminal P/N 12066493. Reinstall the connector.
3.
Crimp and solder a new terminal, P/N 12084590, to the other end of the wire. Install this wire to the yellow/red terminal of the alarm module.
4.
Crimp and solder a new terminal, P/N 12084590, to another length of 10 gauge wire (long enough to reach the park/neutral switch on the
transaxle). Install this wire into the yellow terminal of the alarm module.
5.
Run the wire through the transmission shift cable grommet (next to the cable, not on the outside of the grommet) into the engine compartment.
6.
Raise the vehicle. On 3.4L only, remove the exhaust down pipe. Crimp and solder a new terminal, P/N 12052139, with cable seal, P/N 12048443,
to the new wire. Disconnect the connector to the park/neutral switch, and remove the terminal from cavity F. Cut the old terminal off, and tape the
wire back. Install the new terminal into the connector, and reinstall the connector. Route and secure the wire to avoid any rubbing or pinching. Use
sealer to insure that the front-of-dash does not leak where the wire goes thru. On 3.4L, reconnect the exhaust down pipe. Lower the vehicle.
7.
Install the knee bolster, the sound insulator panels, and reconnect the negative battery cable. On 3.1L, rotate the engine back to the original
position. Any time the negative battery cable has been disconnected, perform the relearn procedure for the 3.1L/3.4L engines, using the Tech 1
scan tool.
PART AVAILABILITY:
Parts are expected to be available at GMSPO by 11/15/93.