
Lumina V6-3.8L VIN K (1998)
Brake Bleeding: Service and Repair
Hydraulic Brake System Bleeding (Pressure Bleeding)
^
Tools Required
- J 29532 Diaphragm Type Brake Bleeder
- J 35589 Compact Brake Bleeder Adapter
NOTICE: Pressure bleeding equipment must be of the diaphragm type. It must have a rubber diaphragm between the air supply and the brake fluid to
prevent air, moisture, and other contaminants from entering the hydraulic system.
1. Clean the brake fluid reservoir cover and the surrounding area.
2. Remove the brake fluid reservoir cap
3. Inspect the brake fluid reservoir level.
4. Connect the J 35589 to the brake fluid reservoir.
5. Connect the bleeder adapter to the pressure bleeding equipment.
6. Adjust the pressure bleed equipment to 35-70 kPa (5-10 psi). Wait approximately 30 seconds in order to ensure that there is no leakage.
7. Adjust the pressure bleed equipment to 205-240 kPa (30-35 psi).
NOTICE: Refer to Fastener Notice in Cautions and Notices.
IMPORTANT: Use a shop cloth in order to catch escaping brake fluid. Prevent the fluid from running down the motor pack base or into the electrical
connector. Also, do not allow brake fluid to contact any painted surfaces as surface damage will occur. If brake fluid does contact any surface, flush
the surface with water to lessen the damage.
8. Complete the following procedure with the pressure bleeding equipment connected and pressurized:
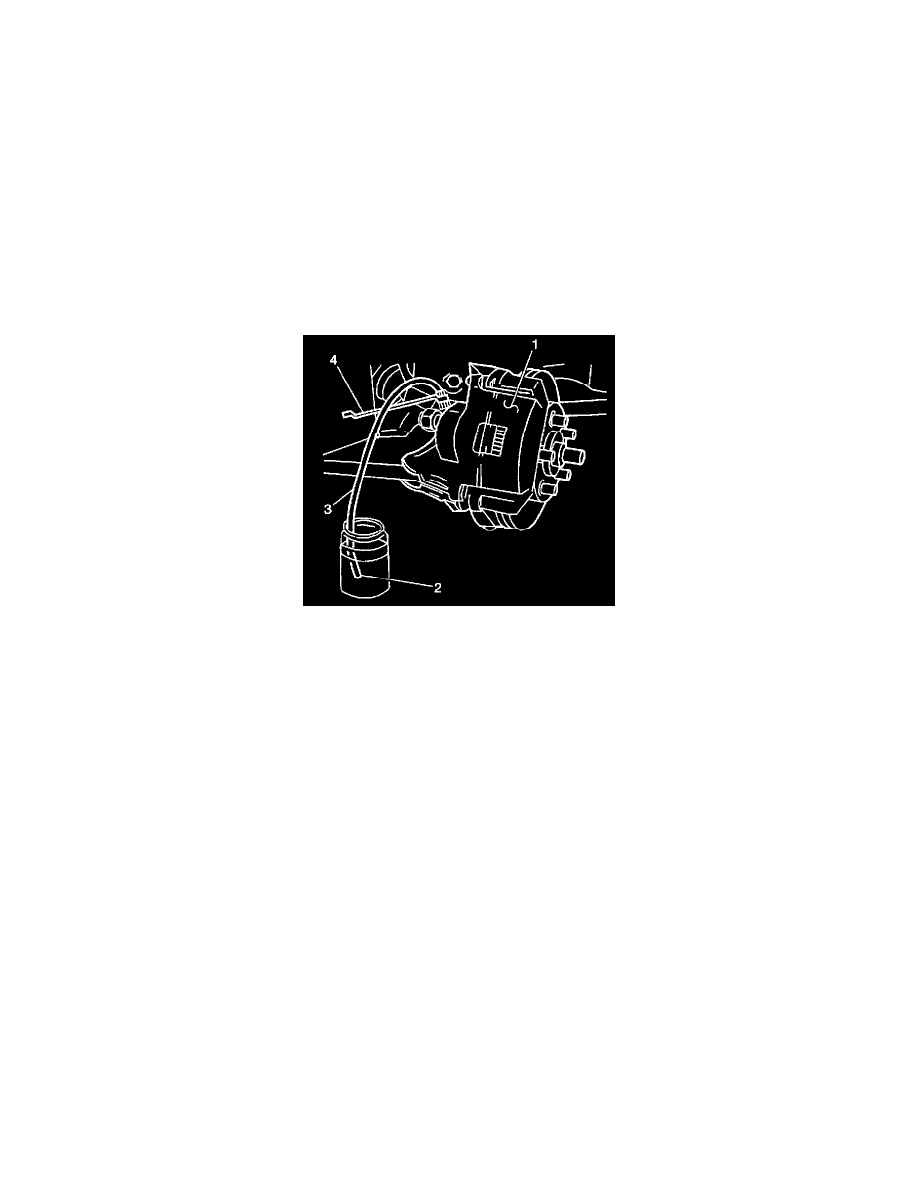
8.1. Attach a clear plastic bleeder hose to the rearward bleeder valve on the brake modulator. Submerge the opposite hose end in a clean container
partially filled with clean brake fluid.
8.2. Slowly open the bleeder valve. Allow the fluid to flow until no air is seen in the fluid.
8.3. Close the valve when the fluid flows without any air bubbles.
8.4. Repeat the previous two steps until no air bubbles are present.
8.5. Relocate the bleeder hose on the forward brake modulator bleeder valve. Submerge the opposite hose end in a clean container partially filled
with clean brake fluid.
8.6. Slowly open the bleeder valve. Allow the fluid to flow until no air is seen in the fluid.
8.7. Close the valve when fluid flows without any air bubbles.
8.8. Repeat the previous two steps until no air bubbles are present.
^
Tighten the Antilock Brake System (ABS) modulator bleeder valves to 9 Nm (80 inch lbs.).
9. Bleed the brake modulator brake pipe connections with the pressure bleeding equipment connected and pressurized:
9.1. Slowly open the forward brake pipe tube nut on the brake modulator and check for air in the escaping fluid.
9.2. When the air flow ceases, immediately tighten the tube nut.
^
Tighten the tube nut to modulator to 24 Nm (18 ft. lbs.).
9.3. Repeat step 9 for the remaining three brake pipe connections moving from front to rear.
10. Raise and suitably support the vehicle.
Important: Bleed sequence: