Lumina APV V6-3800 3.8L (1994)

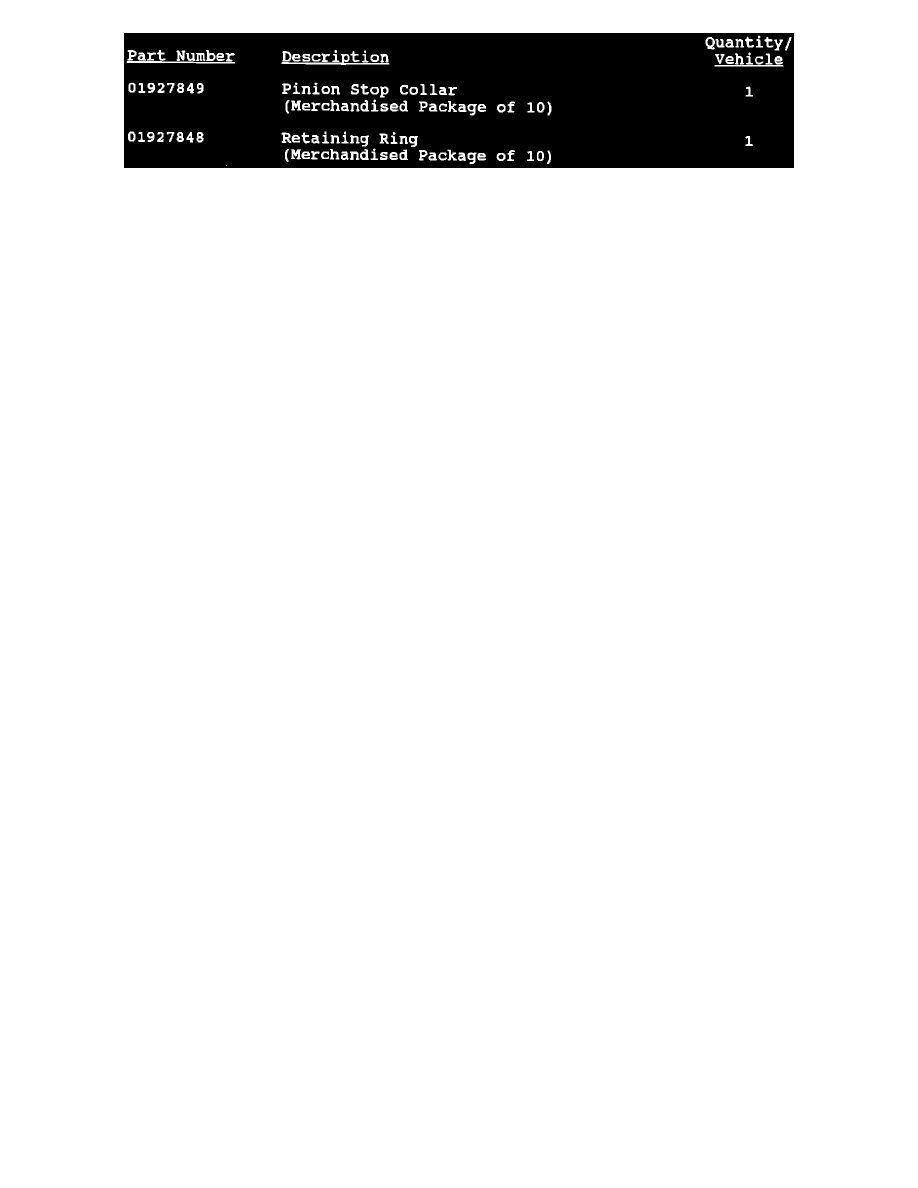
Parts required to complete this campaign are to be obtained from General Motors Service Parts Operations (GMSPO). To ensure these parts will be
obtained as soon as possible, they should be ordered from GMSPO on a "C.I.O." order with no special instruction code, but on an advise code (2).
NOTICE:
All dealers were preshipped a quantity of each part during the week of January 3, 1994. Please do not order excessive quantities for stock as this
causes material shortages and unnecessary customer inconvenience.
Service Procedure
STARTER MOTOR REMOVAL AND REPLACEMENT
1.
All vehicles within breakpoints should be inspected to determine starter motor date codes. Date codes are imprinted on upper half of tag located on
motor end of starter. Tag information is read upside down as viewed from bottom.
2.
A.)
Most vehicles may be inspected by utilizing a mirror, flashlight, and/or use of a pliable material such as modeling clay or similar material to
make an impression of the date code. After making an impression, read code with a mirror.
B.)
Some vehicles such as W-Cars with L82 engines may require removal of an oil filter drip pan to gain access to read the date codes.
C.)
Some vehicles equipped with oil coolers and 2.0L (LE4) equipped J-Cars & T trucks will require starter motor removal to read date codes
per section 6D2 of the service manual.
3.
Remove all starter motor assembly per instructions in appropriate 1994 service manual section 6D2 with date codes N093, N103, N113, N123,
N133, N153 & N163 and perform pinion stop collar procedure.
Notice:
Disconnect negative battery cable after noting radio station settings.
4.
Reinstall starter motor per instructions in service manual, section 6D2. Reset radio settings as noted and reset clock.
5.
Install Campaign Identification Label.
PINION STOP COLLAR REPLACEMENT PROCEDURE
1.
Remove field lead attaching screw from solenoid terminal.
2.
Loosen but do not remove through bolts in starter motor assembly. Do not separate the commutator end and frame.
3.
Separate frame with armature inside from housing.
4.
Remove thrust collar from end of shaft if it is not stuck to housing.
5.
Use care in removing and installing retaining ring to prevent scratching or damaging armature shaft.
6.
Remove pinion stop retaining ring first by prying pinion stop collar off the ring. Pry pinion stop ring off armature with a small screw driver. Do not
reuse ring.
7.
Remove pinion stop collar from armature shaft. Do not reuse collar.
8.
Install new pinion stop collar on armature shaft. Flat side goes towards pinion.
9.
Install new retaining ring onto armature shaft and seat it in shaft groove. Use due care not to damage armature shaft.
10.
Install thrust collar onto armature shaft with small flange toward retaining ring. Use two pliers to squeeze pinion stop collar and the thrust collar to
seat the stop collar on the retaining ring.
11.
Assemble frame, armature and drive assembly into housing. Ensure shift lever is engaged with drive assembly. Ensure armature shaft is engaged
with housing bearing. Tighten through bolts.
