
Brake Bleeding for Metro L3-061 10L VIN 6 TBI (1998)
Brake Bleeding: Service and Repair
CAUTION: Do not move the vehicle until a firm brake pedal is obtained. Air In the brake system can cause the loss of brakes with possible
personal injury.
NOTICE: On vehicles equipped with an Antilock Brake System (ABS), the hydraulic modulator must be bled prior to the brake calipers and wheel
cylinders. For complete brake hydraulic system bleeding procedures for vehicles equipped with ABS, refer to Brake Bleeding.
Bleed the brake system anytime a brake pipe or hose has been opened and air has been introduced into the system.
Bleed the hydraulic system at all four wheels if air has been introduced through a low fluid level or by disconnecting the brake pipes at the master
cylinder.
If a brake pipe or hose is disconnected at only one wheel, then bleed only that wheel cylinder/caliper.
If the pipes are disconnected at any fitting located between the master cylinder and the brakes, then bleed the brake system served by the disconnected
pipe.
MANUAL BLEEDING
IMPORTANT: Bleed the wheel cylinders/calipers in the following sequence:
^
Right rear
^
Left rear
^
Right front
^
Left front
1. Remove the vacuum reserve by applying the brakes several times with the engine off.
2. Remove the master cylinder reservoir cap. Fill the reservoir with brake fluid. Install the cap tightly. Ensure that the reservoir is at least one-half full
during the bleeding operation.
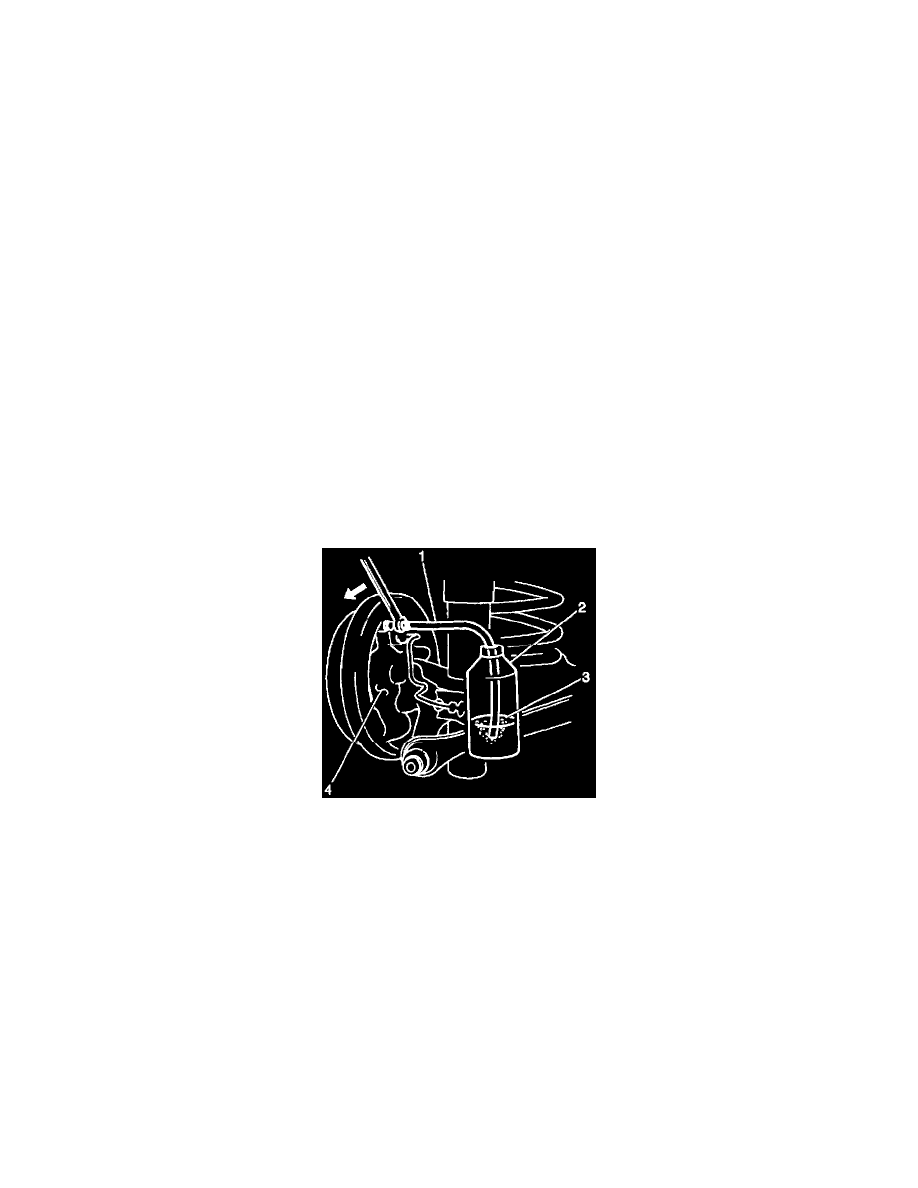
3. Remove the bleeder plug cap from the wheel cylinder/caliper that is to be bled.
4. Attach a clear plastic or vinyl tube (1) to the bleeder plug. Submerge the other end of the tube in a clear container (2) that is partially filled with
brake fluid.
5. Instruct a second technician to press the brake pedal several times, then hold it fully pressed.
6. With the brake pedal fully pressed, loosen the bleeder plug one half turn. The brake pedal should fall all the way to the floor as brake fluid flows
out of the bleeder plug into the clear fluid container.
7. Tighten the bleeder plug. Instruct the second technician to slowly release the pedal.
8. Repeat steps 5 and 6 until all of the air has been removed from the line and air bubbles (3) no longer appear in the clear fluid container.
9. Replenish the brake fluid in the master cylinder reservoir to the MAX level. Install the cap.
10. Pump the brake pedal and inspect for fluid leaks.
11. Inspect the brake pedal feel for sponginess. Inspect the BRAKE indicator for unbalanced pressure. Repeat the entire bleeding procedure in order
to correct either of these two conditions.
12. Repeat this entire procedure at all wheel cylinders/calipers that require bleeding.