Metro L3-061 1.0L VIN 6 TBI (1998)

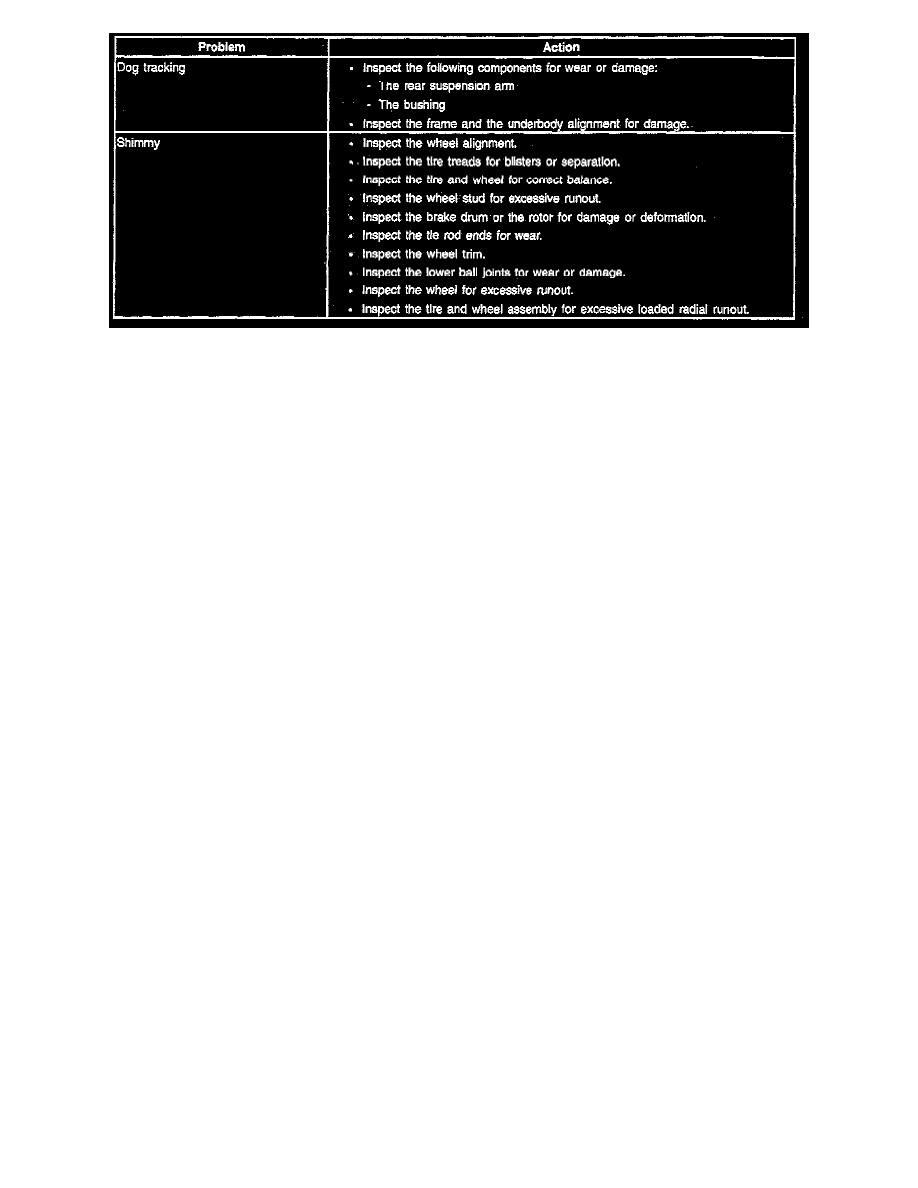
Ride Diagnosis - Part 3 Of 3
Struts or Shock Absorbers Leak
1. Fully extend the strut assembly with the wheel unsupported in order to expose the seal cover area for inspection.
2. Look for signs of leaks in the seal cover area.
3. A slight trace of fluid is NOT cause for replacement. The seal permits some seepage to lubricate the piston rod. There is a built-in reserve to allow
for the seepage.
4. A leaking strut assembly can easily be found because there will be fluid around the seal cover and an excessive amount of fluid on the strut. A
leaking strut assembly must be replaced.
Struts or Shock Absorbers Noisy
1. Check all mountings for proper torque. A loose mounting will cause noise.
2. If all mountings are intact, bounce the vehicle to isolate the suspected unit. Test each strut assembly in turn by quickly pushing down, then lifting
up the corner of the bumper nearest the strut assembly being checked. Use the same amount of effort on each test and note the resistance on
compression and rebound. Compare this with a similar having acceptable ride quality. Both strut assemblies should provide the same feeling of
resistance.
3. Ride in the vehicle with the owner in order to be sure that you understand the complaint.
Struts or Shock Absorbers Weak
1. Check and adjust the tire pressures to the pressures specifications shown on the tire placard, located on the driver's side door lock pillar.
2. Note the load conditions under which the vehicle is normally driven.
3. Ride in the vehicle with the owner in order to be sure you understand the complaint before proceeding to the next step.
4. Test each strut dampener/shock in turn by quickly pushing down, then lifting up, the corner of the bumper nearest the strut dampener/shock being
checked. Use the same amount of effort on each test and note the resistance on compression and rebound. Compare this with a similar vehicle
having acceptable ride quality. Both strut dampeners/shocks should provide the same feeling of resistance.
Wheel Bearings Diagnosis
A road test can usually indicate excessive wheel bearing noise. Although it is difficult to verbally describe sound, wheel bearing generally emit a kind of
howling sound when they go bad. This sound is only present when the vehicle is moving, it is constant and unwavering, and it increases in loudness and
pitch with vehicle speed. If wheel bearing noise cannot be positively diagnosed, or if the front or rear origin of the noise cannot be determined, perform
the following wheel bearing test:
1. Raise and support the vehicle.
2. Spin the wheels by hand. Check for out-of-round tires, out-of-balance tires, bent rims or loose wheel bearings.
CAUTION: On front-wheel drive vehicles, drive wheel spin should be limited to 56 km/h (35 mph) as indicated on the speedometer. This
limit is necessary because the speedometer on some front-wheel drive vehicles only indicates half of the actual wheel speed when one
wheel is spinning and the other wheel is stopped Unless care is taken to limit drive wheel spin, the spinning wheel can reach excessive
speed. This could result in possible tire disintegration or differential failure, which could cause serious personal injury or extensive
vehicle damage.
3. Spin the rear wheels using a commercial wheel spinner. Spin the front wheels using the engine.
4. If noise can be heard from the passenger compartment, replace the noisy wheel bearing cartridge. Refer to WHEEL BEARING in FRONT
SUSPENSION or WHEEL BEARING in REAR SUSPENSION.
5. Lower the vehicle.
Tools Required:
