
Tahoe 4WD V8-393 6.5L DSL Turbo VIN S (1995)
^
Before replacing a component, check power, signal and ground wires at the component harness connector. If the checks and connections are
OK, the most probable cause is component failure.
Step 4: Test the Repair
Repeat the System Check to verify that the fault has been corrected and that no other faults were induced during the repair.
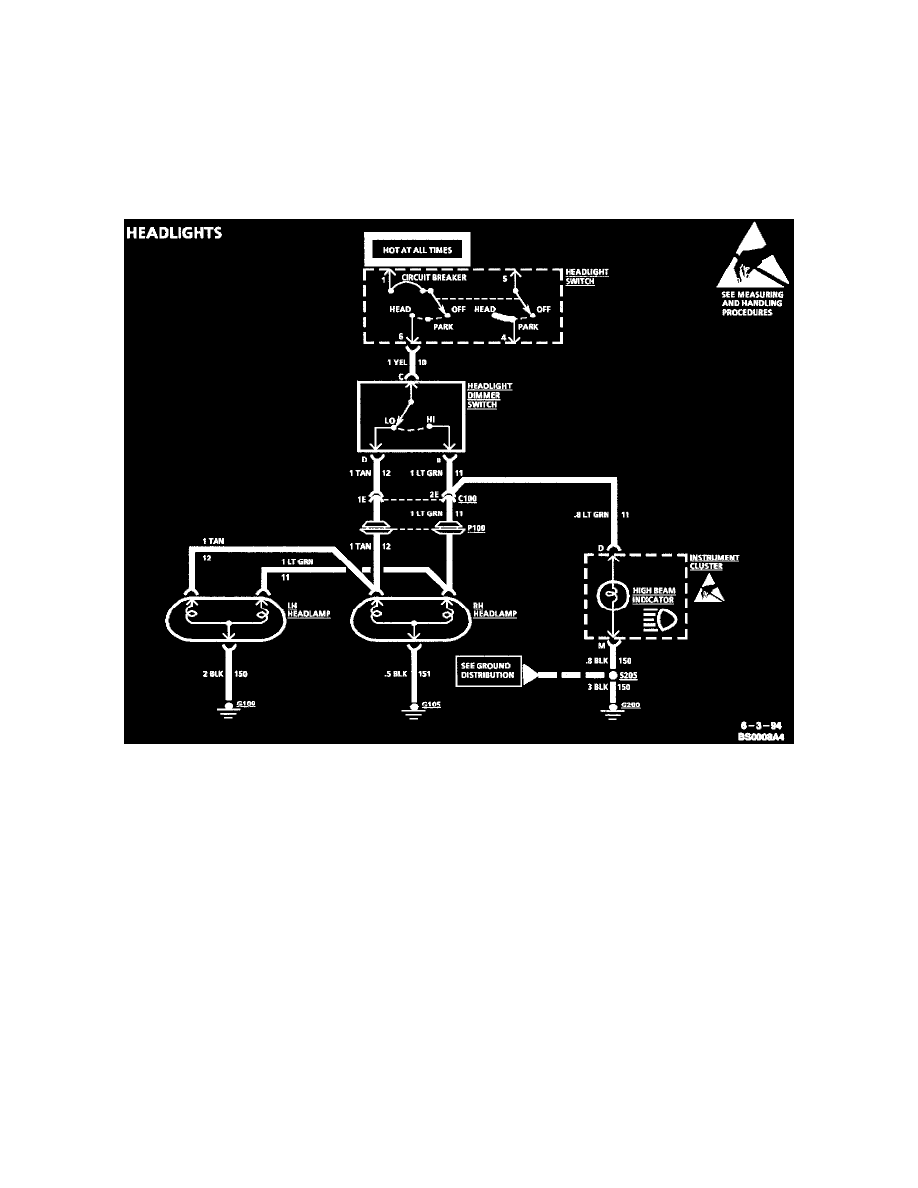
EXAMPLE: A customer brings in a vehicle and says that the HI beams do not work.
Step 1: Perform a System Check on the Headlight Circuit
You may discover that both LO beams operate. In HI, you may notice that the HI Beam Indicator comes ON, but neither HI beam operates.
Typical Headlights Schematic
Step 2: Read the Headlights Electrical Schematic
This is the step that will save time and labor. Remember, it is essential to understand how a circuit should work, before trying to figure out why it
doesn't.
After you understand how the circuit should operate, read the schematic again, this time keeping in mind what you have learned by operating the
circuit.
Since both LO beams work, you know that the Headlight Switch, the YEL wire, the LO contacts of the Headlight Dimmer Switch, terminal "1E"
of C100, the TAN wires and grounds G1O5 and G109 are all good.
Furthermore, since you saw that the HI Beam Indicator came ON when the Headlight Dimmer Switch was moved to HI you know that the HI
contacts of the Headlight Dimmer Switch and the LT GRN wire between the Headlight Dimmer Switch and C100 are good.
At this point, you could test for voltage at the RH Headlamp with the Headlight Dimmer Switch in HI. However, it is extremely unlikely that the
HI beam filaments have burned out in both headlamps, or that both headlamps connections are bad. The cause must be a bad connection at C100,
or a break in the LT GRN wire between C100 and the RH Headlamp.
You have quickly narrowed the possible causes down to one specific area, and have done absolutely no work on the vehicle itself.
Step 3: Find the fault and repair it
Using the Component Location List and the corresponding figure, you can quickly find C100 and the LT GRN wire, locate the exact trouble point