
Tracker 2WD L4-1.6L VIN 6 (2000)
Jump Starting: Service and Repair
NOTE: Do not push or tow the vehicle to start it. Damage to the emission system and/or to other parts of the vehicle may result.
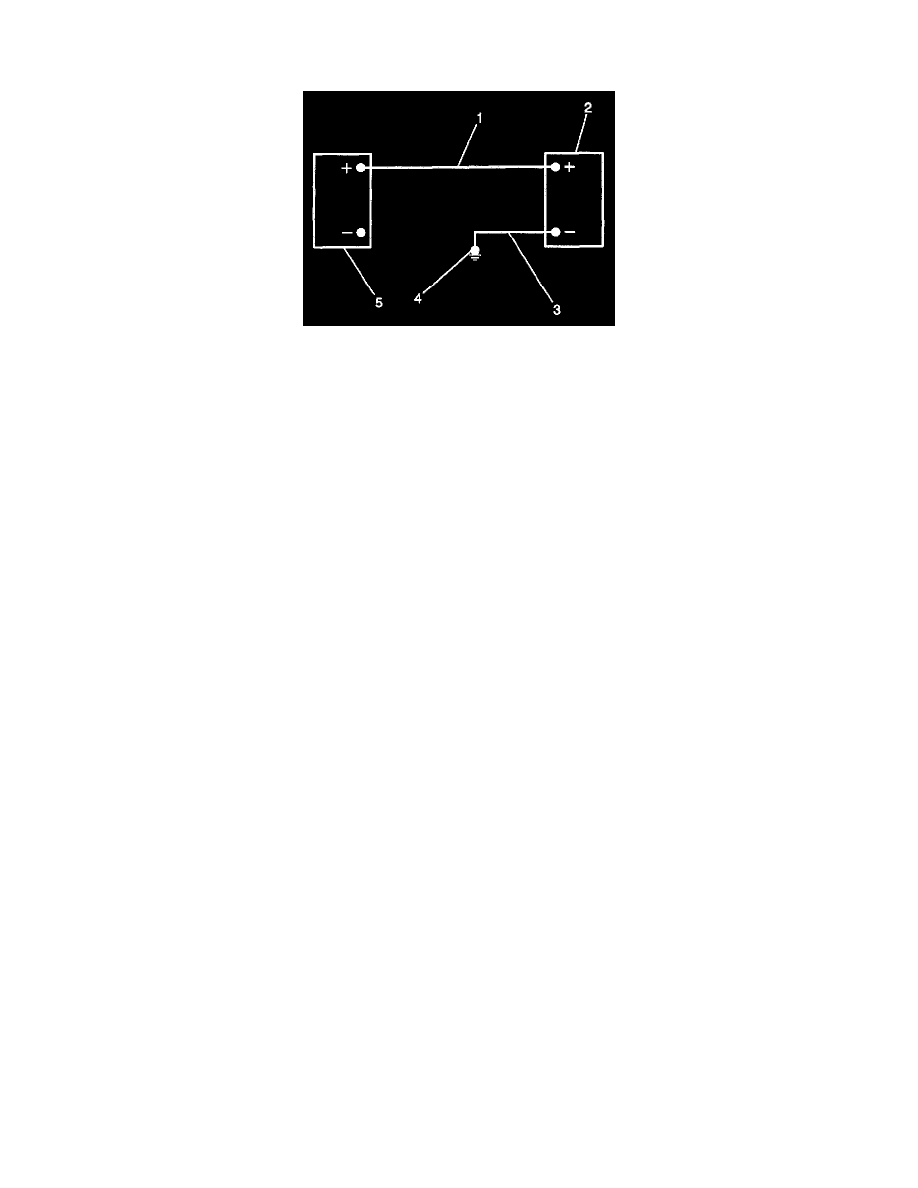
Both the booster (2) and the discharged battery (5) should be treated carefully when using jumper cables. Follow the procedure, using caution not to
generate any sparks.
CAUTION: Departure from these cautions or the procedures could result in: (1) serious personal injury (particularly to eyes) or property
damage from such causes as battery explosion, battery acid or electrical burns; and/or (2) damage to the electronic components of either
vehicle. Never expose any battery to open flame or electric spark-batteries generate a gas which is flammable and explosive. Remove rings,
watches and other jewelry. Wear approved eye protection. Do not allow battery fluid to contact eyes, skin, fabrics or painted surfaces-battery
fluid is a corrosive acid. Flush any contacted area with water immediately and thoroughly. Be careful that metal tools or jumper cables do not
contact the positive battery terminal (or metal in contact with it) or any other metal on the vehicle-a short circuit will occur.
1. Set the parking brake and place the manual selector lever (automatic transaxle models) into the park position. Turn the ignition switch to LOCK.
Turn all electrical accessories and lamps off.
2. Check the state of the built-in hydrometer. Refer to Battery Hydrometer Displays Dark or Yellow Dot. If it is clear or a light yellow color, replace
the battery.
NOTE: When jump starting a vehicle with charging equipment, be sure that the charging equipment used is 12 volts and a negative ground. Do
not use 24 Volt or positive ground charging equipment. Using such equipment can cause serious damage to the electrical system or electronic
components on the vehicle.
IMPORTANT: Do not permit the vehicles to touch each other. This could cause a grounding effect and counteract the jump starting procedure.
3. Attach one end of the positive (+) jumper cable (1) to the positive (+) terminal of the booster battery and the other end (of the same cable) to the
positive (+) terminal of the discharged battery.
IMPORTANT: Do not connect the negative (-) jumper cable (3) directly to the negative (-) terminal of the discharged battery.
4. Attach one end of the negative (-) jumper cable to the negative (-) terminal of the booster battery and the other end to a solid engine ground (such
as the A/C compressor mounting bracket or generator mounting bracket) at least 457 mm (18 in) from the discharged battery.
5. Start the engine of the vehicle with the booster battery. Turn off all electrical accessories and lamps.
6. Start the engine of the vehicle with the discharged battery.
7. Disconnect and remove the negative (-) jumper cable from the solid engine ground and from the negative (-) terminal of the booster battery.
8. Disconnect and remove the positive (+) jumper cable from the positive (+) terminal of the then discharged battery and from the positive (+)
terminal of the booster battery.