
V 30 P/U 4WD V6-262 4.3L (1987)
6.
Slowly open propane metering valve until maximum idle speed (enriched RPM) is obtained.
7.
If enriched idle speed is within specification, Fig. 10, mixture is correct. Proceed to step 14. If enriched idle speed is not within specification,
proceed to next step.
8.
Remove carburetor from engine, then remove plugs covering idle mixture needles as outlined in the Carburetor Section under ``Concealment Plug
Removal''.
9.
Reinstall carburetor and lightly seat mixture needles, then back out needles until engine will just run.
10.
Place transmission in Drive (manual transmission in Neutral), then back out mixture needles equally until maximum idle speed is obtained.
11.
Set idle speed to enriched idle RPM, then turn mixture needles inward until specified curb idle speed is obtained.
12.
With propane flowing, recheck enriched idle speed. If not within specification, repeat steps above. If enriched idle speed is within specification,
proceed to next step.
13.
After adjustments are completed, seal mixture needles with RTV sealant or equivalent.
14.
Check and, if necessary, adjust fast idle speed to specification.
15.
Turn engine off, remove propane tool, then reconnect crankcase ventilation tube and vacuum hoses.
HEAVY DUTY EMISSIONS VEHICLES
Perform idle mixture adjustment with choke fully open, air cleaner removed and engine at normal operating temperature.
1.
Connect tachometer and suitable vacuum gauge to engine following tool manufacturer's instructions.
2.
Remove carburetor from engine, then remove plugs covering idle mixture needles as outlined in the Carburetor Section under ``Concealment Plug
Removal''.
3.
Reinstall carburetor, lightly seat mixture needles, then back out two turns.
4.
Start engine, then set curb idle speed to specification.
5.
Adjust each mixture needle equally to obtain highest possible RPM and vacuum reading.
6.
Repeat steps 4 and 5 until best idle is obtained.
7.
Seal mixture needles with RTV sealant or equivalent, then adjust throttle kicker, if equipped.
8.
Check and, if necessary, adjust fast idle speed to specification.
9.
Shut engine off, remove tachometer and vacuum gauge, then reinstall air cleaner and vacuum hoses.
V6-262 Engine w/E4ME, E4MED Carburetors
The Computer Command Control (C3) system, used on all models, provides precise control of air/fuel mixture during all ranges of engine operation.
Because of this system control, adjustment procedures must be followed in exact sequence to insure correct mixture adjustment. Dwell readings from the
Mixture Control (MC) solenoid are used for adjustment calibration. If unable to obtain specified readings, refer to C3 System Section.
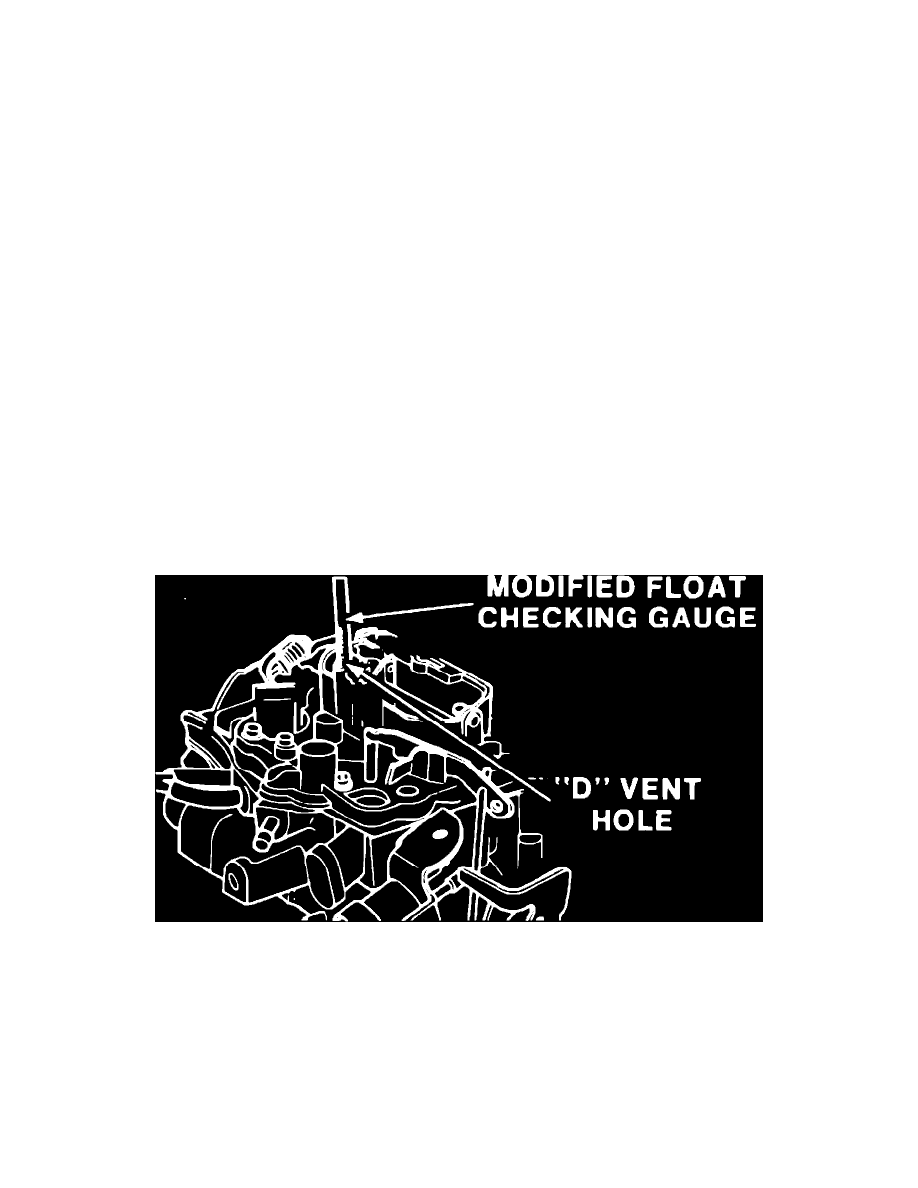
Fig. 10 Checking solenoid plunger travel. V6-262 w/E4ME or E4MED carburetor
MC SOLENOID EXTERNAL GAUGE CHECK
MC solenoid travel must be within specifications before idle mixture can be adjusted. Perform check with engine off and air cleaner removed. Before
proceeding, use modified float gauge J-34935-1 or equivalent, to fit in ``D'' shaped vertical vent on carburetor air horn, Fig. 10.
1.
Insert gauge in ``D'' shaped hole. Press down on gauge and release, making sure that gauge moves freely, without binding.
2.
With gauge released (solenoid up position), read gauge at eye level and record reading that lines up with top of air horn casting.
3.
Press down lightly on gauge until bottomed. Record reading where gauge lines up with top of air horn casting.
4.
Subtract reading in step 2 from reading in step 3 to obtain total MC solenoid travel.
5.
If total MC solenoid travel is 2/32-6/32 inch, proceed to steps 16 and 17 of "MC Solenoid Adjustment" to adjust Idle Air Bleed Valve. If travel is
not within specifications, MC solenoid must be adjusted following entire procedure below.