
Fifth Avenue V6-231 3.8L VIN L FI (1992)
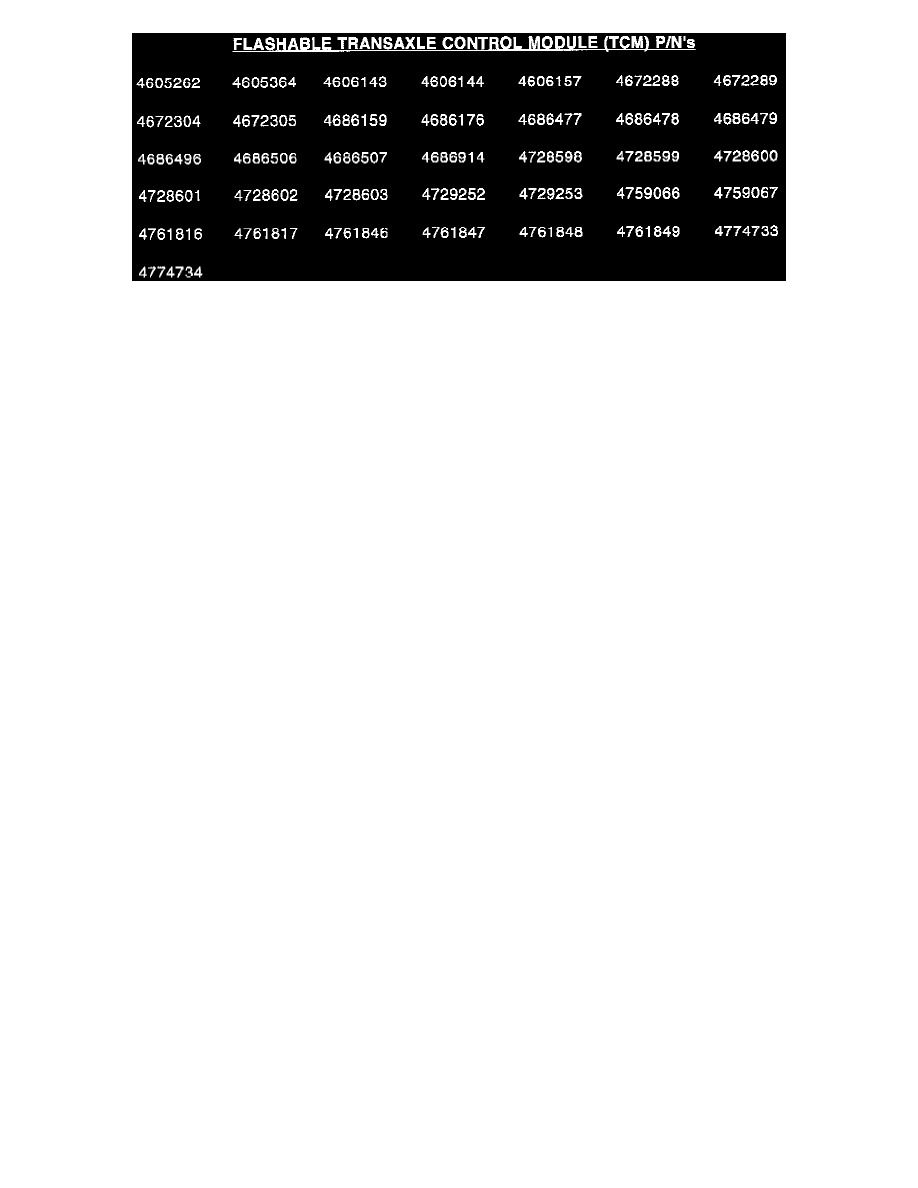
If the vehicle has a TCM part number that is not listed in the illustration, the vehicle will require that the control module be replaced. Some vehicles that
have had service controllers installed may be flashed. Therefore, always check the TCM part number to be sure that a flash controller is not replaced.
EQUIPMENT/PARTS REQUIRED:
1 CH6OOO
Scan Tool (DRB III)
1 CH7035
General Purpose Interface Bus Cable (GPIB)
1 CH7OOO
J1962 Cable (Except LH Models)
1 4669020
Label - Authorized Software Update
1 4275086
Label - Authorized Modification
Note:
The MOPAR diagnostic system is required to perform the following repair and the system must be operating with release 16 or higher installed.
REPAIR PROCEDURE:
This procedure involves flashing the Transaxle Control Module with new software (calibrations) using the DRB III.
1.
Examine the TCM part number on the vehicle. If the part number is listed above, the controller can be flashed using the DRB III.
2.
Connecting the MDS and DRB III to the Vehicle:
A) With the ignition off, disconnect the vehicle 60 way connector from the TCM on the vehicle.
B) Connect the 60 way harness, from the Flash Programming Kit, CH5500 to the TCM on the vehicle.
C) Connect the Flash Programming Adapter to the 60 way harness.
D) Connect the DRB III to the Flash Programming Adapter with DRB III DIN cable CH7025.
E) Connect the MDS to the DRB III.
F) Power the DRB III and Adapter by connecting the battery leads to the vehicle battery.
3.
Use the arrow keys on the DRB III MAIN MENU Screen and select # 2 MDS DIAGNOSTICS.
4.
Use the arrow keys on the MDS and select DIAGNOSTIC MENU, then press NEXT MENU.
5.
Use the arrow keys on the MDS and select CONTROLLER PROGRAMMING, then press NEXT MENU.
6.
Use the arrow keys on the MDS and select PROGRAM CONTROLLER PART, then press NEXT MENU.
7.
Follow the steps presented on the MDS and DRB III which will allow the DRB III to obtain the current part number of the controller.
8.
The MDS will display the part number of the controller on the vehicle and the appropriate replacement part number, then press NEXT MENU to
begin programming.
If the controller on the vehicle has already been updated or programmed, a NO UPDATES AVAILABLE message will be displayed. Check the
part number of the controller on the vehicle and compare it to the part number displayed. If the controller has already been updated, proceed to
step 9.
9.
The MDS and DRB III will prompt for any operator action needed during the remainder of the programming process.
10.
Change the transmission fluid following the procedure outlined in the Service Manual (removing the pan and loosening the valve body will speed
up draining the fluid. Remember to tighten the valve body attaching screws).
Note:
Use only Mopar ATF plus transmission fluid (automatic transmission fluid type 7176). Use of Dextron IIE may cause clutch shudder.
11.
Start the vehicle and with the gear selector in Overdrive, move the vehicle at least five feet and then place gear selector in Neutral.
12.
Using the procedure listed in the Service Manual, complete the following: