
Lebaron GTS L4-153 2.5L SOHC VIN K TBI (1988)
NOTE:
IF PROBLEMS REMAIN, FAULT CODES WILL NOT ERASE.
19.
From the PASSENGER side of vehicle, turn the ignition key to "OFF", then "ON", and observe the instrument cluster airbag light. The light
should go on for 6 to 8 seconds, then go out. The system is functioning normal.
NOTICE:
IF AIRBAG WARNING LIGHT EITHER FAILS TO LIGHT OR GOES ON AND STAYS ON; THERE IS A SYSTEM
MALFUNCTION. YOU MUST REFER TO THE DIAGNOSTIC TEST MANUAL AND USE THE DRB II TO PROPERLY DIAGNOSE
THE PROBLEM.
Wiring Harness Service Procedure
The wiring harness for this system is unique in that the sensor wiring and connectors are dedicated, i.e., are isolated from other circuits to avoid possible
mis-pinning and loss of circuit terminals. All sensor and squib circuit terminals are gold plated, soldered in place, and installed in sealed connectors to
insure years of reliability.
The repair procedures specified in this section are required when repairing airbag system circuits. If the repairs specified in this section cannot be
performed due to environmental constraints, the entire wiring assembly must be replaced.
All terminals used in the repairs of airbag system circuitry are gold plated to prevent corrosion and voltage drop. You must not substitute any other
terminal, and must use the correct part as specified in the parts book.
NOTE:
THE ELECTRICAL CONNECTION BETWEEN THE CLOCKSPRING AND INSTRUMENT PANEL WIRE HARNESS, AT THE BASE
OF THE STEERING COLUMN, MUST BE DISCONNECTED BEFORE ANY WIRE HARNESS REPAIR PROCEDURES ARE
ATTEMPTED.
WARNING:
BEFORE BEGINNING ANY AIRBAG SYSTEM INSTALLATION OR REMOVAL PROCEDURES, REMOVE AND ISOLATE THE
NEGATIVE (-) BATTERY CABLE (GROUND) FROM THE VEHICLE BATTERY.
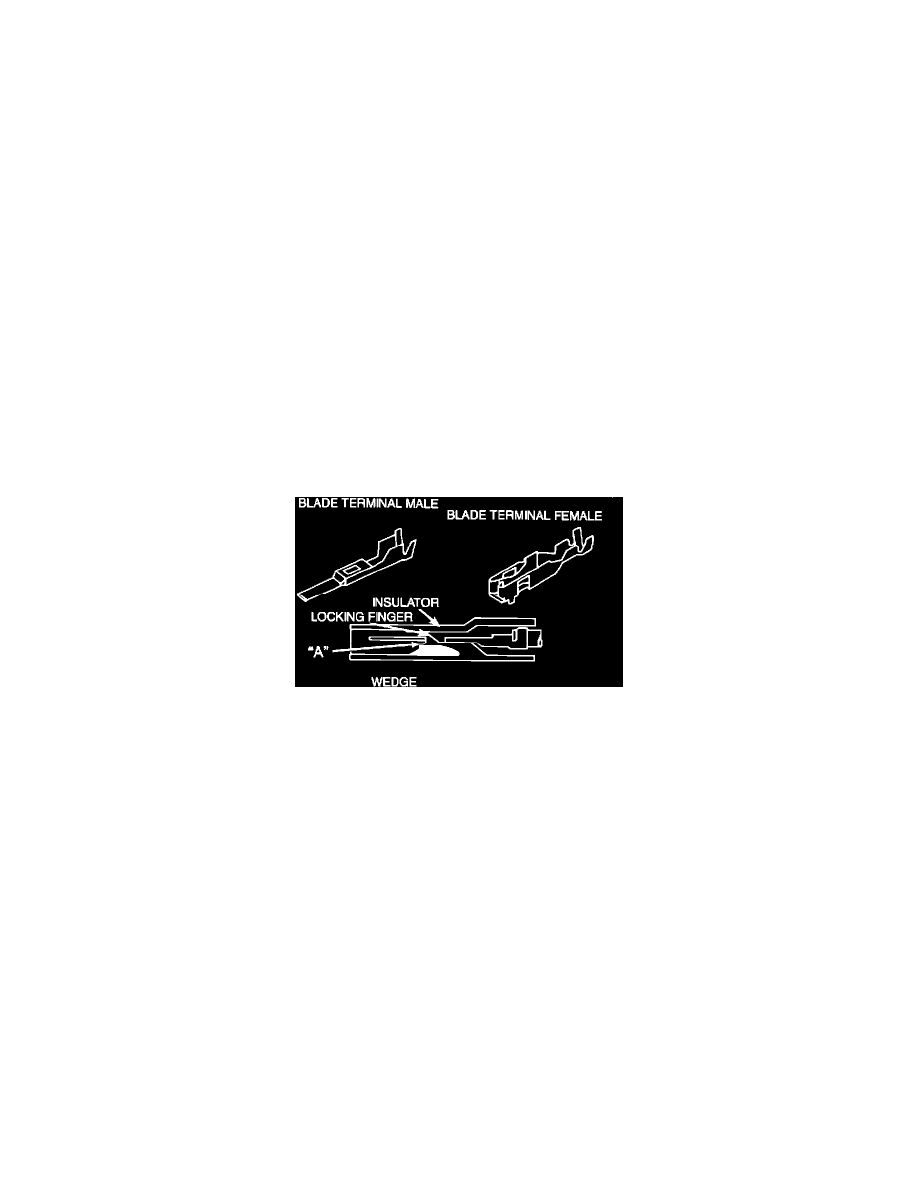
TYPICAL BLADE TERMINAL
Removal and Installation of Terminals
First remove the terminal wedge lock. Insert a tool (i.e. screwdriver) at "A" (shown in the sketch) and gently pry the plastic locking finger down away
from the terminal. Pull gently on the wire until the terminal is released.
To install the new terminal, push the terminal into its cavity until an audible "click" is heard. Pull the wire lightly but firmly to insure that the terminal is
properly hooked. Reinstall the terminal wedge lock.
NOTE:
THIS PROCEDURE APPLIES TO BOTH MALE AND FEMALE TERMINAL.
Pin Information
SEALED PIN TERMINAL