
Lebaron Landau L4-153 2.5L SOHC Turbo VIN J FI (1990)
4.
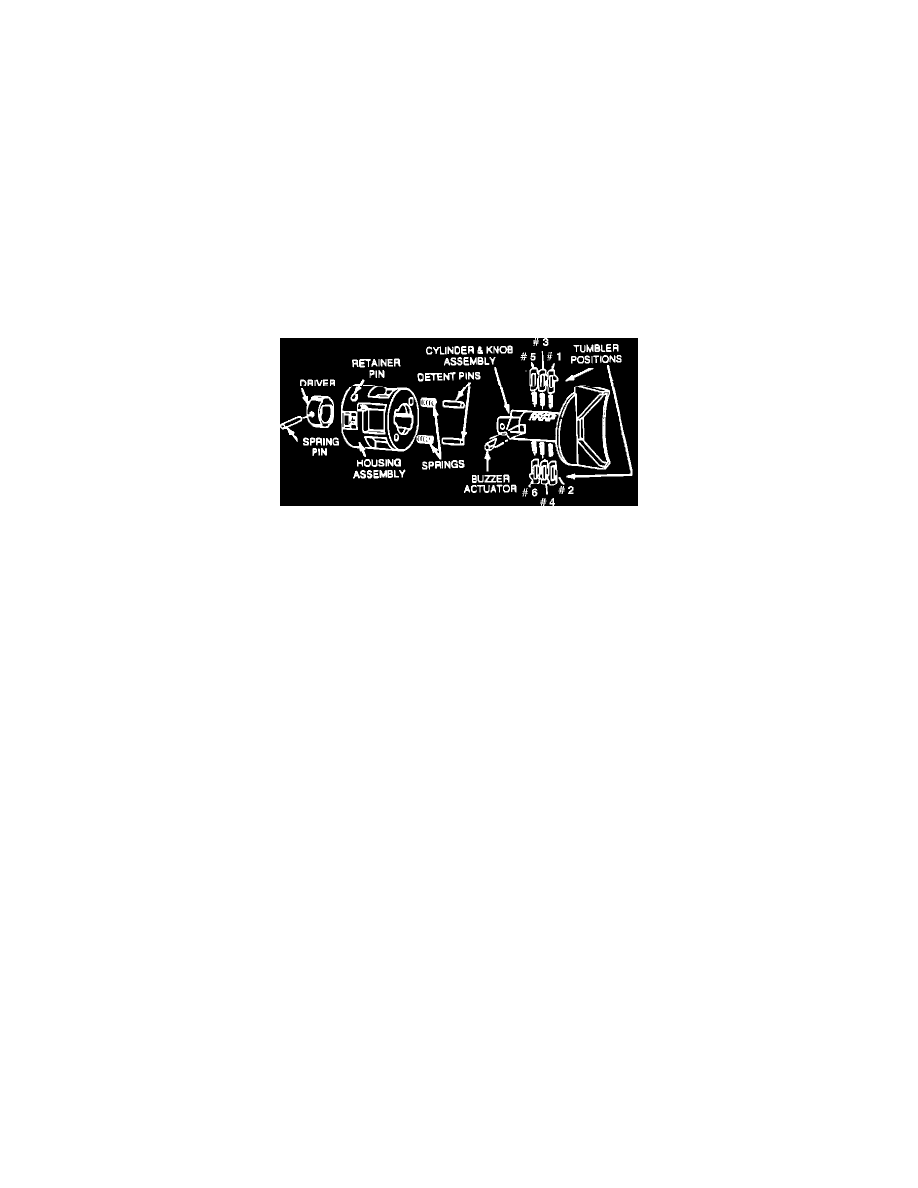
Depress the retaining pin on the ignition lock cylinder housing through the small opening in the collar until flush with lock. The lock cylinder will
spring out approximately 1/8".
5.
Without pushing the lock cylinder in, return the cylinder to the lock position and remove the key.
6.
Push lock cylinder in toward column, then release. The cylinder and housing assembly will then slide out.
Note:
A small number of the vehicles involved in this action may have already been corrected (spring pin installed to retain driver to
cylinder -- see illustration, page 3). If the vehicle being serviced already has the driver retained with a spring pin, no further cylinder
service is required. Proceed to the Ignition Lock Cylinder Installation procedure to reinstall the original lock cylinder assembly.
If no spring pin is present, proceed as follows.
7.
Read and record the G-series key code stamped on the lock cylinder housing.
8.
Set aside old ignition lock cylinder assembly for parts return.
Service Procedure (Continued)
Lock Cylinder Coding
1.
Cross reference the recorded G-series key code to the six digit ignition code provided on the code guide, included in the parts package.
2.
From the parts package, select six tumblers stamped with numbers that correspond to the digits of the ignition code. (Additional tumblers are
provided with this letter for use if needed.)
Insert a small spring from the parts package in the first round opening in the ignition lock cylinder closest to the head of the key (position # 1 in
the illustration).
Insert a tumbler with the same number as the first digit of the ignition code in the slot beside the spring. The tab on the side of the tumbler must be
over the spring.
Tap the tumbler into place with a small hammer.
Install the other small springs and tumblers similarly in positions # 2 through # 6 (see illustration). The numbers on these tumblers must match the
2nd through 6th digits of the ignition code, respectively.
3.
Insert key. (All tumblers must be flush with cylinder.)
4.
Install buzzer actuator in square hole in cylinder with the two ramped surfaces facing down and toward chrome knob (see illustration).
5.
Insert the two (2) detent springs and pins into the lock housing (see illustration).
6.
Install the lock cylinder into the housing. Install the new driver on to the lock cylinder lining up the holes for the spring pin. Drive the spring pin
into the driver, approximately 2 mm into the V" in the driver to ensure proper retention.
Service Procedure (Continued)
Ignition Lock Cylinder Installation:
1.
With key removed and the retaining pin on housing tapped down flush with case, slip lock cylinder and housing assembly into column.
2.
Insert key and turn to start position, as far as it will go. Ignition cylinder should now turn freely from accessory to start position.
3.
Reinstall upper and lower steering column shrouds and (as applicable) the tilt lever.