
Town & Country LWB FWD V6-3.8L VIN L (1999)
12.
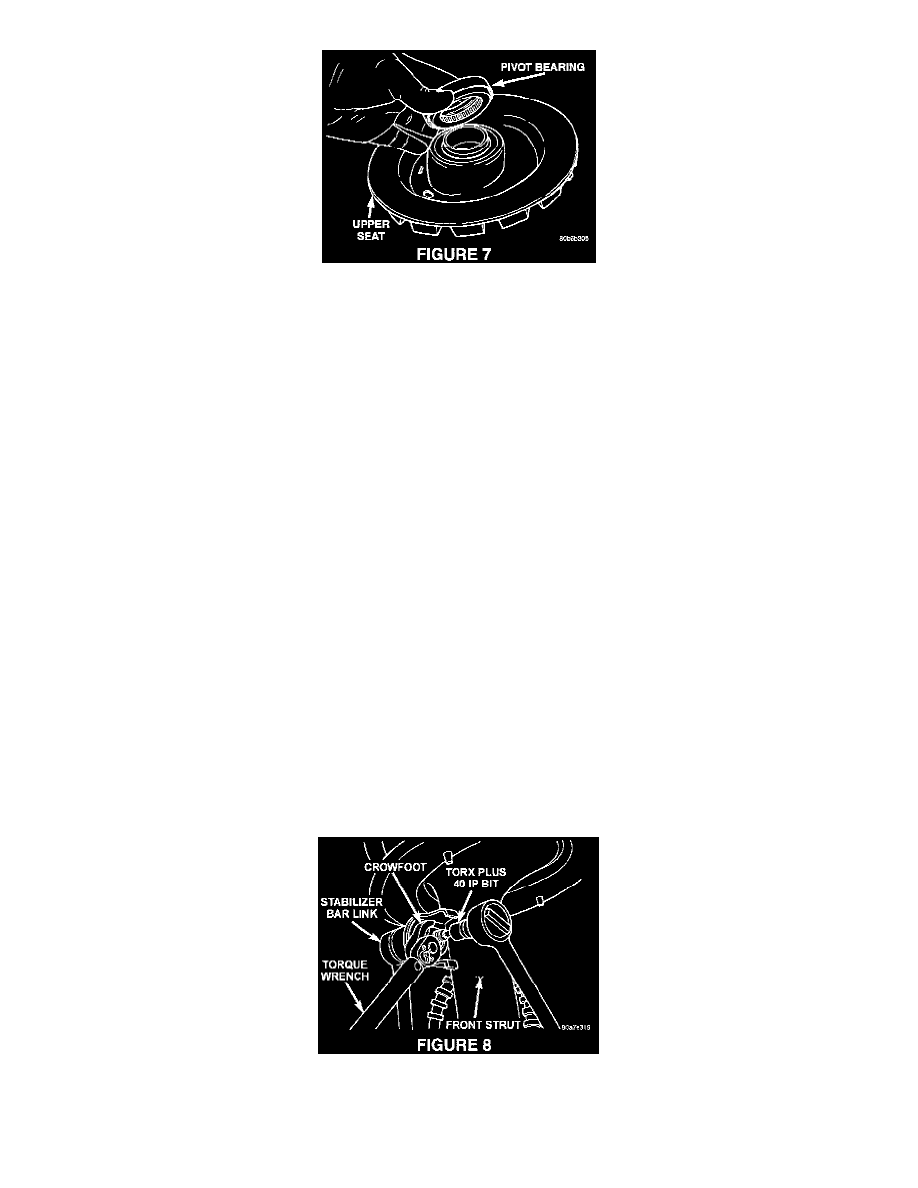
Install the new pivot bearing on the top of the upper spring seat. The bearing must be installed on upper seat with the smaller diameter side of the
pivot bearing toward the spring seat (Figure 7). Be sure the pivot bearing is sitting flat on the spring seat once mounted.
13.
Install the upper mount over the strut shaft and onto the top of the pivot bearing and upper seat (Figure 6). Loosely install the retaining nut on the
strut shaft.
14.
Install Strut Nut Socket (on the end of a torque wrench), Special Tool 6864, on the strut shaft retaining nut. Next, install a 10 mm socket on the
hex on the end of the strut shaft. While holding the strut shaft from turning, tighten the strut shaft retaining nut to a torque of 94 Nm (70 ft. lbs.).
15.
Slowly release the tension from the coil spring by backing off the spring compressor drive fully. As the tension is relieved, make sure the upper
mount, pivot bearing and upper seat align properly. Remove the clamp from the lower end of the coil spring and strut. Push back the spring
compressor upper and lower hooks, then remove the strut assembly from the spring compressor.
16.
Install strut assembly into strut tower, aligning and installing the 3 studs on the upper strut mount into the holes in strut tower. Install the 3 upper
strut mount attaching nut/washer assemblies. Then using a crow foot, tighten the 3 attaching nuts to a torque of 28 Nm (250 in. lbs.).
CAUTION:
THE STEERING KNUCKLE TO STRUT ASSEMBLY ATTACHING BOLTS ARE SERRATED AND MUST NOT BE TURNED DURING
INSTALLATION. INSTALL NUTS WHILE HOLDING BOLTS STATIONARY IN THE STEERING KNUCKLES.
17.
Align strut assembly with steering knuckle. Position arm of steering knuckle into strut assembly clevis bracket. Align the strut assembly clevis
bracket mounting holes with the steering knuckle mounting holes. Install the 2 strut assembly to steering knuckle attaching bolts (Figure 3).
NOTE:
IF STRUT ASSEMBLY IS ATTACHED TO STEERING KNUCKLE USING A CAM BOLT, THE CAM BOLT MUST BE INSTALLED IN THE
LOWER SLOTTED HOLE ON THE STRUT CLEVIS BRACKET. ALSO, ATTACHING BOLTS SHOULD BE INSTALLED WITH THE NUTS
FACING THE FRONT OF THE VEHICLE.
18.
Tighten the strut assembly to steering knuckle attaching bolts to a torque of 88 Nm (65 ft. lbs.) plus an additional 1/4 turn after specified torque is
met.
19.
Install stabilizer bar attaching link on bracket of strut assembly. Install stabilizer bar attaching link to strut bracket attaching nut.
NOTE:
WHEN TORQUING NUT ON STUD OF STABILIZER BAR ATTACHING LINK, DO NOT ALLOW STUD TO ROTATE. HOLD STUD
FROM ROTATING BY INSERTING A TORX PLUS 40 IP BIT IN THE END OF THE STUD (FIGURE 8).