
600 L4-135 2.2L SOHC (1983)
Balance Shaft: Adjustments
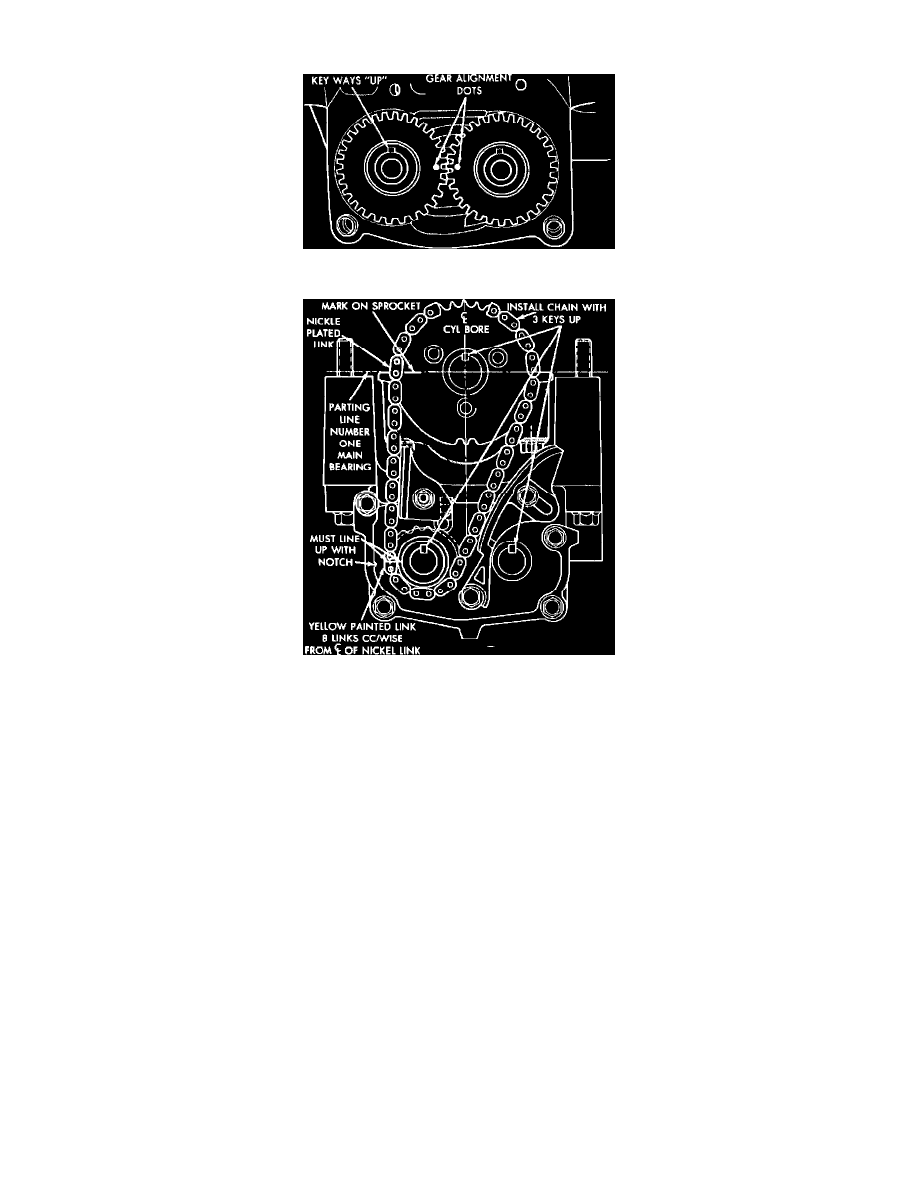
Fig. 24 Setting gear timing
Fig. 25 Setting balance shaft timing
1.
With balance shafts installed in carrier, position carrier on crankshaft and install six attaching bolts, torquing to 40 ft. lbs.
2.
Rotate balance shafts until both shaft keyways are parallel to vertical centerline of engine, then install short hub drive gear on sprocket driven
shaft. After installation, gear and balance shaft keyways must face up with gear timing marks meshed as shown, Fig. 24.
3.
Install gear cover and torque double ended stud/washer fastener to 105 inch lbs.
4.
Install crankshaft sprocket and torque socket head torx screws to 130 inch lbs.
5.
Rotate crankshaft until number one cylinder is at top dead center (TDC). The timing marks on chain sprocket should line up with parting line on
left side of number one main bearing cap, Fig. 25.
6.
Place chain over crankshaft sprocket so that nickel plated link of chain is over timing mark on crankshaft sprocket, Fig. 25.
7.
Place balance shaft sprocket into timing chain so that timing mark on sprocket (yellow dot) mates with yellow painted link on chain.
8.
With balance shaft keyways at 12 o'clock, slide balance shaft sprocket onto nose of balance shaft. Balance shaft may have to be pushed in slightly
to allow for clearance. Balance shaft timing is correct if the timing mark on sprocket, painted link and arrow on side of gear cover are
aligned.
9.
If sprockets are timed correctly, install balance shaft bolts, torquing to 250 inch lbs. A wood block placed between crankcase and crankshaft
counterbalance will prevent gear rotation.