
Caravan L4-2.4L VIN B (2003)
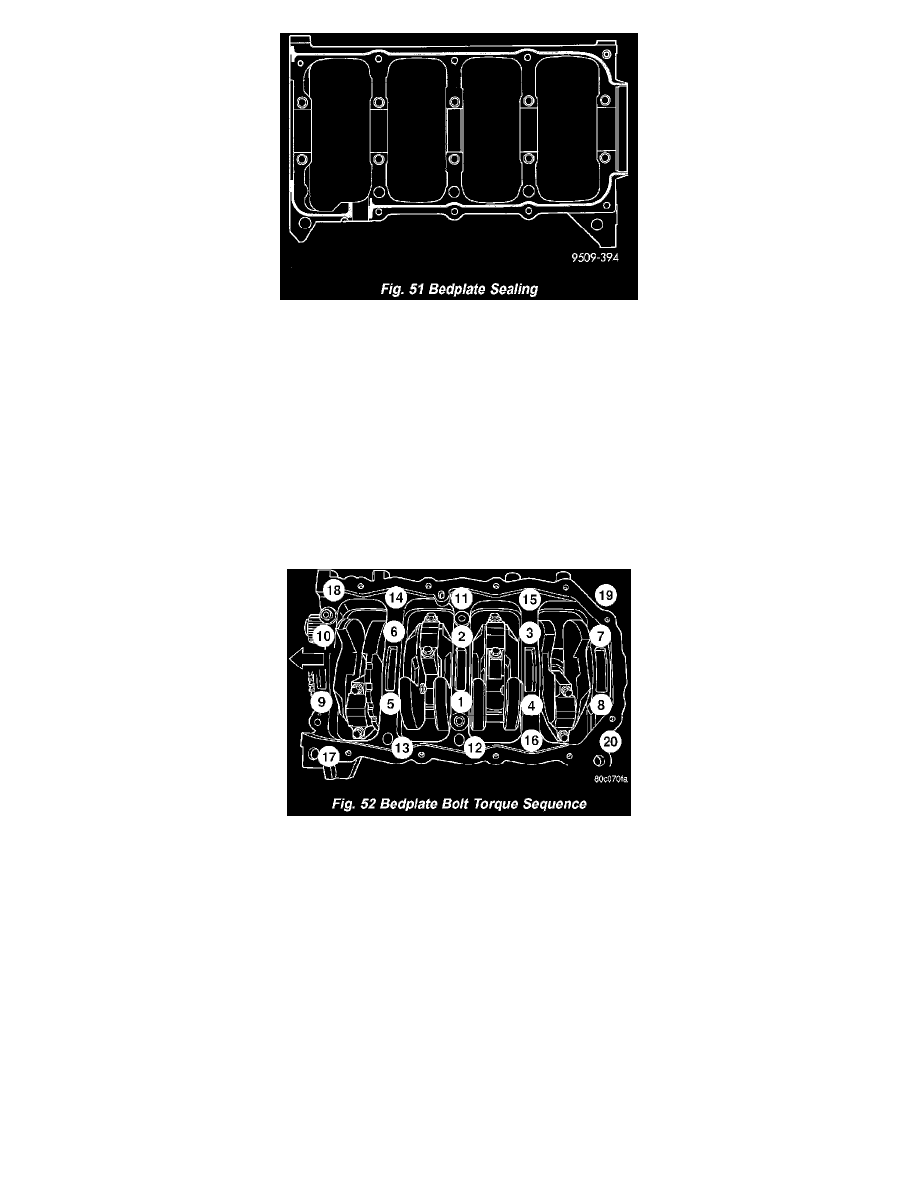
Fig.51
4. Apply 1.5 to 2.0 mm (0.059 to 0.078 in.) bead of Mopar Bed Plate Sealant to cylinder block as shown in (Fig. 51).
5. Install lower main bearings into main bearing cap/bedplate. Make certain the bearing tabs are seated into the bedplate slots. Install the main
bearing/bedplate into engine block.
6. Before installing the bolts the threads should be oiled with clean engine oil, wipe off any excess oil.
7. Install main bearing bedplate to engine block bolts 11, 17, and 20 finger tight. Tighten these bolts down together until the bedplate contacts the
cylinder block.
8. To ensure correct thrust bearing alignment, perform the following steps:
^
Step 1: Rotate crankshaft until number 4 piston is at TDC.
^
Step 2: Move crankshaft rearward to limits of travel.
^
Step 3: Then, move crankshaft forward to limits of travel.
^
Step 4: Wedge an appropriate tool between the rear of the cylinder block (NOT BED PLATE) and the rear crankshaft counterweight. This will
hold the crankshaft in its furthest forward position.
Fig.52
^
Step 5: Install and tighten bolts (1-10) in sequence shown in (Fig. 52) to 41 Nm (30 ft. lbs.).
^
Step 6: Remove wedge tool used to hold crankshaft.
9. Tighten bolts (1-10) again to 41 Nm (30 ft. lbs.) in sequence shown in (Fig. 52).
CAUTION: Do not use a torque wrench for the following step.
10. Turn bolts (1-10) an additional 1/4 turn in sequence shown in (Fig. 52).
11. Install main bearing bedplate to engine block bolts (11-20), and torque each bolt to 28 Nm (250 in. lbs.) in sequence shown in (Fig. 52).
12. Tighten bolts (11-20) again to 28 Nm (250 in. lbs.) in sequence shown in (Fig. 52).
13. After the main bearing bedplate is installed, check the crankshaft turning torque. The turning torque should not exceed 5.6 Nm (50 in. lbs.).
14. Install connecting rod bearings and caps. Do Not Reuse Connecting Rod Bolts. Torque connecting rod bolts to 27 Nm (20 ft. lbs.) plus 1/4 turn.
15. Install balance shafts and housing assembly.
16. Install the oil pump.
17. Install cylinder head if it was removed.
18. Install the timing belt rear cover.