Caravan V6-181 3.0L SOHC VIN 3 FI (1987)

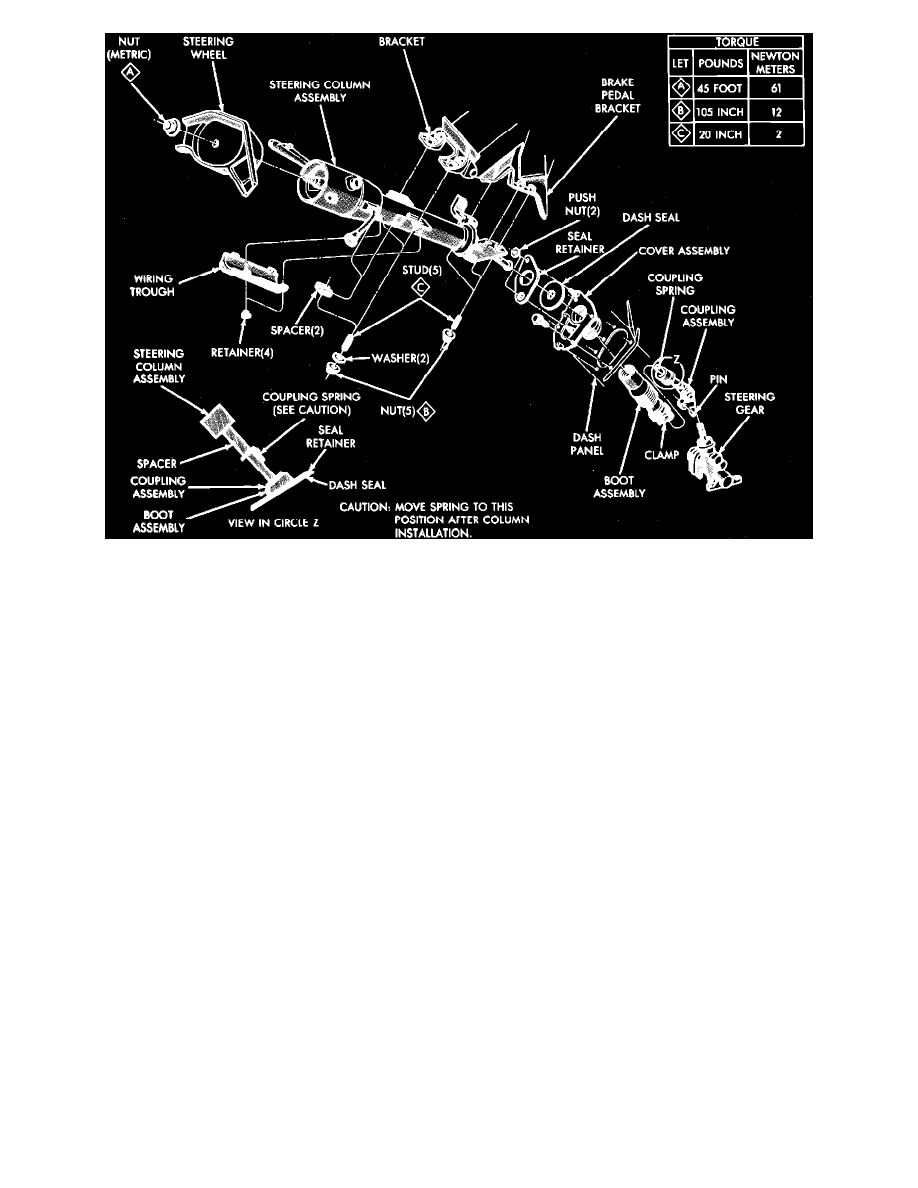
Fig. 7 Steering column installation. 1985---87 front wheel drive Mini-Vans/Wagons
FRONT WHEEL DRIVE MINI-VANS/WAGONS
Removal
1. Disconnect battery ground cable.
2. On vehicles with column shift, disconnect cable rod by prying out of grommet in shift lever, then remove cable clip and disconnect cable from
lower bracket. A new grommet should be used when rod is disconnected from lever.
3. Disconnect electrical connectors from column jacket.
4. Remove steering wheel center pad assembly, then disconnect horn wire(s) and remove horn switch, if used.
5. Remove steering wheel using a suitable puller. Do not attempt to remove steering wheel using a hammer as damage to the steering column
and shaft will result.
6. Remove instrument panel steering column cover and lower reinforcement, then disconnect bezel.
7. Remove indicator setscrew and gearshift indicator from shift housing.
8. Remove steering column support to instrument panel support nuts and lower the support bracket. Do not remove roll pin to remove steering
column assembly.
9. Grasp steering column assembly and pull rearward to disconnect lower stub shaft from steering gear coupling. If vehicle is equipped with speed
control and manual transmission, use care to avoid damaging clutch pedal speed control switch.
10. Reinstall anti-rattle coupling spring completely into lower coupling tube, making sure anti-rattle spring snaps into coupling slot.
11. Remove steering column.
Installation
1. Insert steering column through opening, then align lower stub shaft with lower coupling and insert stub shaft.
2. Raise column into place over the five studs, then install but do not tighten the five stud nuts. Use washers on the breakaway capsules.
3. Pull column rearward and torque the five stud nuts to 105 inch lbs.
4. Using needle nose pliers, pull coupling spring up until spring touches universal joint flange.
5. Connect gearshift cable rod to shift lever by snapping rod into grommet with pliers, then adjust linkage. A new grommet should always be used
when rod is disconnected from lever.
6. Place steering wheel on shaft with master splines aligned, then on models with automatic transaxle, place damper assembly inside steering wheel.
Install retaining wheel retaining nut and torque to 45 ft. lbs. Do not drive onto shaft, use retaining nut to draw it down.
7. Install horn switch components and connect horn switch wire.
8. Connect electrical connectors at steering column jacket, then reconnect battery and check operation of lights and horn.
9. On vehicles with automatic transaxle, connect gearshift indicator pointer in its approximate original position, then slowly move gearshift lever
from Low position to Park position, pausing at each position. If necessary, align pointer correctly.
10. Install instrument panel steering column cover.
