
Charger V6-3.5L VIN G (2006)
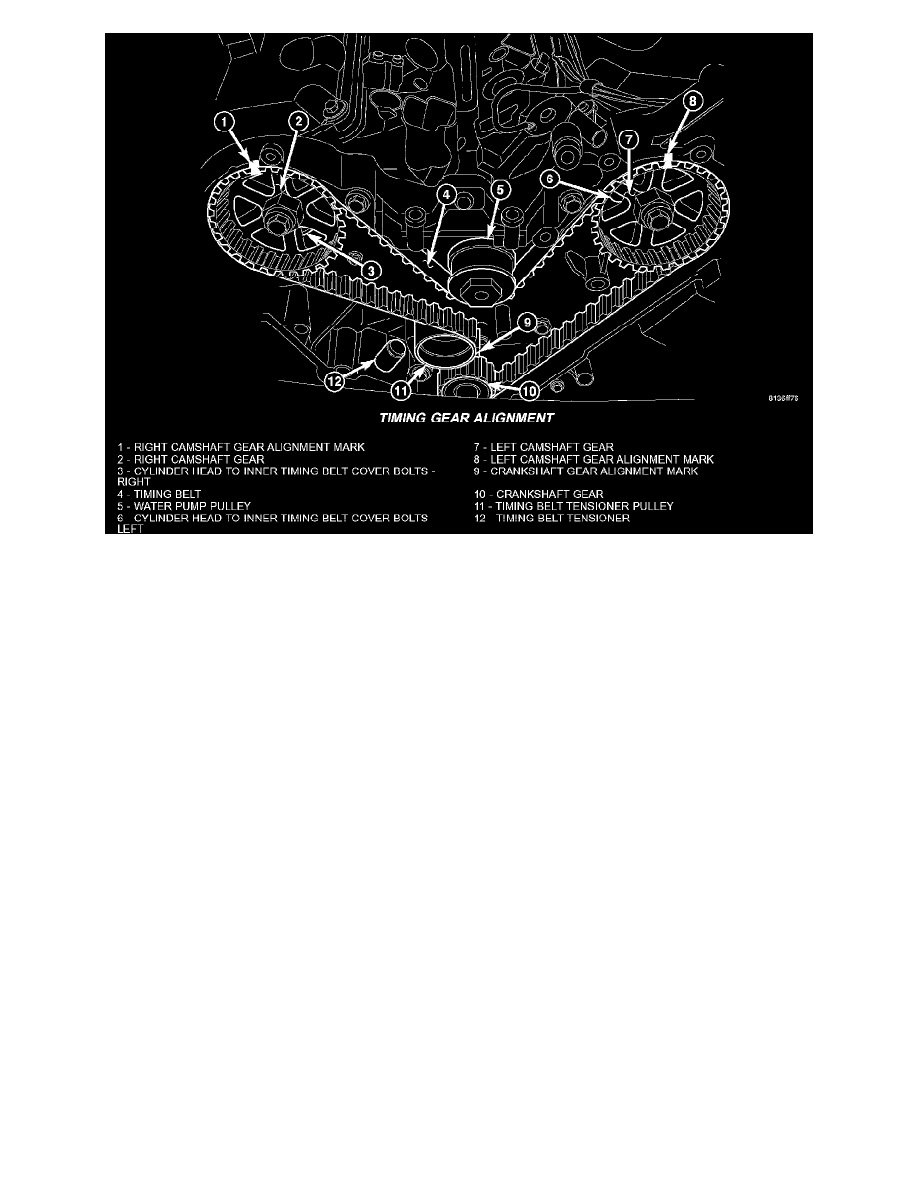
Timing Gear Alignment
CAUTION: If camshafts have moved from the timing marks, always rotate camshaft towards the direction nearest to the timing marks (DO NOT
TURN CAMSHAFTS A FULL REVOLUTION OR DAMAGE to valves and/or pistons could result).
1. Align the crankshaft sprocket (10) with the TDC mark (9) on oil pump cover.
2. Align the camshaft sprockets (2, 7) timing reference marks (1, 8) with the marks on the rear cover.
3. Install the timing belt starting at the crankshaft sprocket (10) going in a counterclockwise direction. Install the belt around the last sprocket.
Maintain tension on the belt as it is positioned around the tensioner pulley (11).
NOTE: If the camshaft gears have been removed it is only necessary to have the camshaft gear retaining bolts installed to a snug torque at this
time.
4. Holding the tensioner pulley (11) against the belt, install the tensioner into the housing and tighten to 28 Nm (250 inch lbs.). Each camshaft
sprocket mark should remain aligned the cover marks.
5. When tensioner is in place pull retaining pin to allow the tensioner to extend to the pulley bracket.
6. Rotate crankshaft sprocket 2 revolutions and check the timing marks on the camshafts and crankshaft. The marks should line up within their
respective locations. If marks do not line up, repeat procedure.
NOTE: If camshaft gears have been removed and timing is correct, counterhold and tighten the camshaft gears to final torque specification.
7. Install the front timing belt cover.
8. Tighten the rocker arm assemblies and install the cylinder head covers.
9. Connect negative battery cable.
CAMSHAFT SPROCKETS