
Charger V8-5.7L (2008)
enough to disengage the three spring clip retainers that secure the trim to the slots in the quarter inner panel behind the rear wheel house.
11. Move the back of the quarter trim panel away from the base of the upper D-pillar trim far enough to access and disconnect the body wire harness
connector from the back of the auxiliary power outlet, if equipped.
12. Using a trim stick or another suitable wide flat-bladed tool, carefully pry the quarter trim panel away from the base of the upper C-pillar trim far
enough to disengage the spring clip retainer that secures the trim to the slot in the quarter inner panel.
13. Lift the quarter trim panel up and over the outboard rear seat belt retractor on the top of the rear wheel house while feeding the loose belt webbing
and lower anchor through the retractor clearance hole in the top of the panel.
14. Remove the quarter trim panel from the vehicle through the liftgate opening.
Quarter Trim Panel - Installation
INSTALLATION
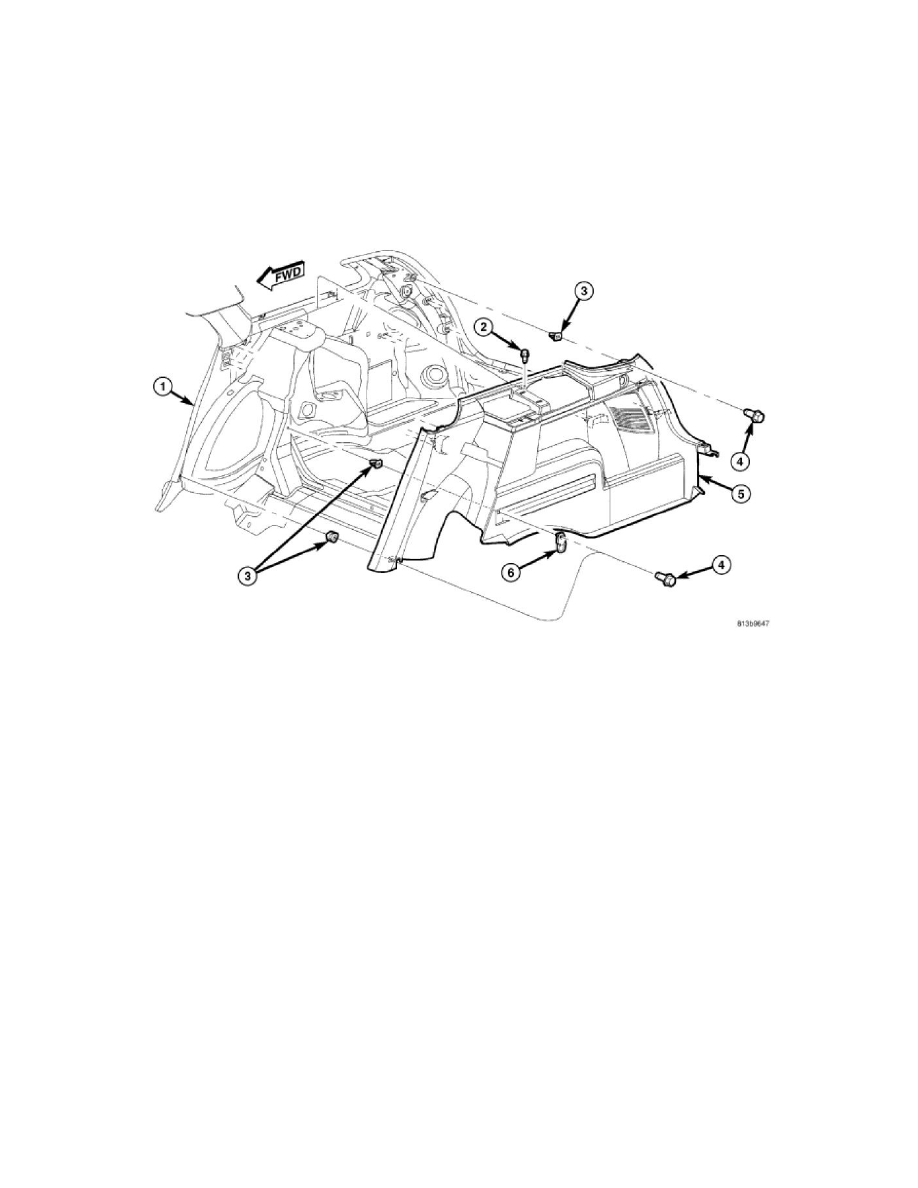
1. Check to be certain that the three spring nuts (3) are properly installed and in good condition on the quarter inner panel (1). Replace a spring nut if
any damage is evident.
2. Position the quarter trim panel (5) into the vehicle through the liftgate opening.
3. Lift the quarter trim panel up and over the outboard rear seat belt retractor on the top of the rear wheel house while pulling the loose belt webbing
and lower anchor through the retractor clearance hole in the top of the panel.
4. Align the spring clip retainer on the back of the quarter trim panel with the slot in the quarter inner panel at the base of the upper C-pillar trim.
5. Using hand pressure, press firmly and evenly on the trim over the spring clip location until the retainer snaps into place.
6. Move the rear of the quarter trim panel away from the base of the upper D-pillar trim far enough to access and reconnect the body wire harness
connector to the back of the auxiliary power outlet, if equipped.
7. Align the three spring clip retainers on the back of the quarter trim panel with the slots in the quarter inner panel behind the rear wheel house.
8. Using hand pressure, press firmly and evenly on the trim over the spring clip locations until the retainers snap into place.
9. Position the rear extension of the quarter trim panel onto the top of the liftgate opening lower panel with the extension sequenced under the end of
the liftgate scuff plate.
10. Install and tighten the three screws (4) that secure the tie-down loop (6) and the quarter trim panel to the quarter inner panel. Tighten the screws to
11 Nm (8 ft. lbs.).
11. Install and tighten the screw that secures the tie-down loop, the liftgate scuff plate and the rear extension of the quarter trim panel to the top of the
liftgate opening lower panel. Tighten the screw to 11 Nm (8 ft. lbs.).
12. Install and tighten the two screws (2) that secure the quarter trim panel to the speaker bracket above the rear wheel house. Tighten the screws to 11
Nm (8 ft. lbs.).
13. Reinstall the speaker bezel onto the quarter trim panel. See: Quarter Panel Trim/Quarter Trim Speaker Bezel - Installation.
14. Reinstall the trim onto the upper D-pillar. See: Pillar Trim/D-Pillar Trim/Installation.
15. Install and tighten the screw that secures the outboard rear seat belt lower anchor to the quarter inner panel. Tighten the screw to 32 Nm (24 ft.
lbs.).
16. Reinstall the rear seat back side bolster onto the quarter inner panel. See: Seats/Seat Back/Service and Repair/Seat Back Cushion / Cover -
Installation.
17. Reinstall the rear seat cushion into the vehicle. See: Seats/Seat Cushion/Service and Repair/Seat Cushion / Cover - Installation.
Quarter Trim Speaker Bezel - Removal
REMOVAL