Colt L4-1410cc 1.4L SOHC (1984)

Timing Belt: Service and Repair
Installation
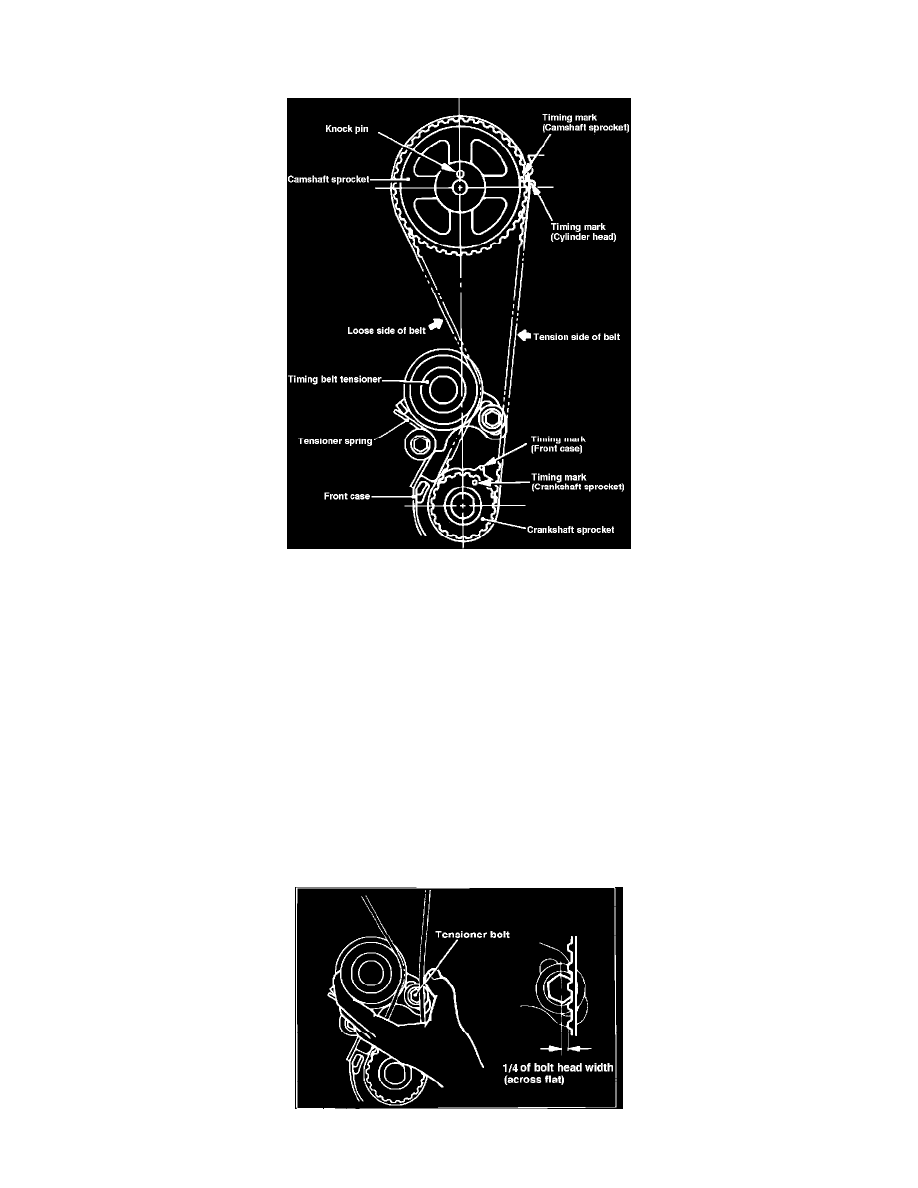
Fig. 38 Camshaft & crankshaft sprocket timing marks. 1400cc engine
1.
Install flange and crankshaft sprocket, then torque sprocket attaching bolt to 37 to 43 ft. lbs.
2.
Install camshaft sprocket then torque attaching bolt to 47 to 54 ft. lbs.
3.
Align camshaft sprocket and crankshaft sprocket timing marks, Fig. 38.
4.
Install timing belt tensioner, spring and spacer, then tighten tensioner bolts. Position lower end of tensioner spring against timing case flange.
5.
Loosen tensioner bolts and position tensioner toward water pump as far as possible.
6.
Install timing belt over crankshaft sprocket, then position belt over camshaft sprocket. Check to ensure that tension side of belt is tight by rotating
camshaft sprocket slightly in the reverse direction of rotation and noting that all timing marks are aligned.
7.
Install crankshaft pulley and pin, then insert attaching bolts and torque to 7.5 to 8.5 ft. lbs.
8.
Loosen tensioner mounting bolt, then the tensioner adjusting bolt. This will apply tension to loose side of belt. Check to ensure that timing belt is
properly positioned on sprockets.
9.
Tighten tensioner adjusting bolt, then the mounting bolt.
10.
Rotate crankshaft one revolution clockwise in direction of rotation, then align crankshaft and camshaft timing marks. Crankshaft should rotate
smoothly. Do not rotate crankshaft in the opposite direction of rotation.
11.
Loosen tensioner mounting bolt, then the tensioner adjusting bolt.
12.
Tighten tensioner adjusting bolt, then the tensioner mounting bolt. Torque bolts to 15-18 ft. lbs.
Fig. 39 Checking timing belt tension. 1400cc & 1500cc engines
