
D150 1/2 Ton Pickup 2WD L6-225 3.7L VIN W 2-bbl (1982)
Intake Manifold: Service and Repair
6-225 (3.7L)
Removal
1. Disconnect battery ground cable.
2. Disconnect air cleaner vacuum line from carburetor, then the flexible connector between air cleaner and carburetor air heater.
3. Disconnect air cleaner line breather cap, then remove air cleaner.
4. Disconnect distributor vacuum control line, crankcase ventilator valve hose and carburetor bowl vent line, if equipped.
5. Remove carburetor air heater.
6. Disconnect fuel line, automatic choke rod and throttle linkage from carburetor, then remove carburetor.
7. Disconnect exhaust pipe from exhaust manifold.
8. Remove manifold assembly to cylinder head attaching nuts and washers, then the manifold assembly.
9. Remove three intake manifold to exhaust manifold attaching screws, then separate manifolds.
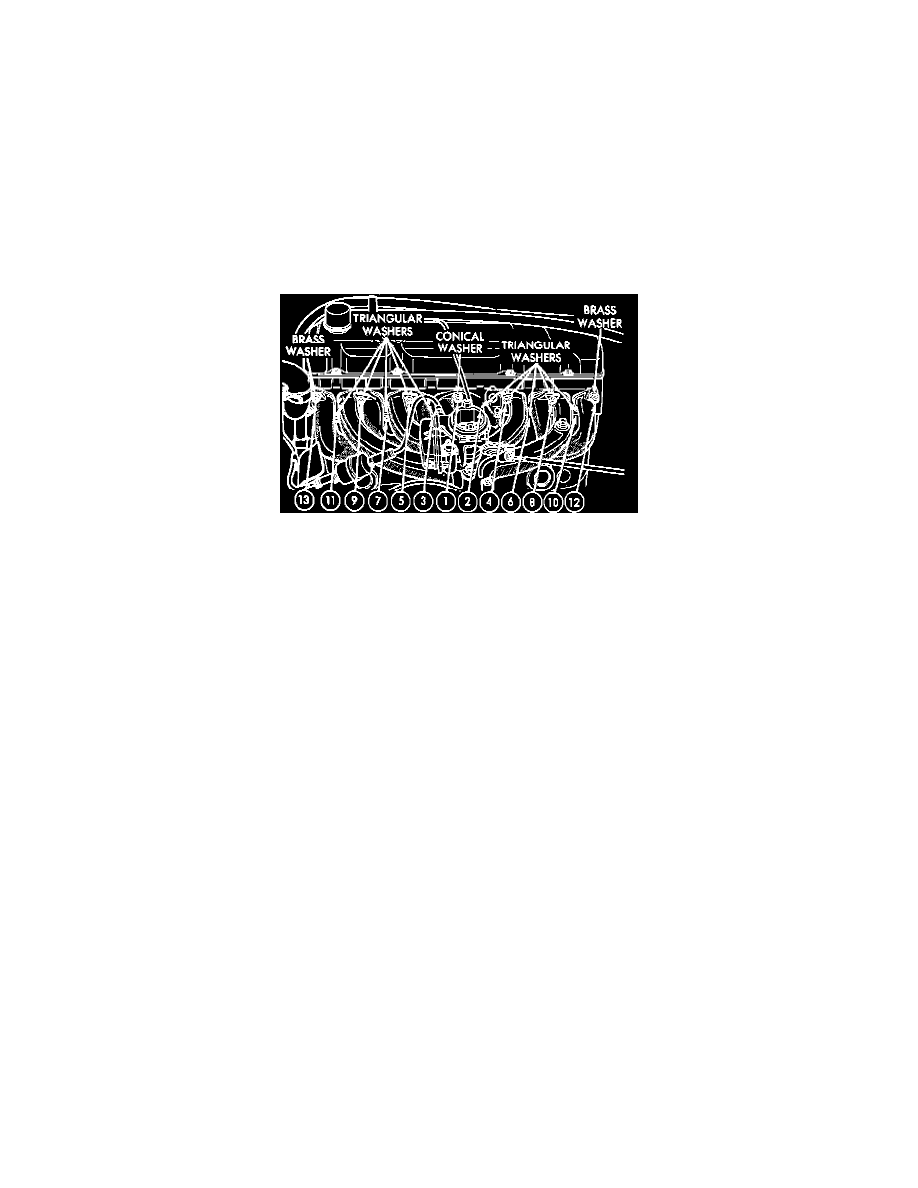
Fig. 1 Intake manifold tightening sequence. 6-225 (3.7L)
Installation
1. Install new gasket between the exhaust and intake manifolds, then the three long screws holding the manifolds together. Do not tighten the three
intake and exhaust manifold attaching screws at this point.
2. Install new manifold to cylinder head gasket. Coat both sides of gasket with suitable sealing compound.
3. Install manifold assembly then the washers as specified in Fig. 1. Install steel conical washer with cup side facing nut and brass washer with flat
side facing manifold. Ensure all washers spanning intake and exhaust flanges are flat and free from distortion.
4. Install nuts with cone side facing the washers, then torque all intake to exhaust manifold screws and manifold to cylinder head nuts to
approximately 10 inch lbs.
5. Torque inboard intake to exhaust manifold screw to specifications, then the outboard intake to exhaust manifold screws to specifications.
6. Repeat step 5 until all three manifold screws are torqued to specifications.
7. Torque manifold to cylinder head nuts to 120 inch lbs. in sequence shown in Fig. 1.
8. Attach exhaust pipe to manifold flange, using a new gasket, then torque stud nuts to 35 ft. lbs.
9. Install carburetor air heater, then the air injection tube, if equipped. Torque tube to 200 inch lbs.
10. Install carburetor and connect fuel line, automatic choke rod and throttle linkage.
11. Install distributor vacuum control line and carburetor bowl vent line.
12. Install air cleaner, then connect breather cap to air cleaner line.
13. Install air cleaner vacuum line to carburetor, then the flexible connector between air cleaner and carburetor air heater.