
Dakota 4WD V8-318 5.2L (1991)
5.
Insert two (2) or three (3) flat washer/spacers at each front screw (maximum combined thickness of 0.240" / 6 MM). Use the same number of
spacers at each front mounting screw (Figure 1).
6.
Insert and tighten front screws to seat frame.
7.
Secure all seat adjuster to seat frame screws and torque to 200 in.lbs.
8.
Check the floor mat or carpet clearance holes at the studs for the rear of seat attachment to floor. Use a trim hole cutter to expand the holes to 32
MM dia. (approx. 1-1/4 in.).
9.
Install the seat assembly in the vehicle by the following sequence.
A)
Position the seat assembly full forward on the adjusters.
B)
Set the seat assembly in the cab lining up the slotted holes in the rear adjuster supports with the studs in the floor.
C)
Carefully lower the front supports down over the front floor crossmember so as not to dislodge the clip-nuts in the front face of floor
crossmember.
D)
Loose assemble the nut and washer assemblies over the rear studs.
E)
Move the seat assembly to the full rear position.
F)
Loosely install the front screws into the clip nuts in the front floor crossmember.
CAUTION:
VISUALLY CHECK THAT THE SEAT ADJUSTERS ON THE LEFT & RIGHT OF THE SEAT (INBOARD VS. OUTBOARD) ARE
COMPLETELY LATCHED IN THE FULL REAR POSITION BEFORE SECURING ANY SEAT TO FLOOR FASTENERS.
G)
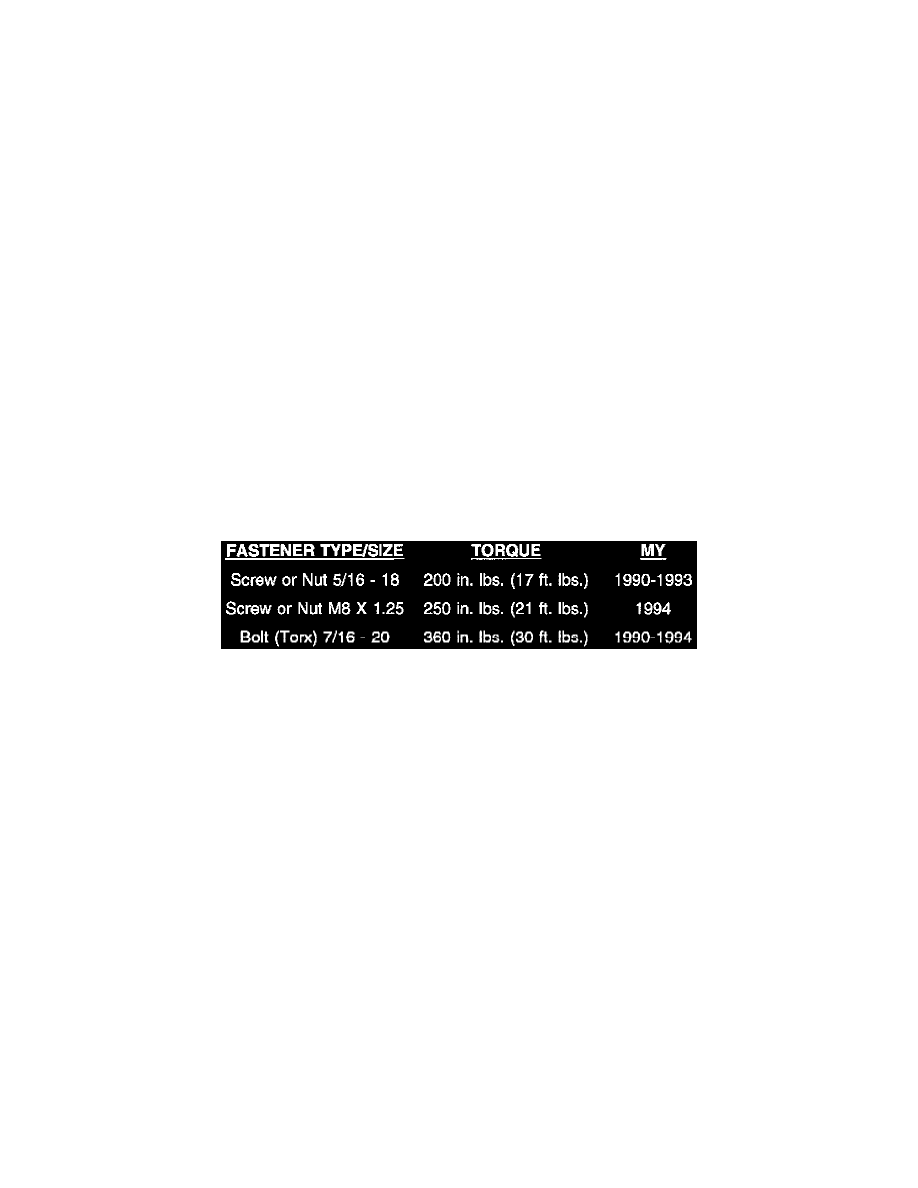
Secure front screws to torque specified by fastener type and year. Torque inboard first and then the outboards.
H)
Move the seat assembly full forward and then secure the rear nut and washer assemblies to specified torque listed above.
NOTE:
FOR THE DRIVER'S (60%) SIDE SPLIT BENCH SEAT, INSTALL THE INBOARD SEAT BELT AND BUCKLE ASSEMBLY FROM THE
TOP. RECONNECT THE WIRING HARNESS BEFORE SECURING THE SEAT BELT ANCHOR BOLT TO FLOOR.
10.
Install seat adjuster covers if used.
POLICY:
Reimbursable within the provisions of the warranty.
TIME ALLOWANCE:
Labor Operation No:
Install Spacer at Each Seat Adjuster Screw -
Bench Seat
23-13-35-96
0.6 Hrs.
Install Spacer at Each Seat Adjuster Screw
60/40 Bench or Bucket Left Side
23-13-35-97
0.4 Hrs.
Install Spacer at Each Seat Adjuster Screw
60/40 Bench or Bucket Right Side
23-13-35-98
0.4 Hrs.
FAILURE CODE: XX - Service Adjustment