
Durango 2WD V8-5.2L VIN Y (1999)
Air Bag Control Module: Service and Repair
WARNING:
-
THE AIRBAG CONTROL MODULE CONTAINS THE IMPACT SENSOR, WHICH ENABLES THE SYSTEM TO DEPLOY THE
AIR BAG. BEFORE ATTEMPTING TO DIAGNOSE OR SERVICE ANY AIR BAG SYSTEM OR RELATED STEERING WHEEL,
STEERING COLUMN, OR INSTRUMENT PANEL COMPONENTS YOU MUST FIRST DISCONNECT AND ISOLATE THE
BATTERY NEGATIVE (GROUND) CABLE. THEN WAIT TWO MINUTES FOR THE SYSTEM CAPACITOR TO DISCHARGE
BEFORE FURTHER SYSTEM SERVICE. THIS IS THE ONLY SURE WAY TO DISABLE THE AIR-BAG SYSTEM. FAILURE TO
DO THIS COULD RESULT IN ACCIDENTAL AIRBAG DEPLOYMENT AND POSSIBLE PERSONAL INJURY.
-
NEVER STRIKE OR KICK THE AIRBAG CONTROL MODULE, AS IT CAN DAMAGE THE IMPACT SENSOR OR AFFECT ITS
CALIBRATION. IF AN AIR BAG CONTROL MODULE IS ACCIDENTALLY DROPPED DURING SERVICE, THE MODULE
MUST BE SCRAPPED AND REPLACED WITH A NEW UNIT FAILURE TO OBSERVE THIS WARNING COULD RESULT IN
ACCIDENTAL, INCOMPLETE, OR IMPROPER AIRBAG DEPLOYMENT AND POSSIBLE OCCUPANT INJURIES.
REMOVAL
1. Disconnect and isolate the battery negative cable. If either of the airbags has not been deployed, wait two minutes for the system capacitor to
discharge before further service.
2. Remove the center support bracket from the instrument panel. Refer to Instrument Panel Center Support Bracket Replacement of Instrument Panel
Systems for the procedures.
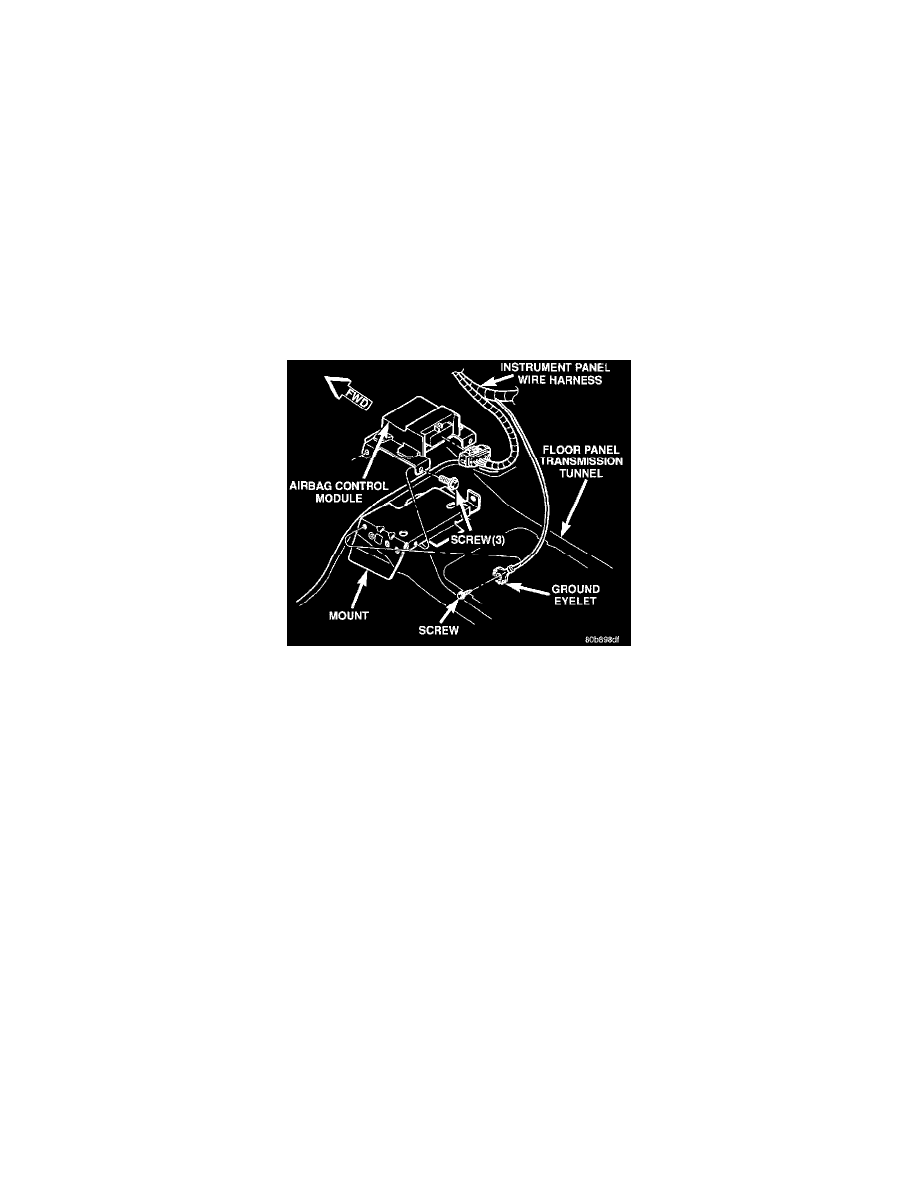
Airbag Control Module Remove/Install
3. Remove the screw that secures the instrument panel wire harness ground eyelet to the left side of the mount that is welded onto the floor panel
transmission tunnel.
4. Disconnect the instrument panel wire harness connector from the Airbag Control Module (ACM). To disconnect the instrument panel wire harness
connector from the ACM:
a. Slide the red Connector Position Assurance (CPA) lock on the top of the connector toward the side of the vehicle.
b. Depress the connector latch tab and pull the connector straight away from the ACM connector receptacle.
5. Remove the three screws that secure the ACM to the mount that is welded onto the floor panel transmission tunnel.
6. Remove the ACM from the mount on the floor panel transmission tunnel.
INSTALLATION
1. Carefully position the ACM to the mount that is welded onto the floor panel transmission tunnel. When the ACM is correctly positioned the arrow
on the ACM label will be pointed forward in the vehicle.
2. Install and tighten the three screws that secure the ACM to the mount that is welded onto the floor panel transmission tunnel. Tighten the screws to
11.8 Nm (105 in. lbs.).
3. Install and tighten the screw that secures the instrument panel wire harness ground eyelet to the left side of the mount that is welded onto the floor
panel transmission tunnel. Tighten the screw to 3.4 Nm (30 in. lbs.).
4. Reconnect the instrument panel wire harness connector to the ACM connector receptacle. Be certain that the connector latch and the red CPA lock
are fully engaged.
5. Do not reconnect the battery negative cable at this time. Refer to Airbag System in the Diagnosis and Testing for the proper procedures.