
Durango 2WD V8-5.2L VIN Y (1999)
Starter Motor: Service and Repair
REMOVAL
1. Disconnect and isolate the battery negative cable.
2. Raise and support the vehicle.
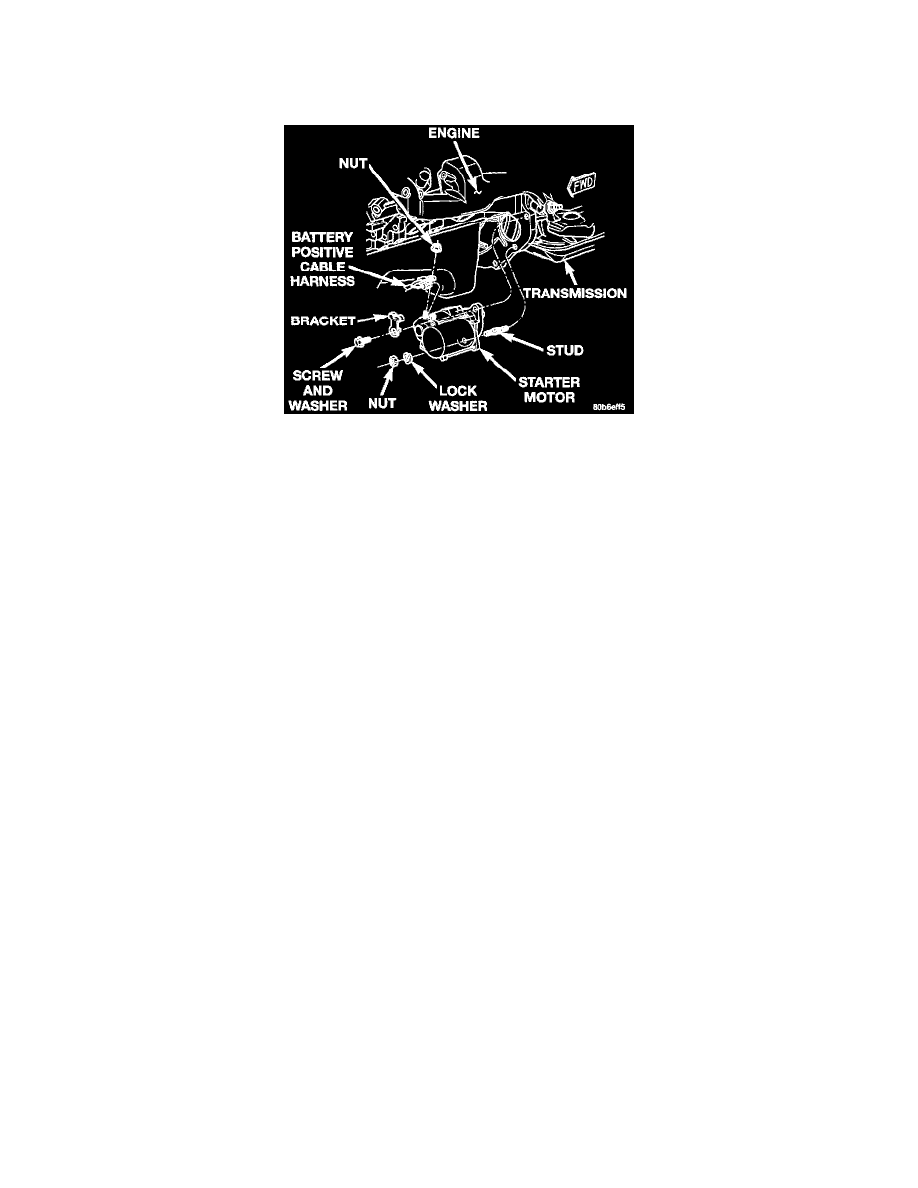
Starter Motor Remove/Install
3. Remove the nut and lock washer securing the starter motor to the mounting stud on the transmission torque converter housing.
4. While supporting the starter motor with one hand, use the other hand to remove the upper mounting screw from the starter motor.
5. Slide the automatic transmission cooler tube bracket forward on the tubes and off of the mounting stud far enough for the starter motor mounting
flange to be removed from the stud.
6. Move the starter motor towards the front of the vehicle far enough for the nose of the starter pinion housing to clear the transmission torque
converter housing. Always support the starter motor during this process, do not let the starter motor hang from the wire harness.
7. Tilt the nose downwards and lower the starter motor far enough to access and remove the nut that secures the battery positive cable connector
eyelet to the solenoid battery terminal stud. Always support the starter motor during this process, do not let the starter motor hang from the wire
harness.
8. Remove the battery positive cable connector eyelet from the solenoid battery terminal stud. Always support the starter motor during this process,
do not let the starter motor hang from the wire harness.
9. Disconnect the battery positive cable wire harness connector from the solenoid terminal connector receptacle. Always support the starter motor
during this process, do not let the starter motor hang from the wire harness.
10. Remove the starter motor from the engine compartment.
INSTALLATION
1. Position the starter motor in the engine compartment.
2. Reconnect the battery positive cable wire harness connector to the solenoid terminal connector receptacle. Always support the starter motor during
this process, do not let the starter motor hang from the wire harness.
3. Install the battery positive cable connector eyelet over the solenoid battery terminal stud. Always support the starter motor during this process, do
not let the starter motor hang from the wire harness.
4. Install and tighten the nut that secures the battery positive cable connector eyelet to the solenoid battery terminal stud. Tighten the nut to 13.6 Nm
(120 in. lbs.). Always support the starter motor during this process, do not let the starter motor hang from the wire harness.
5. Position the starter motor to the front of the transmission torque converter housing.
6. Slide the automatic transmission cooler tube bracket rearward on the tubes and onto the lower starter motor mounting stud.
7. Loosely install the screw that secures the upper starter motor mounting flange to the transmission torque converter housing.
8. Install the lock washer and loosely install the nut securing the starter motor to the lower mounting stud on the transmission torque converter
housing.
9. Tighten the upper starter motor mounting screw. Tighten the screw to 67.8 Nm (50 ft. lbs.).
10. Tighten the lower starter motor mounting nut. Tighten the nut to 67.8 Nm (50 ft. lbs.).
11. Lower the vehicle.
12. Reconnect the battery negative cable.