Durango 4WD V8-4.7L VIN P Flex Fuel (2007)

Body / Frame Mount Bushing: All Technical Service Bulletins
Drivetrain - Rear Axle Whine at 55 Plus MPH
NUMBER: 03-001-08
GROUP: Axle
DATE: March 14, 2008
SUBJECT:
Rear Axle Whine-Like Sound - Only At Vehicle Speeds Greater Than 55 MPH
OVERVIEW:
This bulletin involves the installation of a body/frame damper at the C-Pillar.
MODELS:
2004-2007
(HB/HG)
Durango/Aspen
SYMPTOM/CONDITION:
While driving, the customer may experience an axle whine-like sound coming from the rear of the vehicle (rear axle). The specific axle whine-like sound
will occur when the rear axle is fully warm and only at vehicle speeds that are greater than 88 Km/h (55 MPH). The rear axle whine-like sound will occur
more frequently during light acceleration (drive side), or while maintaining vehicle speed (off throttle / coast) driving maneuvers.
This condition may be due to the axle sound being transmitted into the vehicle body through the C-Pillar body/frame mount.
DIAGNOSIS:
If the above condition is present perform the Repair Procedure.
NOTE:
The Repair Procedure will REDUCE the axle whine-like sound intensity, and only if the condition occurs when the axle is fully warm and at speeds
GREATER THAN 88 km/h (55 MPH).
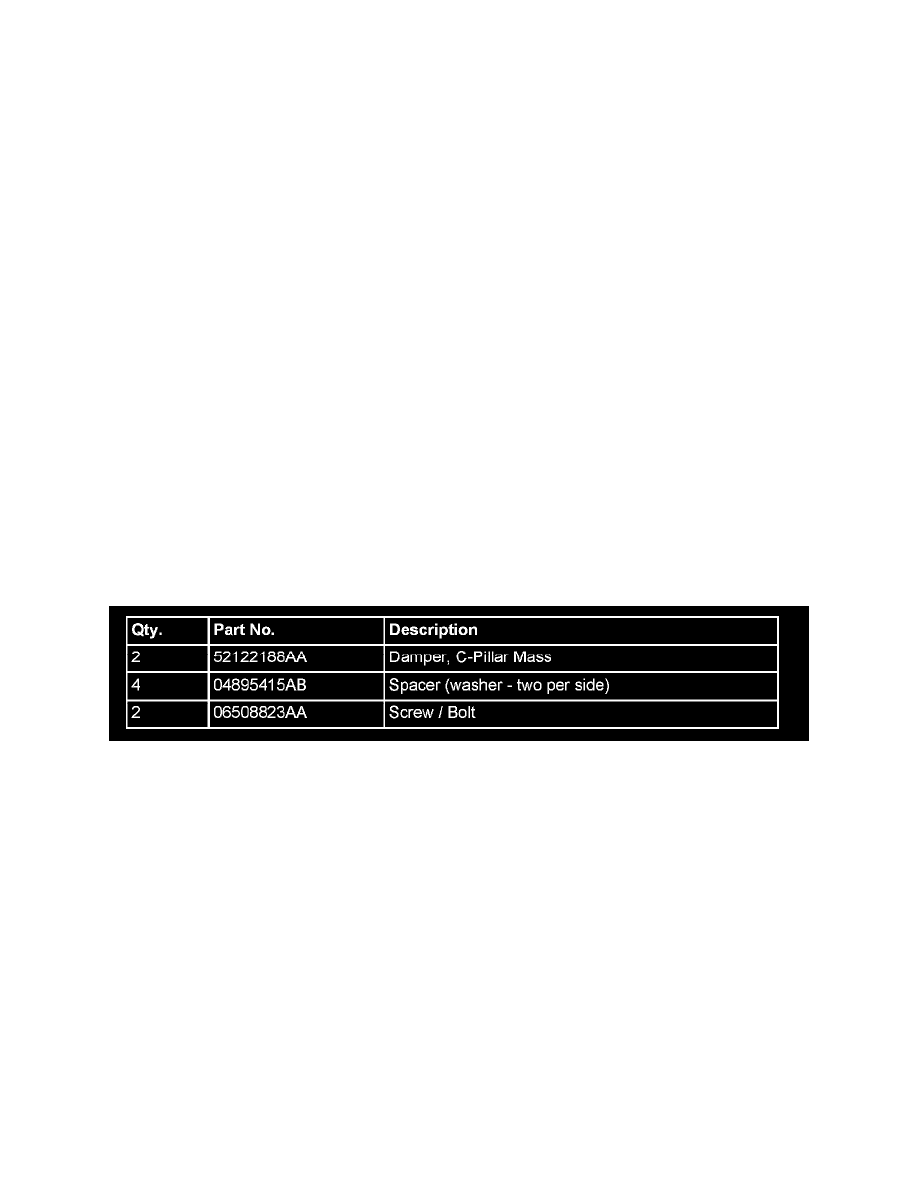
PARTS REQUIRED:
REPAIR PROCEDURE:
1.
Raise the vehicle on a suitable lift.
2.
In front of the left rear wheel, locate the left side C-Pillar body mount consisting of: the upper body-to-frame isolator and the lower rebound
isolator.
3.
Leaving the original upper and lower C-Pillar body mount isolators in place (these isolators will not be replaced), remove and discard the C-Pillar
body mount isolator fastener (bolt).
4.
With the original lower rebound isolator held in its correct position on the vehicle, install the new damper parts in the following order:
a.
Place the two spacers (washers) against the lower side of the lower rebound isolator.
b.
Place the mass damper (oriented correctly) against the spacers. The recessed side of the donut shaped damper will face towards the ground
and towards the head of new fastener (bolt head).
c.
Place the new longer fastener (bolt) through the mass damper, both spacers, lower rebound isolator, vehicle frame, upper body-to-frame
isolator, and into the body.
5.
Verify at all components are installed correctly. If installed correctly the new mount component order should be from top to bottom: the vehicle
