
Dynasty L4-153 2.5L SOHC VIN K TBI (1992)
Steering Wheel: Service and Repair
Models W/Airbag
WARNING: Airbag must be disabled before servicing steering wheel as accidental deployment of the airbag may cause damage or personal
injury. Refer to Air Bags and Seat Belts/Air Bags (Supplemental Restraint Systems)/Service and Repair.
NOTE: Removal and installation of steering wheel requires use of DRB II readout tool for air bag system check. Perform system check before
connecting battery ground cable.
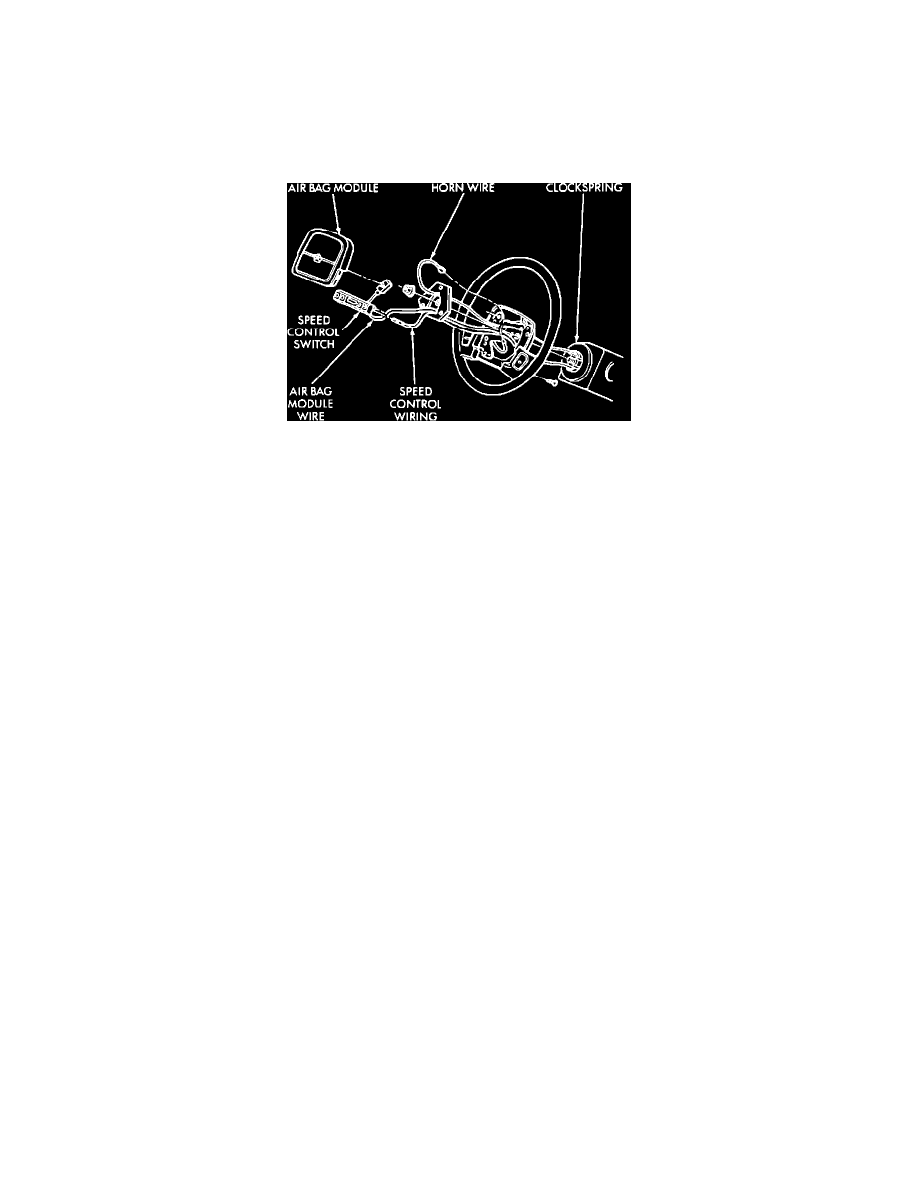
Fig. 19 Steering Wheel Components. Models w/Air Bag
REMOVAL
1. Disconnect battery ground cable.
2. Ensure wheels are in straight ahead position and column is locked in place.
3. Using a 10 mm thin wall socket, remove four nuts attaching air bag module from back side of steering wheel.
4. Lift air bag module, then disconnect electrical connector by spreading apart external latching arms and prying up on connector.
5. Remove speed control switch, if equipped.
6. If equipped, remove Clockspring setscrew from storage location on steering wheel, then install screw in Clockspring to maintain Clockspring
position. Screw is on a plastic tether.
NOTE: There are two types of clocksprings used. One with a setscrew and one with an automatic lock, which engages when steering wheel is
removed. Automatic locking clocksprings can be identified by lack of setscrew and tether strap.
7. Remove steering wheel retaining nut.
8. Remove damper assembly, if equipped.
9. Remove steering wheel using puller tool No. C3428B or equivalent.
INSTALLATION
NOTE: Removal and installation of steering wheel requires use of DRB II readout tool for air bag system check. Perform system check before
connecting battery ground cable.
1. Ensure Clockspring is properly positioned.
2. Install steering wheel and damper, if equipped.
3. Pull air bag and speed control wiring through the lower, larger hole in steering wheel; and horn wire through smaller hole at top of steering wheel.
CAUTION: Use care not to pinch wires.
4. Install steering wheel retaining nut and torque to 45 lb-ft.
5. Move Clockspring setscrew to steering wheel storage location, if equipped.
6. Install speed control switch, if equipped.
7. Connect Clockspring wiring connector to air bag module.
NOTE: To ensure complete connection, latching arms must be visibly on top of connector housing.
8. Install four air bag module attaching nuts and torque to 80-100 inch. lbs.
9. NOTE: Before connecting battery ground cable, perform air bag system check as follows:
a. Connect DRB II readout tool to air bag system diagnostic module (ASDM) diagnostic 6-way connector, located at right side of console.
b. From passenger side of vehicle, turn ignition key to On position. Exit vehicle with DRB II.
c. Ensure no one is inside vehicle, then connect negative battery cable.
d. Using DRB II, read and record active fault data.
e. Read and record any stored faults.
f.
If any faults are present, refer to Air Bags and Seat Belts/Air Bags (Supplemental Restraint Systems), AIR BAG section.
g. Erase stored faults if no active fault codes are present.
h. With ignition key in On position ensure no one is inside vehicle.
i.
From passenger side of vehicle, turn ignition key to Off then On position and observe instrument panel air bag warning light. Light should go