
Dynasty L4-153 2.5L SOHC VIN K TBI (1992)
9. Place a large screwdriver to each side of the ring gear and lift. Check the dial indicator for the amount of end play.
CAUTION: Do not damage the transaxle case and/or differential retainer sealing surface.
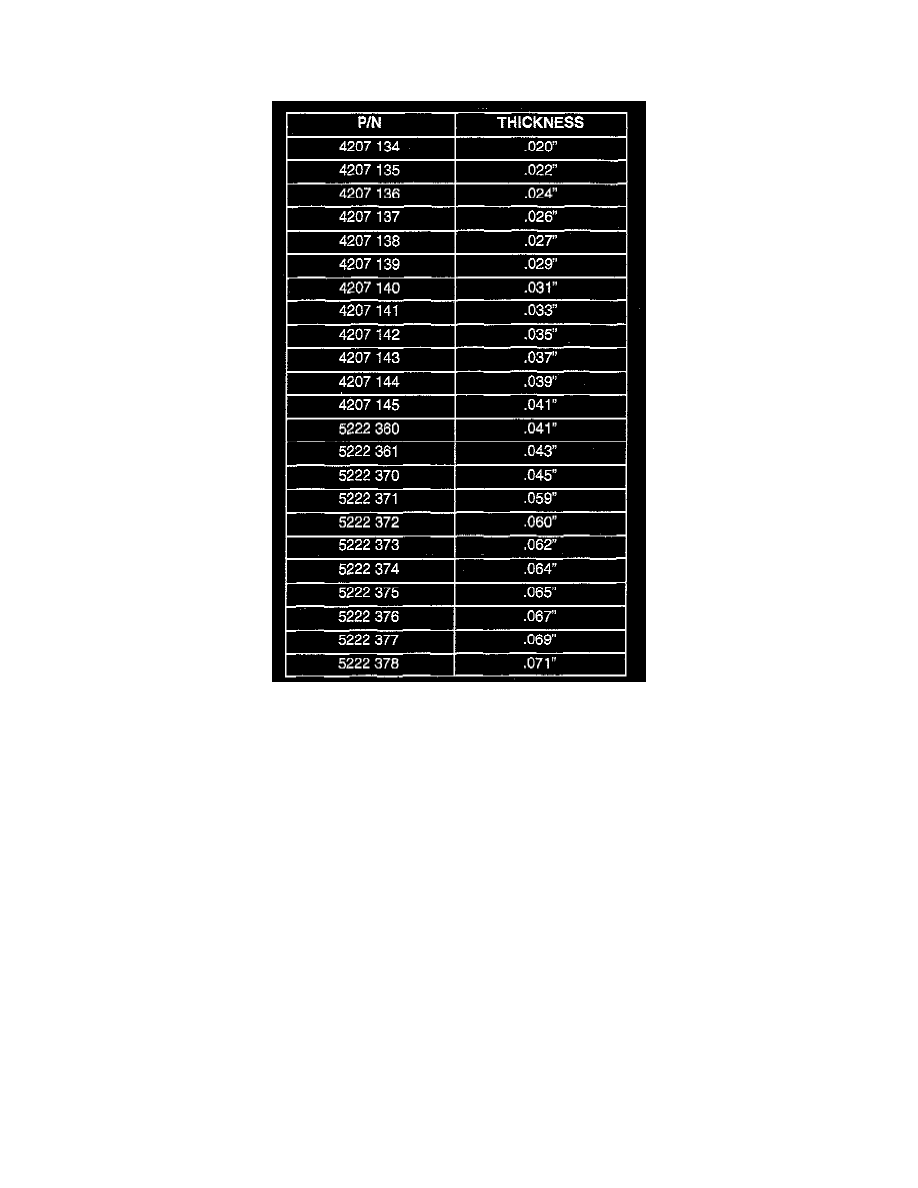
Differential Bearing Shim Chart
10. Using the end play measurement that was determined, add 0.18 mm (0.007 inch). This should give you between 5 and 18 inch pounds of bearing
preload. Refer to the Differential Bearing Shim Chart above to determine which shim to use.
11. Remove the differential bearing retainer. Remove the bearing cup.
12. Install the oil baffle. Install the proper shim combination under the bearing cup.
13. Install the differential bearing retainer. Seal the retainer to the housing with MOPAR Silicone Rubber Adhesive Sealant. Torque bolts to 28 Nm
(250 inch lbs.).
14. Using Miller Special Tool L-4436-A and an inch-pound torque wrench, check the turning torque of the differential. The turning torque should be
between 5 - 18 inch-pounds.
NOTE: If turning torque is too high install a 0.05 mm (0.002 inch) thicker shim. If the turning torque is too low, install a 0.05 mm (0.002 inch)
thinner shim. Repeat until 5 - 18 inch-pounds of turning torque is obtained.
PRELOAD ADJUSTMENT USING GAUGING SHIM (89 - 95 ALL)
1. Remove the bearing cup from the differential bearing retainer using Tool L-4518, and remove the existing shim from under the cup.
2. Install a .50 mm (020 inch) gauging shim into the retainer. Use an arbor press to install the cup.
NOTE: Oil Baffle is not required when making shim selection.
3. Install the bearing retainer into the case and torque bolts to 28 Nm (250 in. lbs.).
4. Position the transaxle assembly vertically on the support stand and install Tool C-4995 into side gear.
5. Rotate the differential at least one full revolution to ensure tapered roller bearings are fully seated.
6. Attach a dial indicator to the case and zero the dial indicator. Place the indicator tip on the end of Tool L-4436.
7. Place a large screwdriver to each side of the ring gear and lift. Check the dial indicator for the amount of end play.