
Grand Caravan V6-3.3L Flex Fuel (2008)
CAUTION: Be certain to adjust the refrigerant oil level when servicing the A/C refrigerant system See: Service and
Repair/Procedures/Refrigerant Oil Level. Failure to properly adjust the refrigerant oil level will prevent the A/C system from operating as
designed and can cause serious A/C compressor damage.
NOTE: When replacing multiple A/C system components, refer to the Refrigerant Oil Capacities chart to determine how much oil should be
added to the refrigerant system See: Service and Repair/Procedures/Refrigerant Oil Level.
NOTE: Replacement of the refrigerant line seals and gaskets is required anytime a refrigerant line is disconnected. Failure to replace the
rubber O-ring seals, metal gaskets or washer seals may result in a refrigerant system leak.
NOTE: The A/C liquid line is serviced in two sections. The front section connects between the A/C condenser and the A/C receiver/drier. The
rear section connects between the A/C receiver/drier and the A/C expansion valve. On models equipped with the rear heating-A/C system, the
rear section of the A/C liquid line also includes an extension tube that connects the liquid line to the underbody lines.
FRONT SECTION
1. Remove the tape or plugs from the opened refrigerant line fittings and the condenser and receiver/drier ports.
2. Lubricate a new rubber O-ring seal with clean refrigerant oil and install it and a new gasket onto the liquid line fitting. Use only the specified
O-ring seal as it made of a special material for the R-134a system. Use only refrigerant oil of the type recommended for the A/C compressor in the
vehicle.
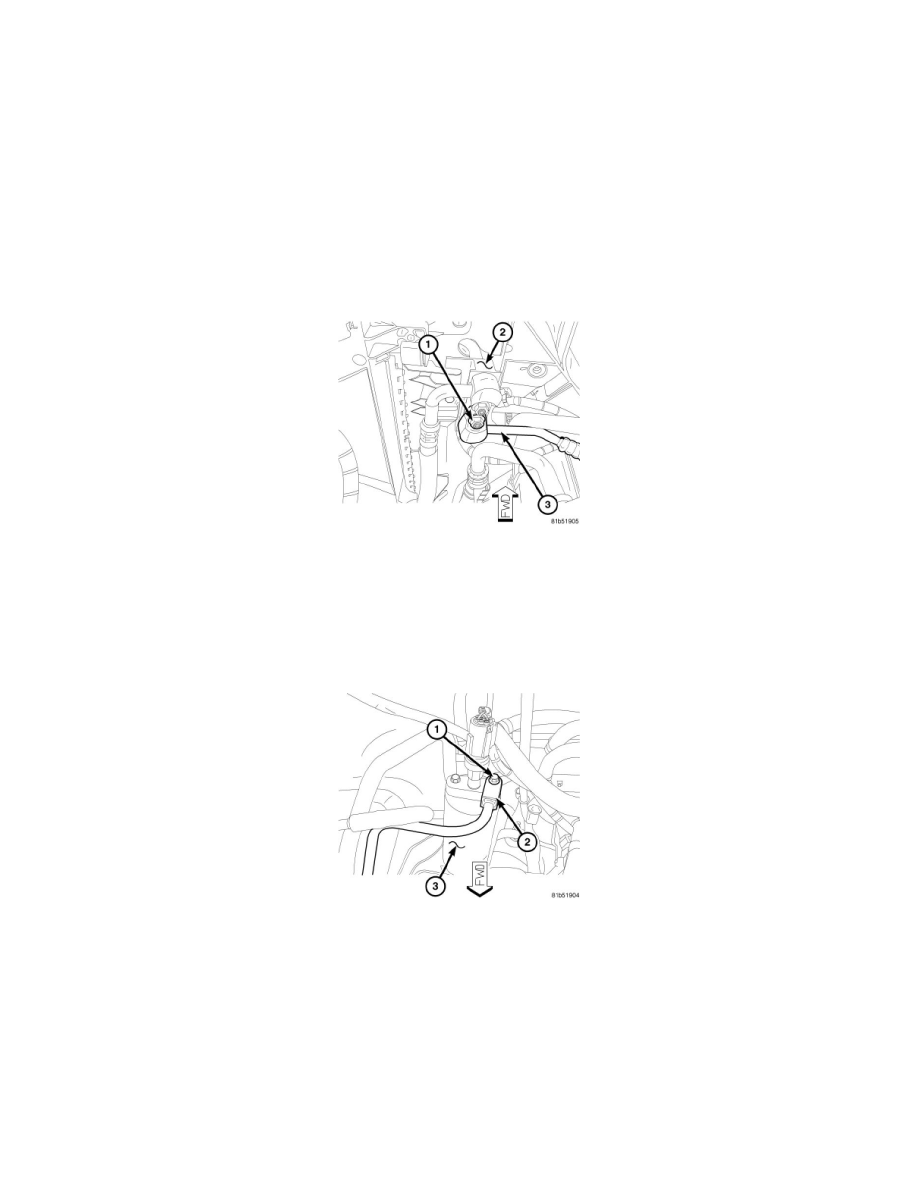
3. Position the front section of the A/C liquid line (3) into the engine compartment and engage the liquid line to the retaining clip located near the
right frame rail.
4. Connect the front section of the A/C liquid line to the condenser tapping block (2).
5. Install the nut (1) that secures the front section of the A/C liquid line to the A/C condenser. Tighten the nut to 23 Nm (17 ft. lbs.).
6. Lubricate a new rubber O-ring seal with clean refrigerant oil and install it onto the liquid line fitting. Use only the specified O-ring seal as it is
made of a special material for the R-134a system. Use only refrigerant oil of the type recommended for the A/C compressor in the vehicle.
7. Connect the front section of the A/C liquid line (2) to the A/C receiver/drier (3).
8. Install the bolt (1) that secures the front section of the A/C liquid line to the A/C receiver/drier. Tighten the bolt to 13.5 Nm (120 in. lbs.).
9. Install the air cleaner housing and inlet duct.
10. Reconnect the negative battery cable.
11. Evacuate the refrigerant systemSee: Service and Repair/Procedures/Refrigerant System Evacuate.
12. Adjust the refrigerant oil levelSee: Service and Repair/Procedures/Refrigerant Oil Level.
13. Charge the refrigerant systemSee: Service and Repair/Procedures/Refrigerant System Charge.
REAR SECTION