
Grand Caravan V6-3.3L Flex Fuel (2008)
frayed, or torn. Straighten any belt that is twisted. Tighten any loose fasteners. Replace any belt that has a damaged or ineffective buckle or retractor.
Replace any belt that has a bent or damaged latch plate or anchor plate. Replace any child restraint anchor or the unit to which the anchor is integral that
has been bent or damaged. Never attempt to repair a seat belt or child restraint component. Always replace damaged or ineffective seat belt and child
restraint components with the correct, new and unused replacement parts listed in the DaimlerChrysler Mopar(R) Parts Catalog.
NOTE: The following procedure is for replacement of an ineffective or damaged seat belt and retractor unit. The front retractor also includes a
seat belt tensioner. If the front seat belt or retractor is ineffective or damaged, but the seat belt tensioner is not deployed, review the
recommended procedures for handling non-deployed supplemental restraints. See: Air Bag Systems/Service and Repair. If the seat belt
tensioner has been deployed, review the recommended procedures for service after a supplemental restraint deployment before removing the
unit from the vehicle. See: Repairs and Inspections Required After a Collision/Service and Repair.
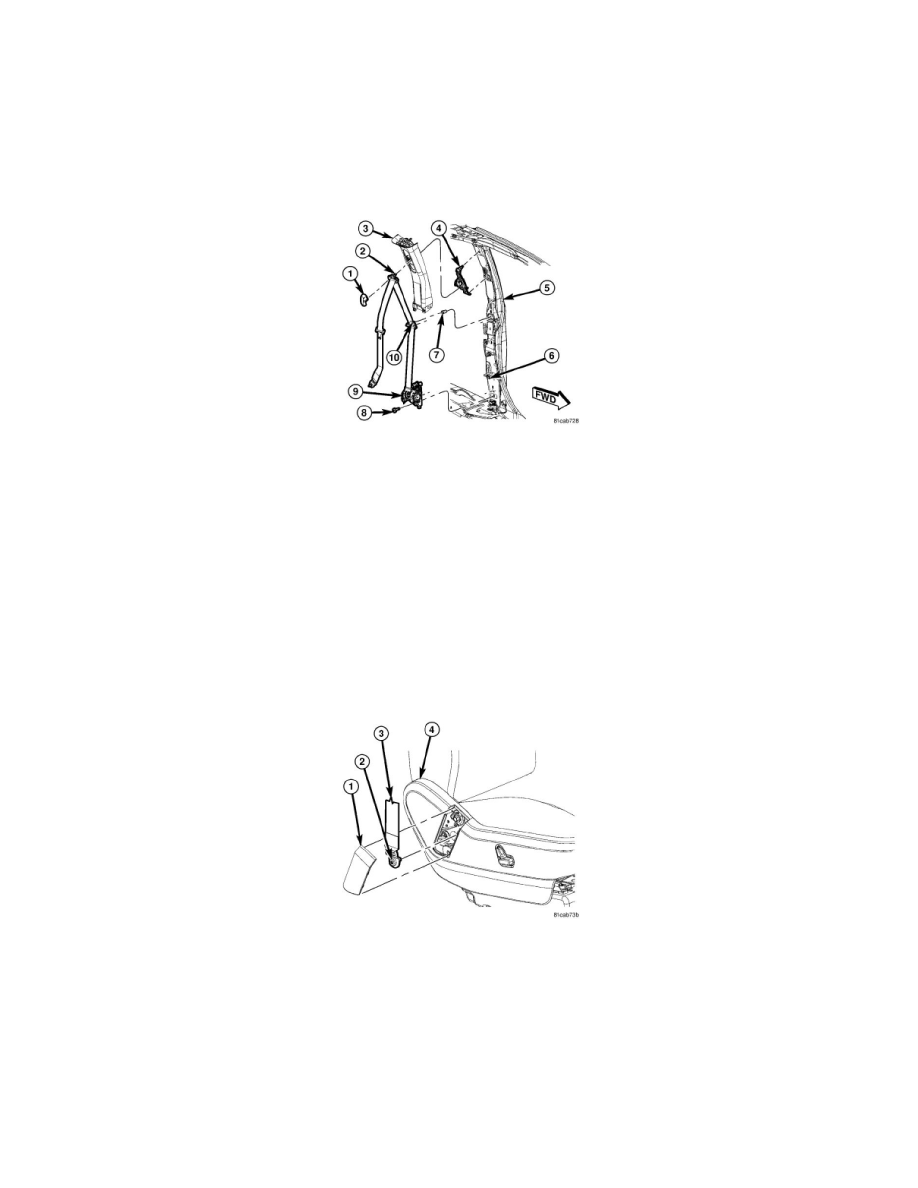
1. Position the front seat belt and retractor (9) to the lower B-pillar (5) as a unit. Be certain to engage the engagement tab on the upper retractor
bracket into the engagement slot in the lower B-pillar.
2. Install and tighten the screw (8) that secures the lower retractor bracket to the B-pillar. Tighten the screw to 39 Nm (29 ft. lbs.).
3. Reconnect the body wire harness connector (6) to the seat belt tensioner initiator on the retractor.
4. For export market vehicles on the driver side only, reconnect the second body wire harness connector to the seat belt switch connector receptacle
on the retractor.
5. Position the belt web guide to the B-pillar.
6. Install and tighten the screw (10) that secures the belt web guide to the B-pillar. Tighten the screw to 9 Nm (79 in. lbs.).
7. Reinstall the lower trim onto the inside of the B-pillar.See: Body and Frame/Interior Moulding / Trim/Trim Panel/Service and Repair/Pillar
Trim/B-Pillar Trim.
8. Reinstall the upper trim (3) onto the inside of the B-pillar.See: Body and Frame/Interior Moulding / Trim/Trim Panel/Service and Repair/Pillar
Trim/B-Pillar Trim.
9. Position the seat belt turning loop onto the height adjuster (4) on the upper B-pillar.
10. Install and tighten the screw (2) that secures the turning loop to the height adjuster. Tighten the screw to 39 Nm (29 ft. lbs.).
11. Snap a new trim cover (1) onto the height adjuster (4) on the upper B-pillar.
12. Position the front seat belt (3) lower anchor to the bracket on the outboard side of the front seat cushion frame.
13. Install and tighten the screw (2) that secures the lower anchor to the bracket on the outboard side of the front seat cushion frame. Tighten the screw
to 39 Nm (29 ft. lbs.).
14. Align the seat belt anchor cover (1) to the opening near the rear of the outboard seat side shield (4). Using hand pressure, press firmly and evenly
on the cover until it snaps into place.
15. Do not reconnect the battery negative cable at this time. The Supplemental Restraint System (SRS) verification test procedure should be performed
following service of any SRS component.See: Powertrain Management/Computers and Control Systems/Testing and Inspection/Diagnostic
Trouble Code Tests and Associated Procedures/Verification Tests.
Second Row - Except Swivel
SECOND ROW - EXCEPT SWIVEL