
Grand Caravan FWD L4-2.4L VIN B (1997)
groove.
Caution:
DO NOT reuse the old vacuum seal. A NEW vacuum seal MUST be installed on the master cylinder to prevent vacuum leaks.
23.
With the installation tool pressed against the piston guide, check to make sure that the end of the piston is recessed slightly into the piston
installation tool (Figure 8). If the piston is flush with or extends beyond the end of the tool, the pin is not properly installed in the piston assembly
and the installation procedure must be repeated.
24.
Using a CLEAN shop rag or paper towel, remove any fluid from the end of the casting and the snap-ring groove area. Inspect to make sure that no
dirt or other debris is present in this area.
25.
Remove the installation tool from the primary piston and DISCARD. Do not re-use the tool.
26.
With installation tool removed, install the new boot over the primary piston and master cylinder body (Figure 9). Ensure that the rear (smaller) end
of the boot is installed in the groove at the end of the primary piston, and the front (larger) end of the boot is slipped over the end of the body.
There should be no wrinkles in the boot.
27.
Depress piston fully by hand to make sure piston moves freely.
28.
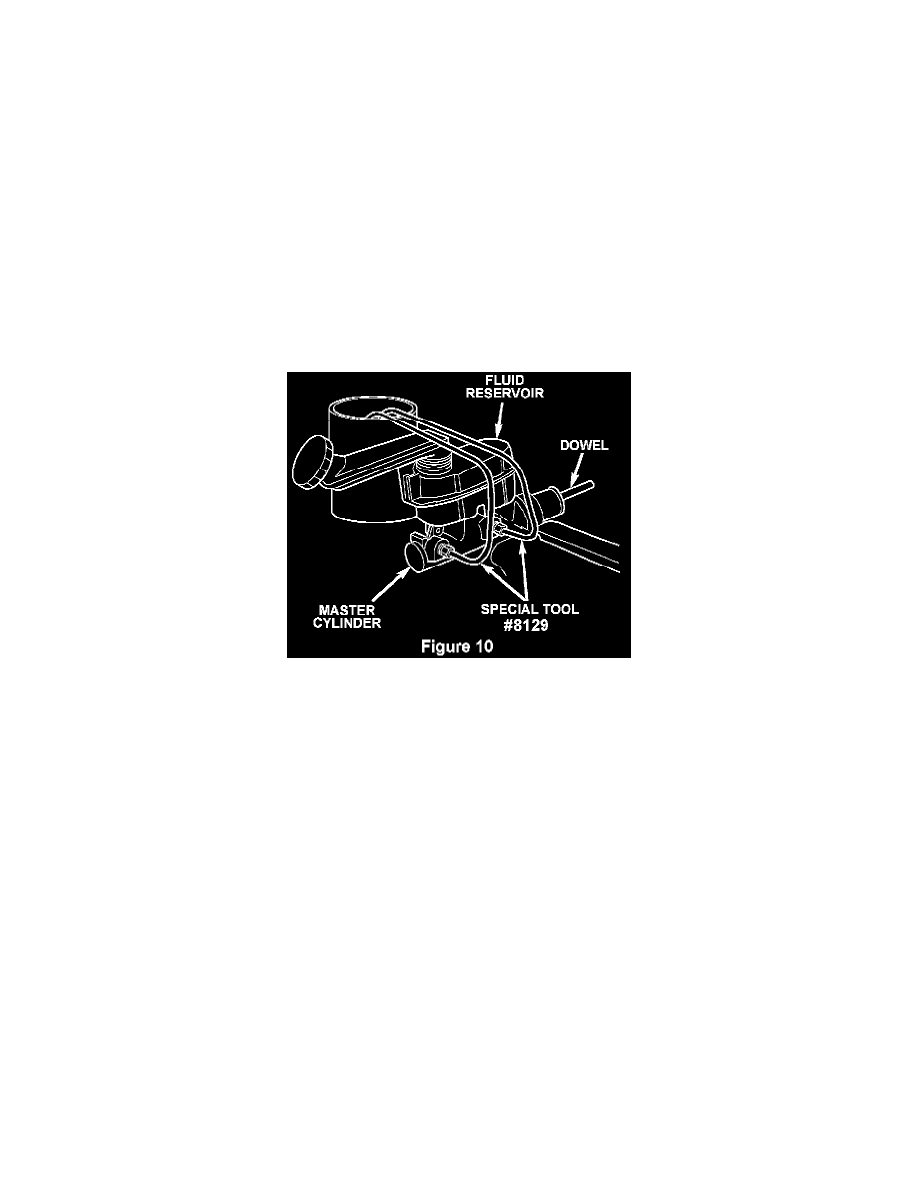
Attach Miller Special Tool # 8129 bleed tubes to the primary and secondary outlets. Due to the filler neck on the reservoir, the bleed tubes must be
gently bent so that the ends exit into a separate container (Figure 10). Fill the separate container and the master cylinder reservoir with clean brake
fluid that conforms to DOT 3 specifications. Bench bleed the master cylinder using the provided dowel rod. Slowly depress the pistons to the stop,
then allow the pistons to return to the fully released position. Repeat this step several times after all air bubbles are expelled from the bleed tubes.
This will ensure all air is bled from the master cylinder. Replenish the reservoir with CLEAN brake fluid as required. DISCARD brake fluid
collected in the container. Do not pour this into the master cylinder reservoir.
Caution:
^
DO NOT use a screwdriver or other sharp object to perform the bleed procedure. This may damage booster rod contact surface.
^
DO NOT attempt to separate the master cylinder filler neck from the reservoir as this may cause leakage or damage the filler neck.
Note:
DO NOT install the master cylinder without following the above bench bleeding procedure. When this procedure is followed, it is not necessary to
bleed the entire vehicle brake system.
29.
Remove the bleed tubes from the master cylinder outlet ports. Plug the outlet ports with the supplied plugs, top off the reservoir with brake fluid
and install the filler neck cap.
30.
Remove and inspect the inside of the boot to make sure that there is no accumulation of brake fluid. Fluid puddling in the boot, is caused by an
improperly installed pin, or a damaged rear seal.
31.
Re-install the boot.
B. Inspect Power Brake Booster
NOTE:
DISREGARD PARTS PACKAGE INSTRUCTION SHEET reference to 2 inches of brake fluid in brake booster as an acceptable level and to
replace booster if fluid level exceeds 2 inches. There must be no more than 114 inch of brake fluid in booster. If brake fluid level exceeds 1/4 inch.