
Grand Caravan FWD V6-3.3L VIN 3 Flex Fuel (2002)
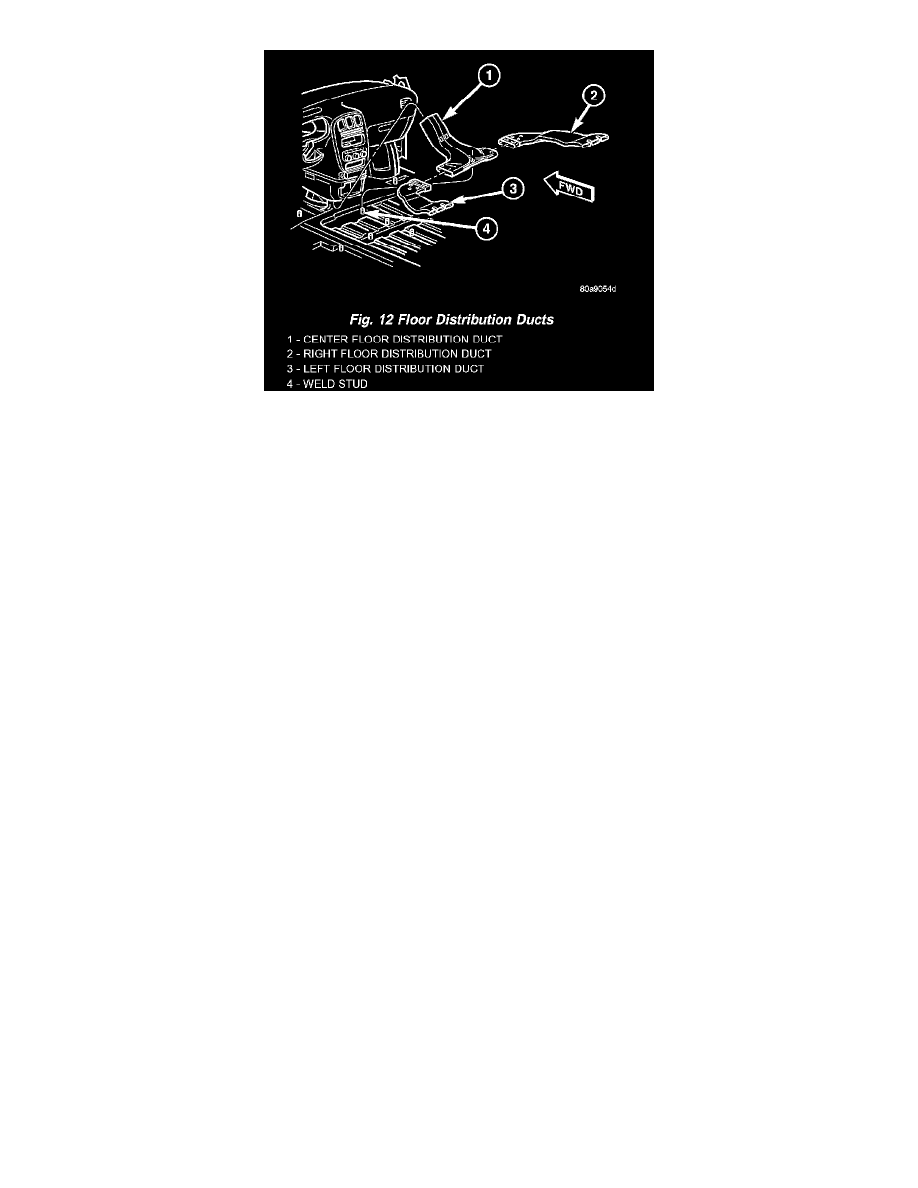
Fig.12 Floor Distribution Ducts
2. Lift the center floor distribution duct upward far enough to disengage its locator hole from the weld stud on the front floor panel.
3. Pull the floor distribution duct assembly rearward far enough to disengage the center floor distribution duct from the outlet on the bottom of the
heater-A/C housing unit.
4. Disassemble the right and/or left floor distribution ducts from the center floor distribution duct as required.
INSTALLATION
1. Assemble the right and/or left floor distribution ducts onto the center floor distribution duct as required.
2. Slide the floor distribution duct assembly under the instrument panel center stack far enough to engage the center floor distribution duct with the
outlet on the bottom of the heater-A/C housing unit.
3. Align the locator hole on the center floor distribution duct with the weld stud on the front floor panel.
4. Using hand pressure, push the locator hole of the center floor distribution duct down over the weld stud on the front floor panel.
5. Reinstall the carpet onto the front floor panel and under the instrument panel.
Panel Ducts Replacement
REMOVAL
WARNING: ON VEHICLES EQUIPPED WITH AIRBAGS, DISABLE THE AIRBAG SYSTEM BEFORE ATTEMPTING ANY
STEERING WHEEL, STEERING COLUMN, OR INSTRUMENT PANEL COMPONENT DIAGNOSIS OR SERVICE. DISCONNECT
AND ISOLATE THE BATTERY NEGATIVE (GROUND) CABLE, THEN WAIT TWO MINUTES FOR THE AIRBAG SYSTEM
CAPACITOR TO DISCHARGE BEFORE PERFORMING FURTHER DIAGNOSIS OR SERVICE. THIS IS THE ONLY SURE WAY TO
DISABLE THE AIRBAG SYSTEM. FAILURE TO TAKE THE PROPER PRECAUTIONS COULD RESULT IN ACCIDENTAL AIRBAG
DEPLOYMENT AND POSSIBLE PERSONAL INJURY.
1. Disconnect and isolate the battery negative cable.
2. Remove the instrument panel from the vehicle. Refer to: Body and Frame, Interior Trim, Dashboard/Instrument Panel, Service and Repair,
Instrument Panel Service Procedures, Instrument Panel Assembly Replacement, See: Body and Frame/Interior Moulding / Trim/Dashboard /
Instrument Panel/Service and Repair/Instrument Panel Assembly
3. Place the instrument panel face down on a suitable work surface. Be certain to take the proper precautions to protect the face of the instrument
panel from cosmetic damage.
4. Remove the fasteners that secure the panel ducts to the instrument panel armature.
5. Disengage the panel ducts from the panel outlets.
6. Remove the panel ducts from the instrument panel.
INSTALLATION
1. Position the panel ducts to the instrument panel.
2. Engage the panel ducts to the panel outlets.
3. Install the fasteners that secure the panel ducts to the instrument panel armature.
4. Reinstall the instrument panel into the vehicle. Refer to: Body and Frame, Interior Trim, Dashboard/Instrument Panel, Service and Repair,
Instrument Panel Service Procedures, Instrument Panel Assembly Replacement, See: Body and Frame/Interior Moulding / Trim/Dashboard /
Instrument Panel/Service and Repair/Instrument Panel Assembly