
Grand Caravan FWD V6-3.3L VIN 3 Flex Fuel (2002)
Blower Motor Resistor: Service and Repair
Front
REMOVAL
WARNING:
-
ON VEHICLES EQUIPPED WITH AIRBAGS, DISABLE THE AIRBAG SYSTEM BEFORE ATTEMPTING ANY STEERING
WHEEL, STEERING COLUMN, OR INSTRUMENT PANEL COMPONENT DIAGNOSIS OR SERVICE. DISCONNECT AND
ISOLATE THE BATTERY NEGATIVE (GROUND) CABLE, THEN WAIT TWO MINUTES FOR THE AIRBAG SYSTEM
CAPACITOR TO DISCHARGE BEFORE PERFORMING FURTHER DIAGNOSIS OR SERVICE. THIS IS THE ONLY SURE WAY
TO DISABLE THE AIRBAG SYSTEM. FAILURE TO TAKE THE PROPER PRECAUTIONS COULD RESULT IN ACCIDENTAL
AIRBAG DEPLOYMENT AND POSSIBLE PERSONAL INJURY.
-
THE BLOWER MOTOR RESISTOR MAY GET VERY HOT DURING NORMAL OPERATION. IF THE BLOWER MOTOR WAS
TURNED ON, WAIT FIVE MINUTES TO ALLOW THE BLOWER MOTOR RESISTOR TO COOL BEFORE PERFORMING
DIAGNOSIS OR SERVICE. FAILURE TO TAKE THIS PRECAUTION CAN RESULT IN PERSONAL INJURY.
CAUTION: Do not operate the blower motor with the blower motor resistor removed from the circuit. Failure to take this precaution can result in
vehicle damage.
1. Disconnect and isolate the battery negative cable.
2. Open the glove box.
3. Flex both sides of the glove box bin inward near the top far enough for the rubber glove box stop bumpers to clear the sides of the glove box
opening, then roll the glove box downward.
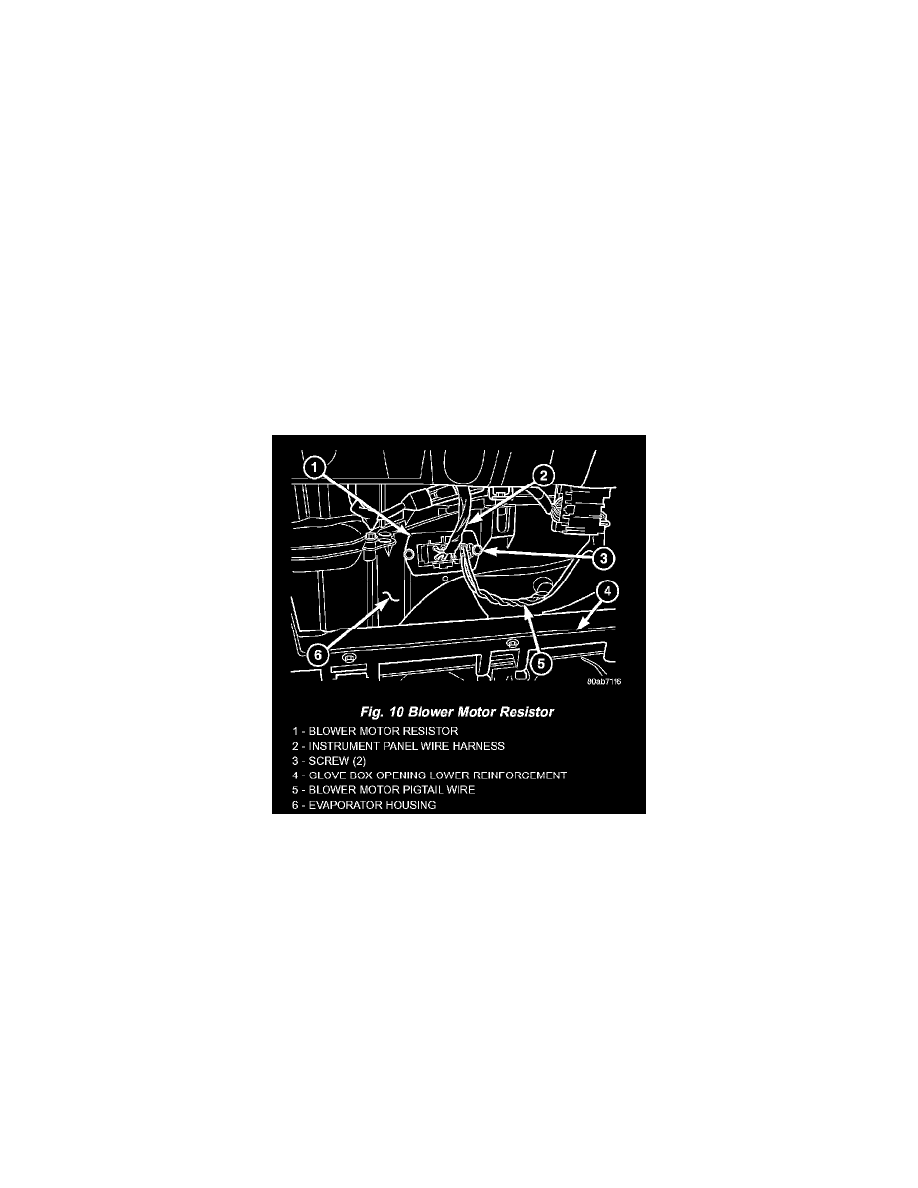
Fig.10 Blower Motor Resistor
4. Reach through the glove box opening to access and disconnect the instrument panel wire harness connector for the blower motor resistor from the
resistor connector receptacle.
5. Reach through the glove box opening to access and disconnect the blower motor pigtail wire connector from the resistor connector receptacle.
6. Remove the two screws that secure the blower motor resistor to the evaporator housing.
7. Remove the blower motor resistor from the evaporator housing.
INSTALLATION
CAUTION: Do not operate the blower motor with the blower motor resistor removed from the circuit. Failure to take this precaution can result in
vehicle damage.
1. Position the blower motor resistor into the evaporator housing.
2. Install and tighten the two screws that secure the blower motor resistor to the evaporator housing. Tighten the screws to 2 Nm (17 in. lbs.).
3. Reconnect the blower motor pigtail wire connector to the blower motor resistor connector receptacle.
4. Reconnect the instrument panel wire harness connector for the blower motor resistor to the resistor connector receptacle.
5. Flex both sides of the glove box bin inward near the top far enough for the rubber glove box stop bumpers to clear the sides of the glove box