
Grand Caravan FWD V6-3.3L VIN 3 Flex Fuel (2002)
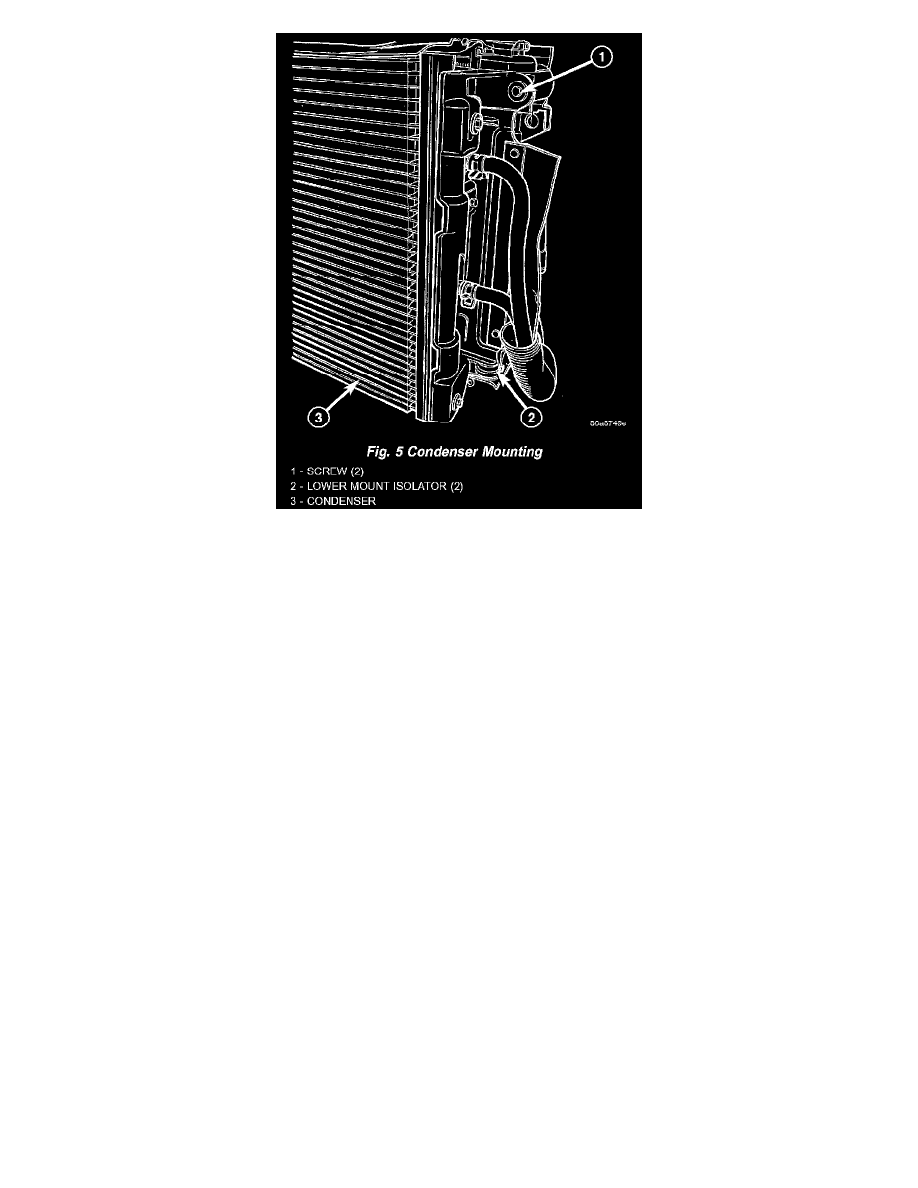
Fig.5 Condenser Mounting
15. Remove the screw that secures the top of the mounting bracket on each side of the condenser to the cooling module.
16. Lift the condenser, transmission oil cooler, and mounting brackets as a unit far enough to disengage the locating pin that secures the mounting
brackets in the lower mount rubber isolators on each side of the cooling module.
17. Remove the condenser, transmission oil cooler, and mounting brackets from the vehicle as a unit.
18. Remove the two screws that secure each mounting bracket to the sides of the condenser.
19. Remove the one screw that secures the left mounting bracket to the side of the transmission oil cooler.
20. Remove the left mounting bracket from the side of the condenser and transmission oil cooler.
21. Remove the condenser from the right mounting bracket and transmission oil cooler unit.
INSTALLATION
NOTE:
-
If the condenser is being replaced, add 30 milliliters (1 fluid ounce) of refrigerant oil to the refrigerant system. Use only refrigerant oil of the type
recommended for the compressor in the vehicle.
-
Be certain that each of the radiator and condenser air seals are reinstalled in their proper locations. These air seals are required in order for the air
conditioning and engine cooling systems to perform as designed.
1. Position the condenser to the right mounting bracket and transmission oil cooler unit.
2. Position the left mounting bracket onto the side of the condenser and transmission oil cooler.
3. Install and tighten the one screw that secures the left mounting bracket to the side of the transmission oil cooler. Tighten the screw to 5 Nm (45 in.
lbs.).
4. Install and tighten the two screws that secure each mounting bracket to the sides of the condenser. Tighten the screws to 5 Nm (45 in. lbs.).
5. Position the condenser, transmission oil cooler, and mounting brackets into the vehicle as a unit. Be certain that the locating pins that secure the
mounting brackets are engaged in the lower mount rubber isolators on each side of the cooling module.
NOTE: Verify that the condenser isolators are all installed and positioned correctly.
6. Install and tighten the two screws that secure the top of the mounting bracket on each side of the condenser to the cooling module. Tighten the
screws to 5 Nm (45 in. lbs.).
7. Remove the tape or plugs from the condenser outlet port and the liquid line fitting.
8. Lubricate a new rubber O-ring seal with clean refrigerant oil and install it on the liquid line fitting.
9. Reconnect the liquid line fitting to the condenser outlet port on the right side of the cooling module.
10. Install and tighten the nut that secures the liquid line fitting to the condenser. Tighten the nut to 23 Nm (17 ft. lbs.).
11. Remove the tape or plugs from the condenser inlet port and the discharge line fitting.