
Grand Caravan FWD V6-3.3L VIN 3 Flex Fuel (2002)
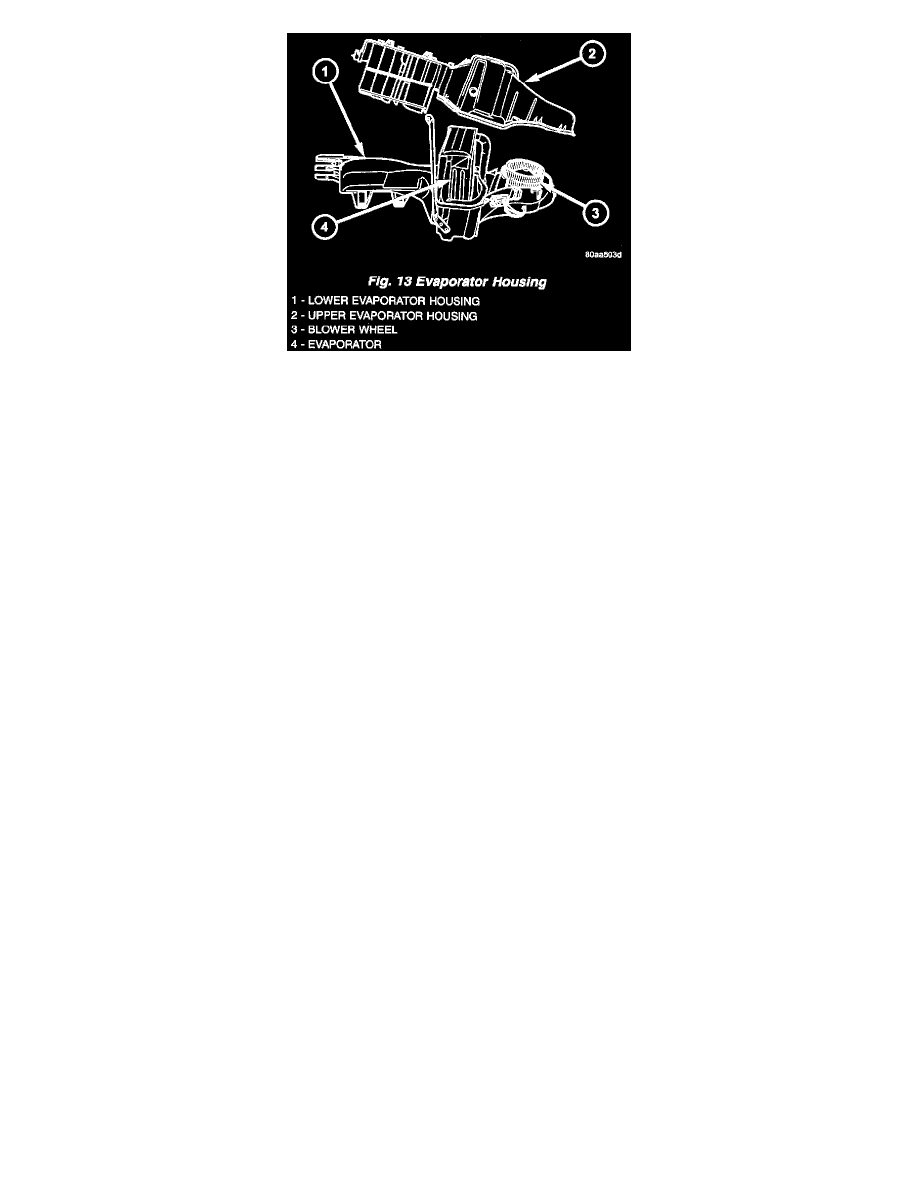
Fig.13 Evaporator Housing
15. Carefully separate and remove the upper half of the evaporator housing from the lower half. Be certain not to lose the rubber grommet for the
HVAC wire harness evaporator temperature sensor take out. This grommet is located on the inboard side of the flange around the expansion valve
/evaporator tube opening on the dash panel side of the unit, where it is captured in a notched area between the upper and lower housing halves.
16. Carefully lift the evaporator and its foam wrap out of the lower half of the evaporator housing as a unit. Be certain not to lose the clam shell type
rubber seal that is fitted to the evaporator inlet and outlet tubes where they exit the evaporator housing.
INSTALLATION
NOTE: if the evaporator Is being replaced, add 60 milliliters (2 fluid ounces) of refrigerant oil to the refrigerant system. Use only refrigerant oil of
the type recommended. for the compressor in the vehicle.
1. Carefully lower the evaporator and its foam wrap into the lower half of the evaporator housing as a unit. Be certain that the clam shell type rubber
seal is fitted to the evaporator inlet and outlet tubes where they exit the evaporator housing.
2. Position the upper half of the evaporator housing onto the lower half. Be certain that the rubber grommet and the HVAC wire harness take out for
the evaporator temperature sensor are captured. in the notched area between the upper and lower housing halves.
3. Install and tighten the twelve screws around the perimeter of the evaporator housing that screws the upper housing half to the lower half. Tighten
the screws to 2 Nm (18 in. lbs.).
4. Position the upper half of the recirculation air door onto the lower half of the door.
5. Install and tighten the two screw's that secure the upper half of the recirculation air. door to the lower half of the door. Tighten the screws to 2 Nm
(18 in. lbs.).
6. Position the upper intake air housing onto the top of the evaporator housing over the recirculation air door and the blower wheel housing. Be
certain that the upper pivot of the, recirculation air door is captured in the pivot receptable, of the upper intake air housing.
7. Install and tighten the three screws. that secure the upper intake air housing to the top of the outboard end of the evaporator housing. Be certain not
to miss the screw located just inside the inboard side of the fresh air intake opening. Tighten the screws to 2 Nm (18 in. lbs.).
8. Install and tighten the two screws,, that secure the upper intake air. housing to the lower intake air housing. Tighten the screws to 2 Nm (18 in.
lbs.).
9. Engage the two hook. formations on the bottom of the distribution housing in the two receptacles on the evaporator housing.
10. Roll the top of the distribution housing up into position against the evaporator housing.
11. Install and tighten the three screws from the dash panel side of the unit that secure the top of the distribution housing to, the inboard end of the
evaporator housing. Tighten the screws to 2 Nm (18 in. lbs.).
12. Engage the HVAC wire harness in the routing clips molded into the outside of the HVAC housing components.
13. Reconnect the HVAC wire harness connector for the blower motor with the motor connector receptacle on the bottom of the outboard end of the
evaporator housing.
14. Reinstall the expansion valve onto the evaporator inlet and outlet tube fittings.
15. Install a new foam seal onto the HVAC housing seal flange around the fresh air inlet opening and the expansion valve/evaporator tube opening on
the dash panel side of the unit.
16. Reinstall the heater core tubes into the heater core.
17. Reinstall the HVAC unit housing into the vehicle.