
Intrepid V6-3.2L VIN J (1998)
Labor Operation No:
08-80-72-91 Switch, High Pressure Power Steering
- Replace
0.4 Hrs.
FAILURE CODE: FM - Flash Module
P8 - New Part
Repair Procedure
This bulletin involves checking for dummy switch installation, installing a dummy switch as required and/or selectively erasing and reprogramming the
Powertrain Control Module (PCM) with new software (calibration changes).
1.
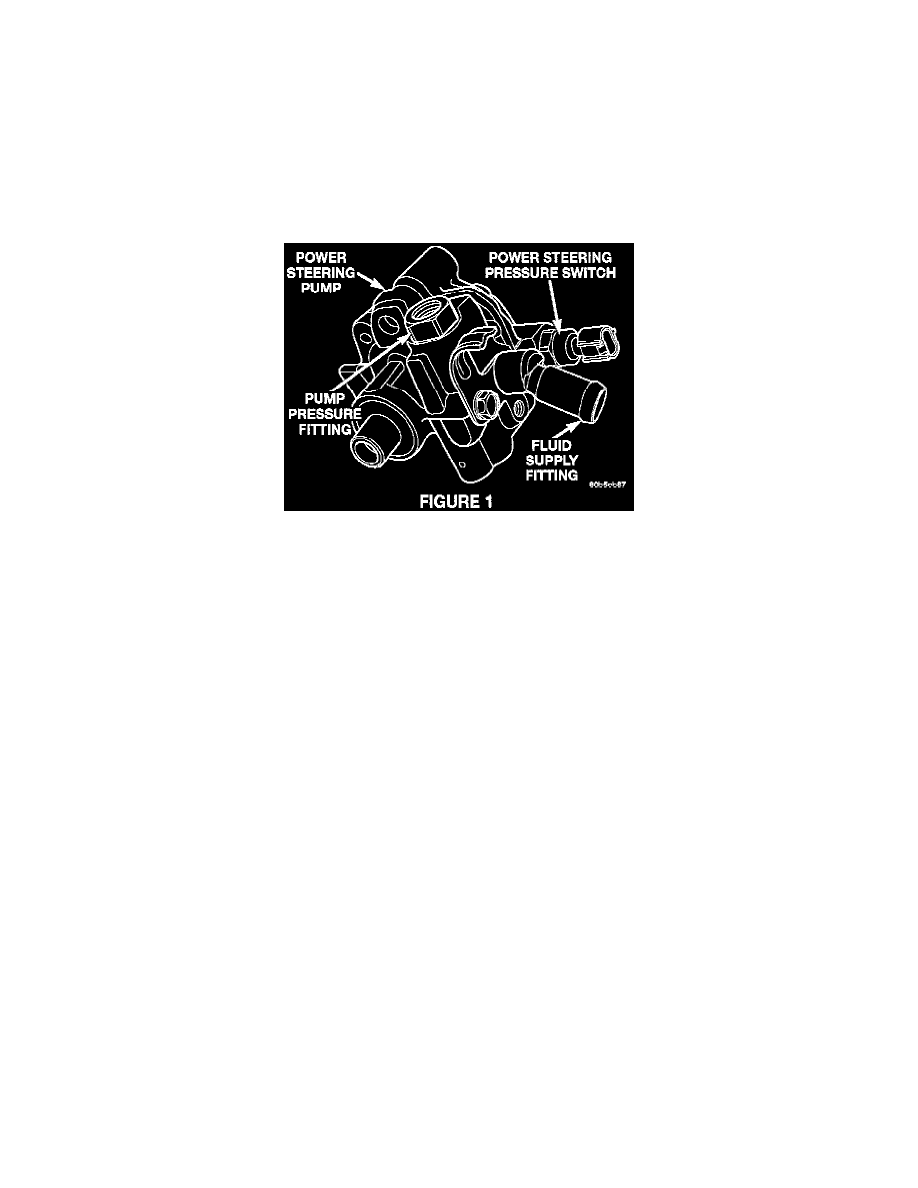
Raise the vehicle on a hoist. Locate the power steering pump and switch (Figure 1).
2.
To identify the dummy switch, inspect the plastic insulator where it meets the brass body. A green rubber band was installed to identify these
switches. Additionally, the dummy switch may or may not include an electrical terminal in its connector. To positively identify the switch, remove
it from the power steering pump and inspect it's face for a pressure hole. The dummy switch will be solid without a hole.
3.
If the dummy switch is installed, proceed to step 4 of this bulletin. If a functional switch is found, replace it with dummy switch p/n 04606496AA
and then proceed to step 4.
NOTE:
DO NOT LEAVE A FUNCTIONAL SWITCH ON THE POWER STEERING PUMP. ALWAYS RECONNECT THE ELECTRICAL
CONNECTOR TO THE DUMMY SWITCH.
4.
Connect the MDS (Mopar Diagnostic System) and DRB III (Scan Tool) to the vehicle and power them up.
5.
Use the arrow keys and select # 2 MDS DIAGNOSTICS on the DRB III MAIN MENU Screen.
6.
Use the arrow keys and select DIAGNOSTIC MENU on the MDS, then press NEXT MENU.
7.
Use the arrow keys and select VEHICLE CONTROLLER PROGRAMMING on the MDS, then press NEXT MENU.
8.
Use the arrow keys and select PROGRAMMING OF ALL OTHER CONTROLLERS USING MDS & DRB III on the MDS, then press NEXT
MENU.
9.
Follow the steps presented on the MDS and DRB III which will allow the DRB III to obtain the current part number of the PCM.
10.
The MDS will display the part number of the PCM on the vehicle and the appropriate replacement part number, then press NEXT MENU to begin
programming.
If the PCM on the vehicle has already been updated or programmed, a NO UPDATES AVAILABLE message will be displayed. Check the part
number of the PCM on the vehicle and compare it to the part number displayed. If the PCM has already been updated, then another condition
exists that will require further diagnosis and repair.
11.
The MDS and DRB III will prompt for any operator action needed during the remainder of the programming process.
NOTE: