
Journey FWD V6-3.5L (2009)
TIMING GEAR ALIGNMENT
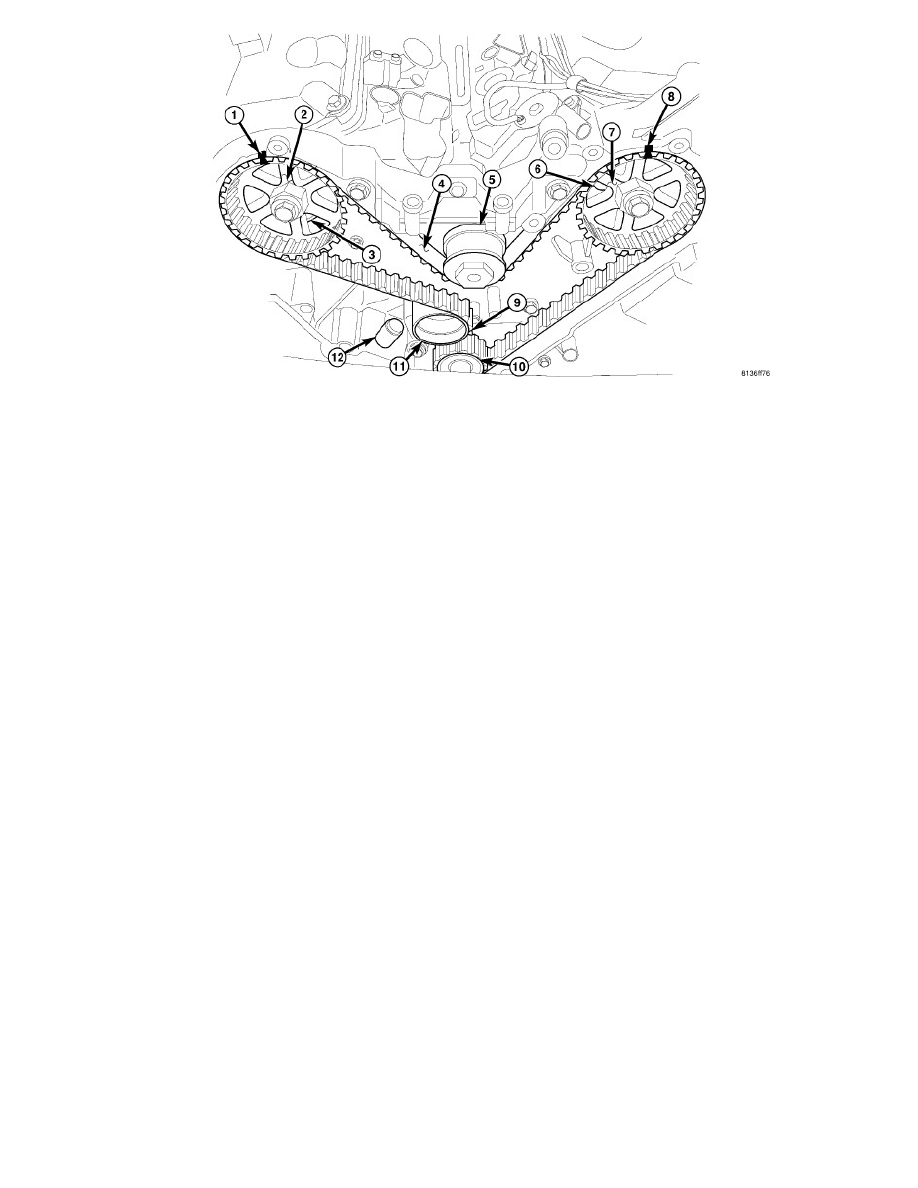
1. Align the crankshaft sprocket (10) with the TDC mark (9) on the oil pump cover.
2. Align the camshaft sprockets (2, 7) timing reference marks (1, 8) with the marks on the rear cover.
3. Install the timing belt (4) starting at the crankshaft sprocket (10) going in a counterclockwise direction. Install the belt around the last sprocket and
maintain tension on the belt as it is positioned around the tensioner pulley (11).
NOTE: It is necessary to compress the plunger into the tensioner body and install a locking pin prior to reinstalling the tensioner. See Timing
Belt Removal for tensioner compression procedure See: Timing Belt & Sprockets - Removal .
4. Hold the tensioner pulley (11) against the belt and install the reset (pinned) timing belt tensioner (2) into the housing. Tighten attaching bolts to 28
Nm (250 in. lbs.).
5. When tensioner (12) is in place, pull the retaining pin to allow the tensioner to extend to the pulley bracket.
6. Rotate the crankshaft sprocket (10) two revolutions and check the timing marks on the camshafts and crankshaft. The marks should line up within
their respective locations. If the marks do not line up, repeat the procedure.
7. Install the front timing belt cover See: Timing Cover/Service and Repair/Engine Timing Cover(s) - Installation.
8. Connect the negative battery cable and tighten nut to 5 Nm (45 in. lbs.).
NOTE: The Cam/Crank Variation Relearn procedure must be performed anytime there has been a repair/replacement made to a powertrain
system, for example: flywheel, valvetrain, camshaft and/or crankshaft sensors or components See: Powertrain Management/Computers
and Control Systems/Testing and Inspection/Programming and Relearning