
Journey FWD V6-3.5L (2009)
NOTE: Replacement of the refrigerant line O-ring seals and gaskets is required anytime a refrigerant line is disconnected. Failure to replace
the rubber O-ring seals and metal gaskets could result in a refrigerant system leak.
NOTE: LHD model shown in illustrations.
1. Remove the tape or plugs from all of the opened refrigerant line fittings and the expansion valve and receiver/drier ports.
2. Lubricate new rubber O-rings with clean refrigerant oil and install them and new gaskets onto the liquid and suction line fittings. Use only the
specified O-ring seals as they are made of special materials compatible to the R-134a system. Use only refrigerant oil of the type recommended for
the A/C compressor in the vehicle.
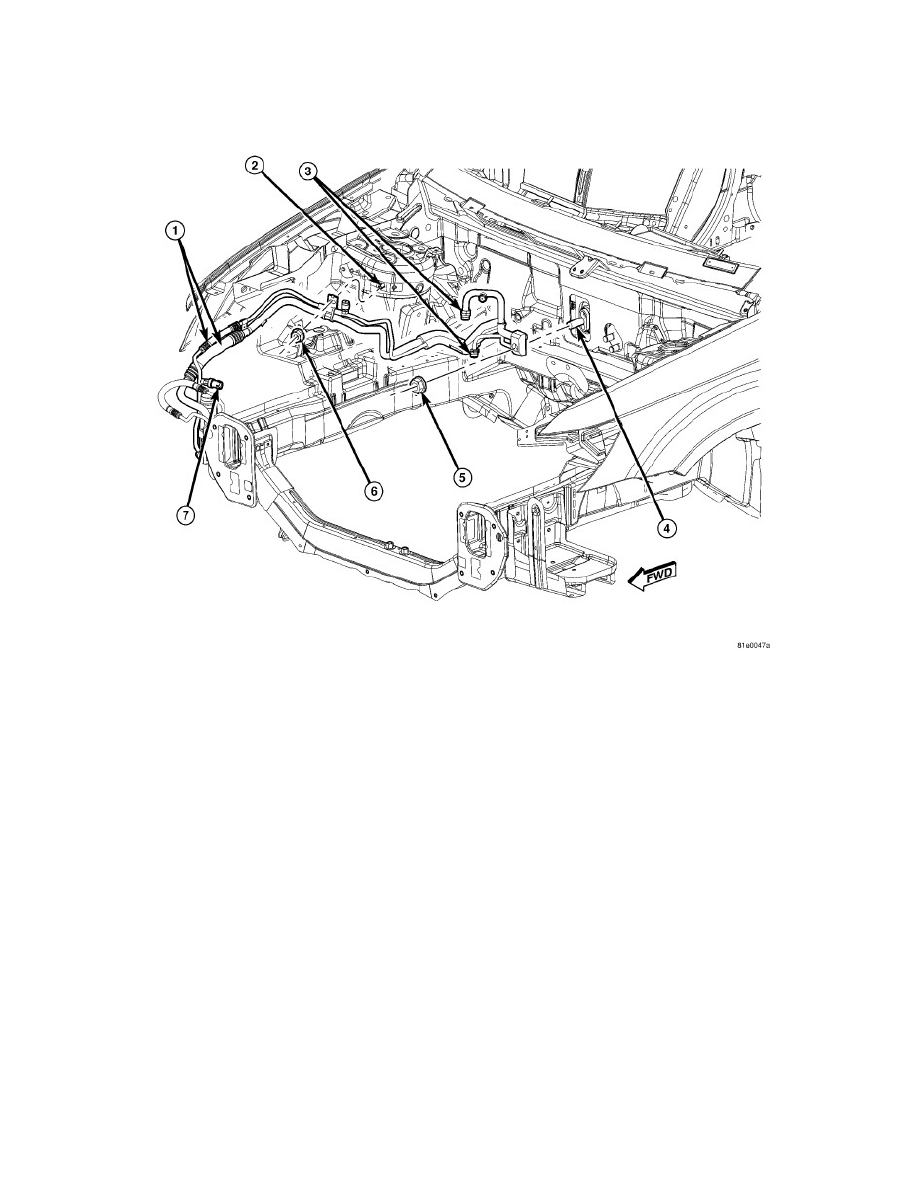
3. Position the A/C liquid and suction line assembly (1) into the engine compartment.
4. Connect the A/C liquid and suction line assembly to the A/C expansion valve (4).
CAUTION: Use care when installing the A/C lines to the A/C expansion valve. Carefully align the tube ends with the valve prior to tightening
the A/C line retaining nut or damage to the sealing rings and tube ends may occur.
5. Install the nut (5) that secures the A/C liquid and suction line assembly to the A/C expansion valve. Tighten the nut to 20 Nm (15 ft. lbs.).
6. Install the nut (6) that secures the refrigerant line retaining bracket to the stud (2) located on the right front strut tower. Tighten the nut securely.
7. If equipped with rear A/C, connect the rear A/C extension lines to the fittings (3) located on the A/C liquid and suction line assembly See: A/C
Underbody Lines - Installation.
8. If removed, lubricate a new rubber O-ring seal with clean refrigerant oil and install it onto the fitting for the A/C pressure transducer (7) located on
the A/C liquid line and install the pressure transducer. Tighten the A/C pressure transducer to 5.6 Nm (50 in. lbs.).
9. Connect the wire harness connector to the A/C pressure transducer.
10. If equipped with ABS, install the ABS control module and pump assembly See: Brakes and Traction Control/Antilock Brakes / Traction Control
Systems/Hydraulic Control Assembly - Antilock Brakes/Service and Repair/Removal and Replacement/Integrated Control Unit (ICU) -
Installation.
11. Install the power steering fluid reservoir See: Steering and Suspension/Steering/Power Steering/Power Steering Fluid Reservoir/Service and
Repair/Reservoir, Power Steering Pump - Installation.
12. Install the engine coolant reservoir See: Engine, Cooling and Exhaust/Cooling System/Coolant Reservoir/Service and Repair/Coolant Recovery
Bottle - Installation.