
Magnum V8-5.7L (2008)
upstream, as far as ten feet or more from the bleeder screw. If the bleeder screw is not opened sufficiently, fluid flow is restricted causing a slow,
weak fluid discharge. This will NOT get all the air out. Therefore, it is essential to open the bleeder screw at least one full turn to allow a fast,
large volume discharge of brake fluid.
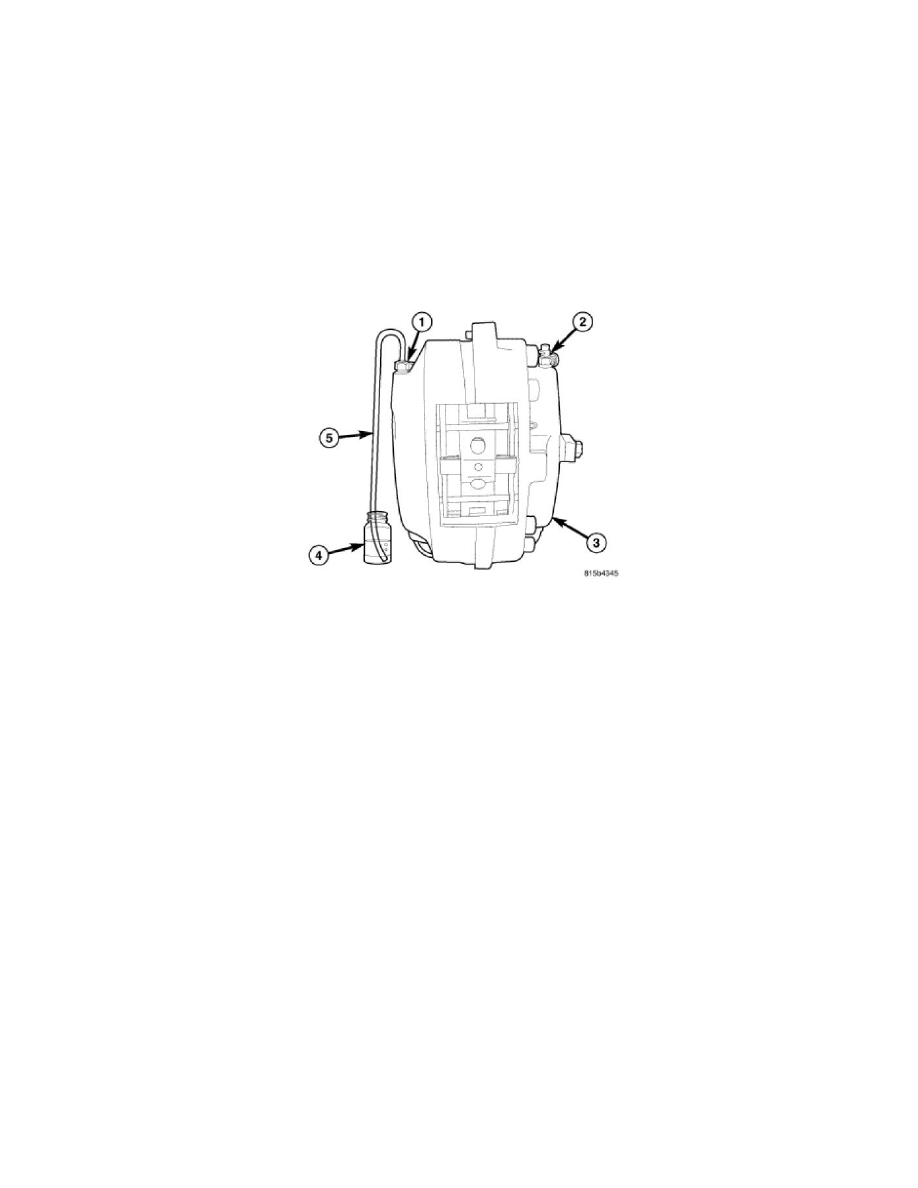
5. While the pedal is being held down, open the inboard bleeder screw (2) at least one full turn. When the bleeder screw opens the brake pedal will
drop all the way to the floor. Continue to hold the pedal all the way down.
6. Once the brake pedal has dropped, close the bleeder screw. The pedal can then be released.
7. Repeat the above three steps until all trapped air is removed from that wheel circuit (usually four or five times). This should pass a sufficient
amount of fluid to expel all the trapped air from the brakes hydraulic system. Be sure to monitor brake fluid level in master cylinder fluid
reservoir making sure it stays at a proper level. This will ensure air does not reenter brake hydraulic system through master cylinder.
NOTE: Monitor the brake fluid level in the fluid reservoir periodically to make sure it does not go too low. This will ensure that air does
not reenter the brake hydraulic system.
8. Remove clear hose and install bleeder screw dust cap.
9. Attach a clear hose (5) to the outboard bleeder screw (1) at that same wheels brake caliper and feed the other end of hose into a clear jar (4)
containing enough fresh brake fluid to submerge the end of the hose.
10. Have an assistant pump the brake pedal three or four times, then hold it down before the bleeder screw is opened.
CAUTION: Open the bleeder screw at least one full turn when instructed. Some air may be trapped in the brake lines or valves far
upstream, as far as ten feet or more from the bleeder screw. If the bleeder screw is not opened sufficiently, fluid flow is restricted causing
a slow, weak fluid discharge. This will NOT get all the air out. Therefore, it is essential to open the bleeder screw at least one full turn to
allow a fast, large volume discharge of brake fluid.
11. While the pedal is being held down, open the outboard bleeder screw (2) at least one full turn. When the bleeder screw opens the brake pedal will
drop all the way to the floor. Continue to hold the pedal all the way down.
12. Once the brake pedal has dropped, close the bleeder screw. The pedal can then be released.
13. Repeat the above three steps until all trapped air is removed from that wheel circuit (usually four or five times). This should pass a sufficient
amount of fluid to expel all the trapped air from the brakes hydraulic system. Be sure to monitor brake fluid level in master cylinder fluid
reservoir making sure it stays at a proper level. This will ensure air does not reenter brake hydraulic system through master cylinder.
NOTE: Monitor the brake fluid level in the fluid reservoir periodically to make sure it does not go too low. This will ensure that air does
not reenter the brake hydraulic system.
14. Remove clear hose and install bleeder screw dust cap.
15. Bleed opposite rear brake wheel circuits as necessary in the same manner until all air is removed from the brake hydraulic system, then proceed to
the front brakes.
FRONT BRAKES