
Magnum V8-5.7L (2008)
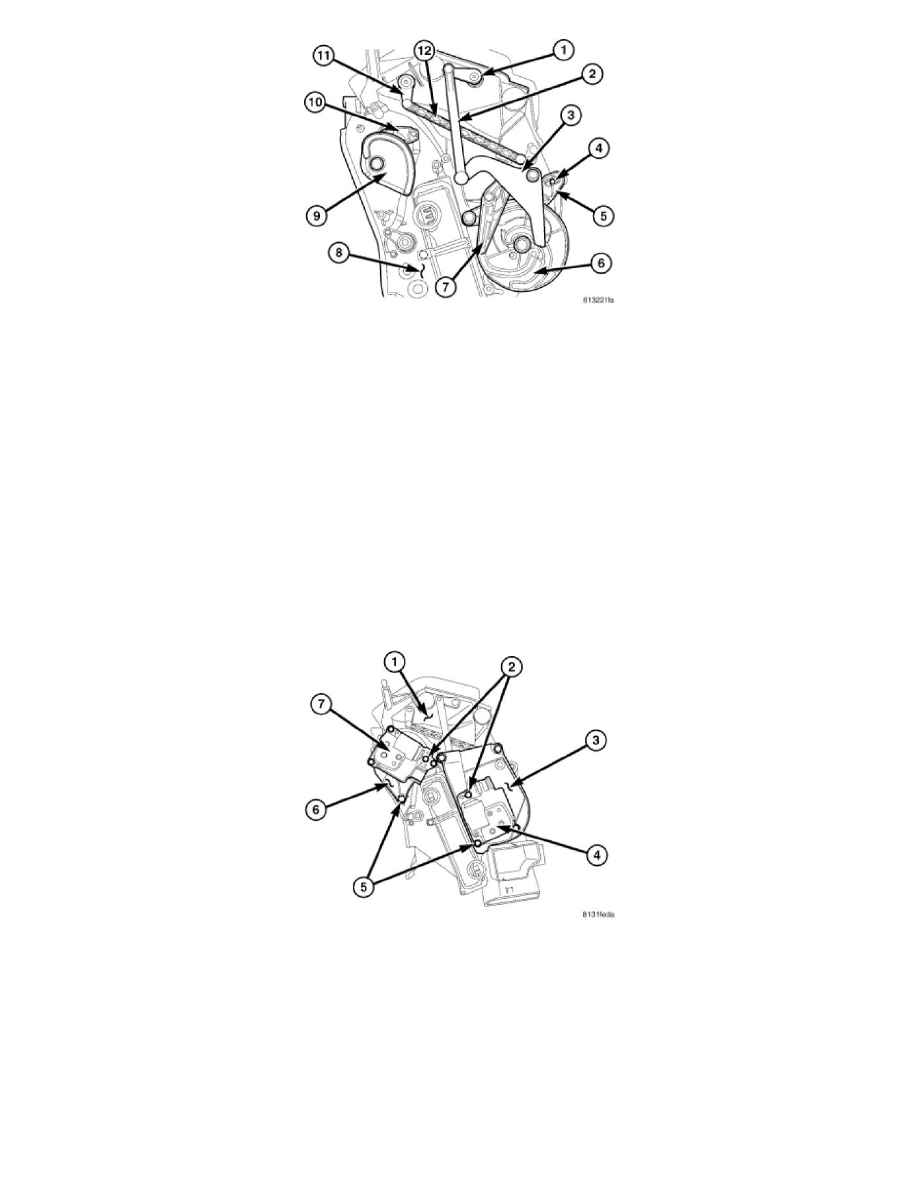
14. Install the blend door cam (9) onto the blend door lever (10) and the pivot shaft located on the driver side of the air distribution housing (8).
15. Install the floor door linkage (5) onto the floor door lever (4) and the pivot shaft on air distribution housing.
NOTE: Align the guide pin on the floor door linkage with the guides on the mode door cam during installation of the floor door linkage.
16. Install the mode door cam (6) onto the pivot shaft on air distribution housing.
17. Connect the defrost/demister door linkage rod (12) onto the defrost/demister door lever (11).
NOTE: Align the guide pin on the defrost/demister linkage with the guides on the mode door cam during installation of the
defrost/demister linkage.
18. Install the defrost/demister linkage (7) onto the pivot shaft on air distribution housing.
19. Connect the instrument panel door linkage rod (2) onto the instrument panel door lever (1).
NOTE: Align the guide pin on the instrument panel linkage with the guides on the mode door cam during installation of the instrument
panel linkage.
20. Install the instrument panel linkage (3) onto the pivot shaft on air distribution housing.
21. Position the blend door actuator mounting bracket (6) and the mode door actuator mounting bracket (3) onto the driver side of the air distribution
housing (1).
22. Install the screws (5) that secure the mounting brackets to the air distribution housing. Tighten the screws to 2 Nm (17 in. lbs.).
23. Position the blend door actuator (7) onto the air distribution housing. If necessary, rotate the actuator slightly to align the splines on the actuator
output shaft with those on the blend door cam See: Air Door/Air Door Actuator / Motor/Service and Repair/Blend Door Actuator - Installation.
24. Position the mode door actuator (4) onto the air distribution housing. If necessary, rotate the actuator slightly to align the splines on the actuator
output shaft with those on the mode door cam See: Air Door/Air Door Actuator / Motor/Service and Repair/Mode Door Actuator - Installation.
25. Install the screws (2) that secure the blend door actuator to the air distribution housing. Tighten the screws to 2 Nm (17 in. lbs.).
26. Position the mode door actuator mounting bracket (6) onto the driver side of the air distribution housing (1).
27. Install the screws that secure the blend door actuator mounting bracket to the air distribution housing. Tighten the screws to 2 Nm (17 in. lbs.).
28. Position the blend door actuator (7) onto the air distribution housing. If necessary, rotate the actuator slightly to align the splines on the actuator
output shaft with those on the blend-air door linkage See: Air Door/Air Door Actuator / Motor/Service and Repair/Blend Door Actuator -