
Neon L4-2.0L VIN C (1998)
Alignment: Service and Repair
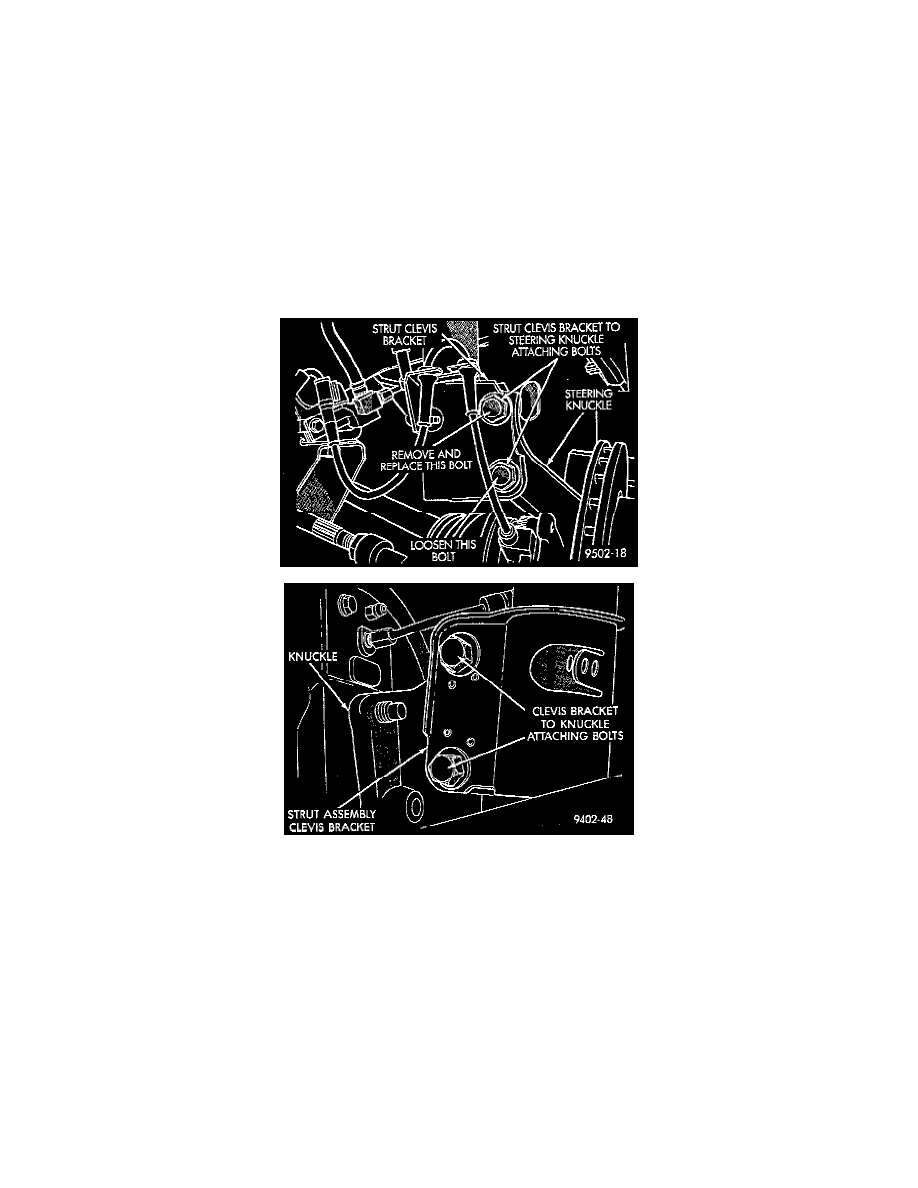
Camber Adjustment Bolt Package Installation
1. If front and or rear camber readings obtained are not within the required specification range, a Mopar (R) Service Kit is available to provide the
required adjustment. The kit contains new bolts and nuts for the strut clevis bracket to steering knuckle attachment. The bolts contained in the
service kit, are slightly undersize allowing for movement between the strut clevis bracket and steering knuckle. The movement allowed by the
undersize bolts will provide approximately 2 degrees of camber adjustment per side of vehicle. To install new bolts in service kit follow the
procedure below.
CAUTION: The Mopar (R) Service Kit for allowing adjustment of front and rear camber are different for the front and rear of the vehicle. When
using the service kits be sure that the front and rear strut attaching bolts are always used in the right location on the vehicle.
2. Raise front and or rear of vehicle until tires are not supporting the weight of the vehicle.
CAUTION: The steering knuckle and rear knuckle to strut assembly attaching bolts are serrated and must not be turned during removal. Remove
nuts while holding bolts stationary in the steering knuckles.
3. Remove original upper bolt attaching the front or rear strut clevis bracket to the steering knuckle or rear knuckle.
4. Loosen lower bolt attaching strut clevis bracket to steering knuckle or rear knuckle ONLY enough to allow knuckle to move in clevis bracket.
5. Install bolt from service kit into the upper strut clevis bracket to steering knuckle or rear knuckle mounting hole.
CAUTION: Only the nuts supplied in the service kits MUST be used with the service kit replacement bolts. The original nuts will not properly
secure the strut clevis bracket to steering knuckle or rear knuckle.
6. Install nut provided in service kit on the replacement bolt.
7. Tighten upper bolt and nut from service kit until snug, but still allowing movement between strut clevis bracket and knuckle.
8. Remove original lower bolt. Install bolt from service kit into the bottom hole of the strut clevis bracket. Install nut and snug.
9. Lower vehicle until full weight of vehicle is supported by the suspension and then jounce front and rear of vehicle an equal amount of times.
10. Adjust front and or rear camber to the preferred setting by pushing or pulling on the top of the front or rear tire. When camber is correctly set
tighten upper and lower strut clevis bracket bolts. Again jounce front and rear of vehicle an equal amount of times and verify front and rear camber
setting.
11. When vehicle is at correct camber setting torque both front strut clevis bracket to steering knuckle attaching bolts to 53 Nm (40 ft. lbs.) plus an
additional 1/4 turn after required torque is met. Torque rear strut clevis bracket to rear knuckle attaching bolts to 95 Nm (70 ft. lbs.).
12. If Toe readings obtained are not within the required specification range, adjust Toe to meet the preferred specification setting. Toe is adjustable