
Nitro 2WD V6-4.0L (2007)
Condenser HVAC: Service and Repair
Installation
INSTALLATION
CAUTION: Be certain to adjust the refrigerant oil level when servicing the A/C refrigerant system. Failure to properly adjust the refrigerant
oil level will prevent the A/C system from operating as designed and can cause serious A/C compressor damage.
CAUTION: The radiator/condenser air seals must be reinstalled in their proper locations in order for the A/C and engine cooling systems to
perform as designed.
NOTE: When replacing multiple A/C system components, refer to the Refrigerant Oil Capacities chart to determine how much oil should be added to
the refrigerant system.
NOTE: If only the A/C condenser is being replaced, add 30 milliliters (1 fluid ounce) of refrigerant oil to the refrigerant system. Use only refrigerant
oil of the type recommended for the A/C compressor in the vehicle.
NOTE: Replacement of the refrigerant line O-ring seals and gaskets is required anytime a refrigerant line is opened. Failure to replace the rubber O-ring
seals and metal gaskets could result in a refrigerant system leak.
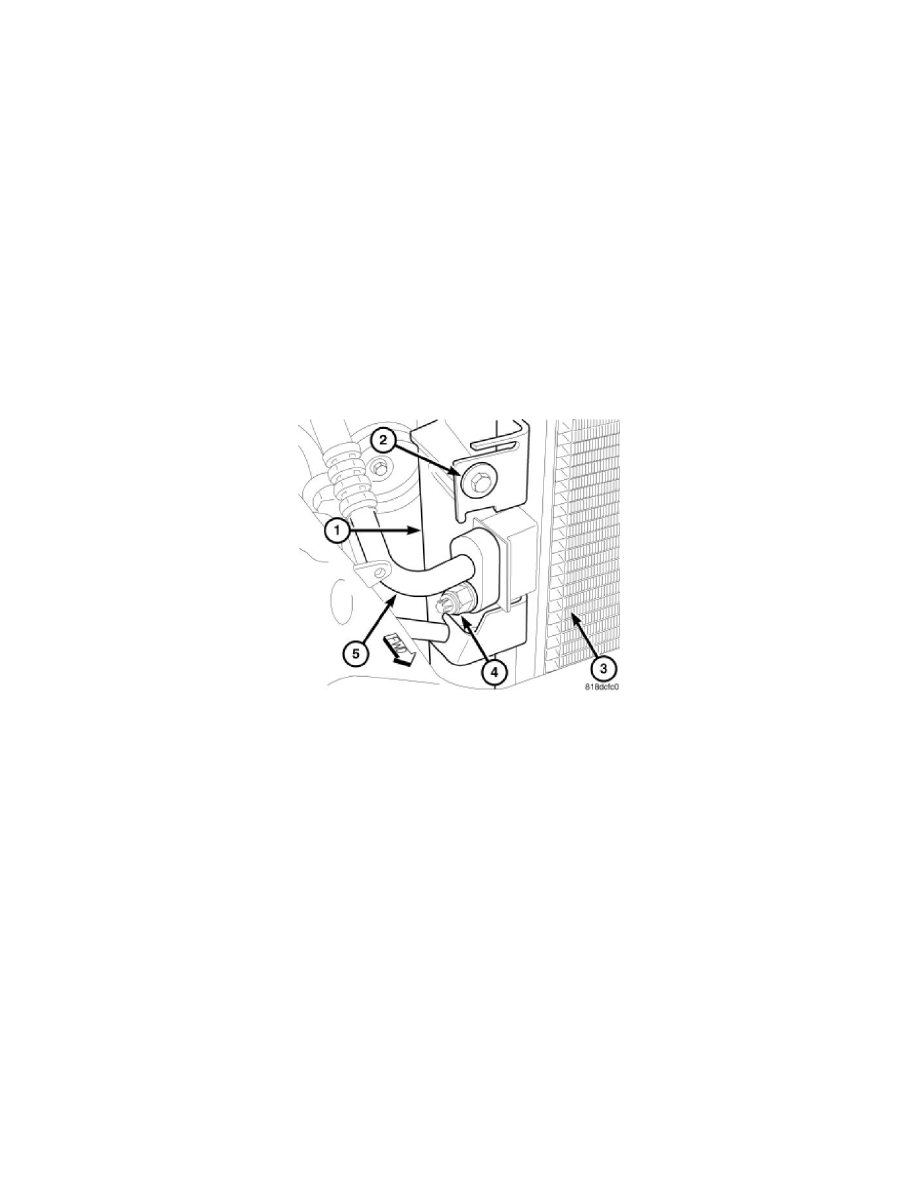
NOTE: LHD model shown in illustrations. RHD model similar.
NOTE: Upper condenser retaining bracket and bolt shown. Lower retaining bracket and bolt similar.
1. Remove the tape or plugs from the opened refrigerant line fittings and the receiver/drier and condenser ports.
2. Lubricate new rubber O-ring seals with clean refrigerant oil and install them and a new gasket onto the refrigerant line fittings. Use only the
specified O-rings as they are made of a special material for the R-134a system. Use only refrigerant oil of the type recommended for the A/C
compressor in the vehicle.
3. If removed, install the A/C receiver/drier onto the A/C condenser (3).
4. Position the A/C condenser into the engine compartment and install it onto the condenser mounting brackets.
5. Install the two bolts (2) that secure the A/C condenser to the right side of the radiator (1). Tighten the bolts to 5 Nm (44 in. lbs.).
NOTE: Rotate and tilt the A/C discharge line as necessary to connect it to the A/C condenser.
6. Connect the A/C discharge line (5) to the A/C condenser and install the retaining nut (4). Tighten the nut to 22.5 Nm (200 in. lbs.).
7. Reposition the right side condenser air seal.
8. If equipped with an automatic transmission, connect the transmission cooler lines to the transmission cooler portion of the A/C condenser.
9. Install the grille.