
RAM 1500 Van V6-239 3.9L Magnum (1995)
MAKE SURE THAT THE STRIKER IS PERPENDICULAR TO THE C-PILLAR AND IS NOT TILTED.
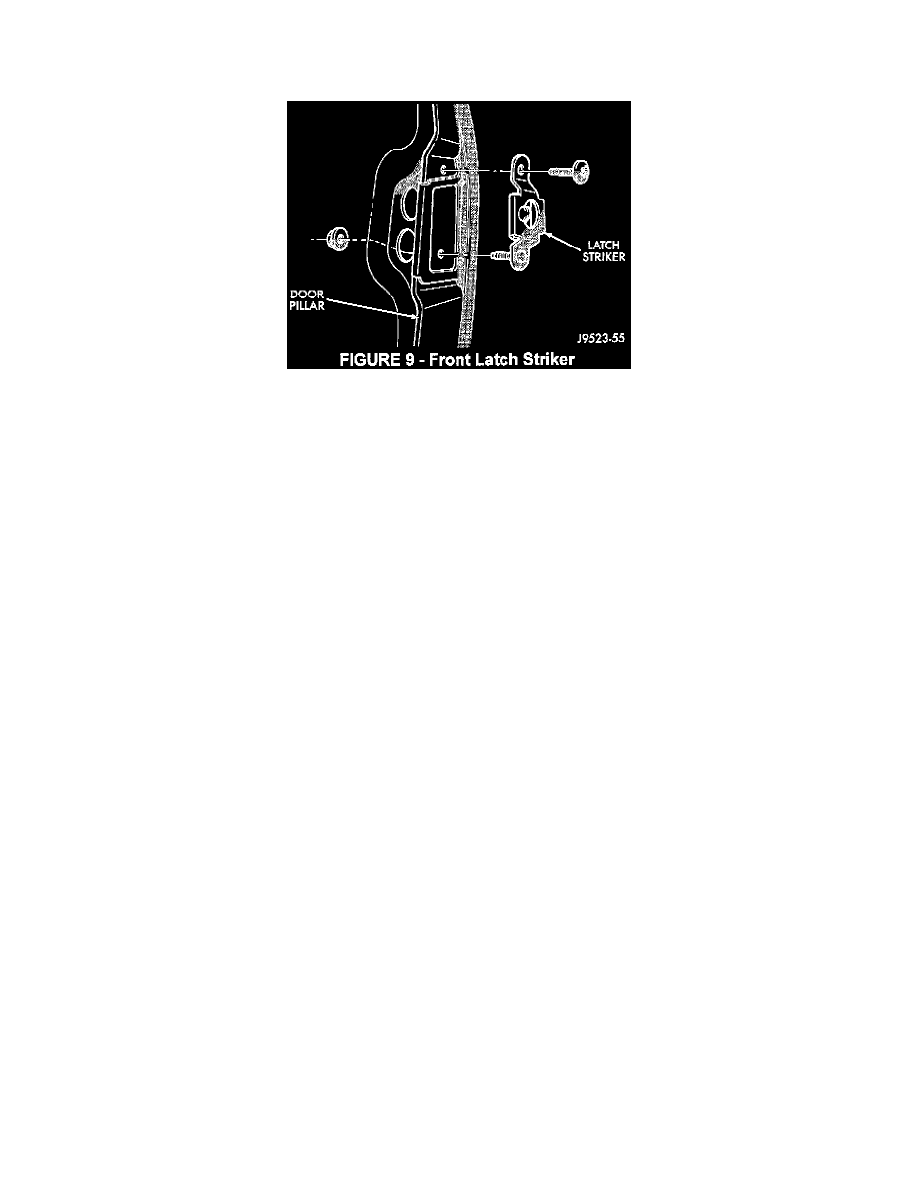
6.
Remove the plug for accessing the front latch striker attaching nut from the forward side of the B-Pillar.
7.
Loosen the nut and screw that attaches the front latch striker to the B-Pillar (Figure 9).
8.
Adjust the front latch striker to a position where the stabilizer pin will not contact the striker when closing the door but will center into the striker
with the door fully closed. Tighten the inner striker nut to 22 Nm (200 in. lbs.) of torque and the upper striker screw to 11 Nm (95 in. lbs.) of
torque.
9.
Install the B-Pillar plug.
10.
Adjust the stabilizer pin so that pin fits snug into the front striker latch grommet with the door closed. A small amount of grease can be applied to
the end of the stabilizer pin to help identify when the pin contacts the grommet. Adjust the pin out until witness marks appear on the front striker
grommet then, tighten the lock nut on the pin.
11.
Apply a thin coat of weatherstrip lubricant (p/n 04773427) to the sliding door weatherstrip.
12.
Open and close the sliding door to verify the repair.
Adjust Sliding Door - Major Adjustment
1.
Inspect the lower roller bumper bracket (Figure 3) for any damage. Replace the bumper bracket with p/n 55347152 if any damage is noticed.
Install the bumper bracket and tighten the attaching screw to 23 Nm (200 in. lbs.) of torque.
NOTE:
VEHICLES BUILT BEFORE JAN. 2, 1996 (MDH 0102XX) WILL REQUIRE LOWER ROLLER BUMPER BRACKET, P/N 55347152, TO BE
INSTALLED.
NOTE:
PRIOR TO PERFORMING THE NEXT STEP, IT MAY BE NECESSARY TO SCREW THE FRONT STABILIZER PIN INWARD (FIGURE 4)
TO MAKE SURE THAT THE PIN IS NOT CAUSING THE DOOR TO BE IMPROPERLY POSITIONED.
2.
Loosen the rear striker screws (Figure 8). Adjust the rear striker so that the sliding door character lines match that of the C-Pillar. Tighten the
screws to 23 Nm (200 in. lbs.) of torque.
3.
Close the sliding door.
4.
Loosen the front upper roller bracket screws (Figure 7).
5.
If necessary, remove the sliding door trim panel. Refer to the 1997 Ram Van/Wagon Service Manual (Publication No. 81-370-7107), page 23-33,
for information regarding sliding door trim panel removal.